You’re working with assemblies in .NET, and you have to load one of these assemblies in your code. Trouble is that the code you’re currently running – and which is getting ready to load that assembly – has been built for the x64 architecture, and the assembly you want to load was built for x86. You try to load the assembly – either explicitly or by calling one of the methods in it – and sure enough, you run into the following exception:
System.BadImageFormatException: ‘Could not load file or assembly ‘x86_Assembly’ or one of its dependencies. An attempt was made to load a program with an incorrect format.’
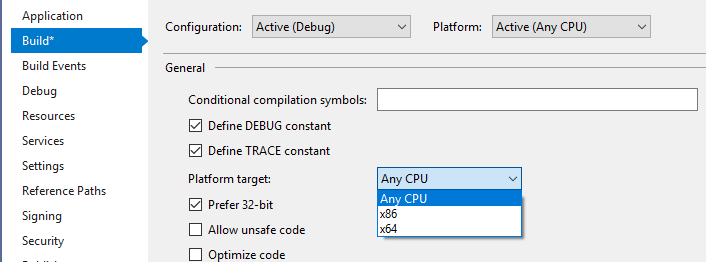
Ok, so clearly this combination whereby an x86 assembly gets loaded in x64 code doesn’t work. But what about the rest ? There are 3 options in the Platform target drop down, and the Prefer 32-bit option becomes active once the Any CPU is selected, thus yielding a total of 4 possible targets.
Those 4 targets can equally apply to the assembly that’s being loaded, as well as to the code that’s loading it. All in all, 16 possible combinations. The question that this post sets out to answer is “Which out of these 16 work, and which don’t ?“.
TL;DR (I’ve got no time for your nonsense, just tell me the answer): The table of truth will tell you. If you make sure the assembly you’re loading is built using AnyCPU or AnyCPU+Prefer 32-bit, you’ll have no issues, regardless of the platform target you’re using for the “host” process, aka the code that loads the assembly. “Explicit cross-bitness”, as in loading x86 assembly in x64 code or the other way around won’t work. Having the same platform target for the code consuming the assembly and the assembly itself will always work. For “How about loading assemblies in an AnyCPU host process” or “Why is this ?” you’ll have to read on.
Give me the whole story (I’ve got plenty of popcorn, carry on): we’ll start by defining what an assembly is, what does it mean to load an assembly and how it can be done, present an example and analyze the outcome, and in the end go deeper and draw some conclusions. We’ll finish with a Q&A session.
I’ll also set the expectation of what to find next. Unless noted, we’re talking about a x64 Windows and C# managed code. We’re considering neither unsafe nor unmanaged code. We’ll also assume that all the assemblies involved target the same .NET version (on its own, a mix-up with the versions can generate our exception too).
The title of this article contains the notion of assembly loading, so let’s break this down first.
Assemblies and Loading Them
What’s an assembly ? As per “CLR via C#“: “[…]an assembly is a grouping of one or more modules or resource files“. Ok, what’s a module ? A managed module is the result of compiling one or more source files. Why managed ? Because it takes the .NET CLR (Common Language Runtime) to run it.
What does it mean to load an assembly ? It means making the types and their code contained in that assembly available to your running code. Access restrictions can be applied to the type members (private, internal,…) but we’ll keep this out of the discussion for now. Since a type can contain fields, methods, properties or events, loading an assembly will make those fields, methods, properties or events in the assembly that are marked as accessible available to the calling code.
In what ways can one load an assembly ? There are 2 types of loading an assembly:
- Early binding – you explicitly tell the compiler the assembly you’re referencing. The assembly will be loaded automatically right before the running code enters a method that references any of the types defined in that assembly. This is the case for example when references to assemblies are added within Visual Studio
- Late binding – involves using a process called reflection to manually load an assembly at a specific point in time. The assembly will be loaded on the spot and its types made available to the running code
Let’s Test !
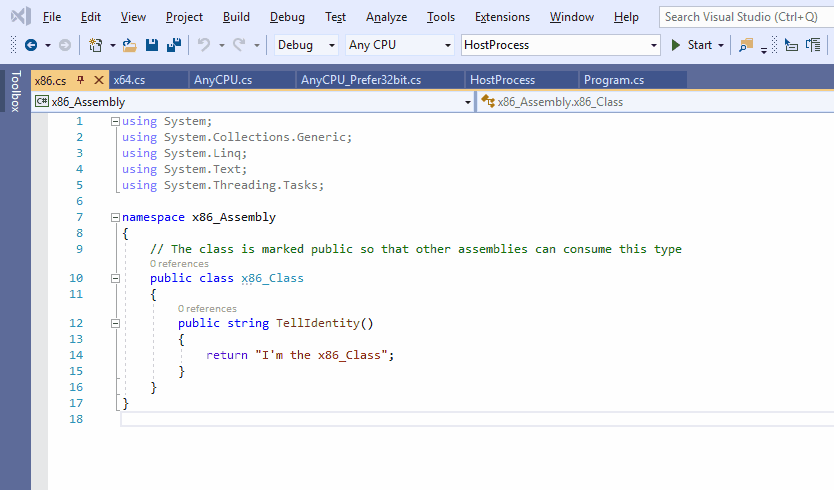
How do we go about testing what types of assemblies can be loaded ? We’ll create 4 different assemblies, each for one of the possible platform options that can be targeted – x86 / x64 / AnyCPU / AnyCPU+Prefer 32-bit -, and each consisting of a single class that in turn contains a single method. This method will return a string that helps identifying the respective class.
The code for the 4 assemblies is below – note the additional Main method defined on the 4th one – this is because AnyCPU+Prefer 32-bit platform target option can only be applied to projects that output an .EXE. The rest of the 3 assemblies output each a single .DLL.
Next we’ll need a host process that will load all of the 4 assemblies in turn. This process – an assembly in itself – will first be compiled for the first of the target platforms option, then executed so that it loads all 4 assemblies defined above, then it will be compiled for the next target, then executed again to load all 4 assemblies, and so on. This way we’ll get all 16 possible combinations.
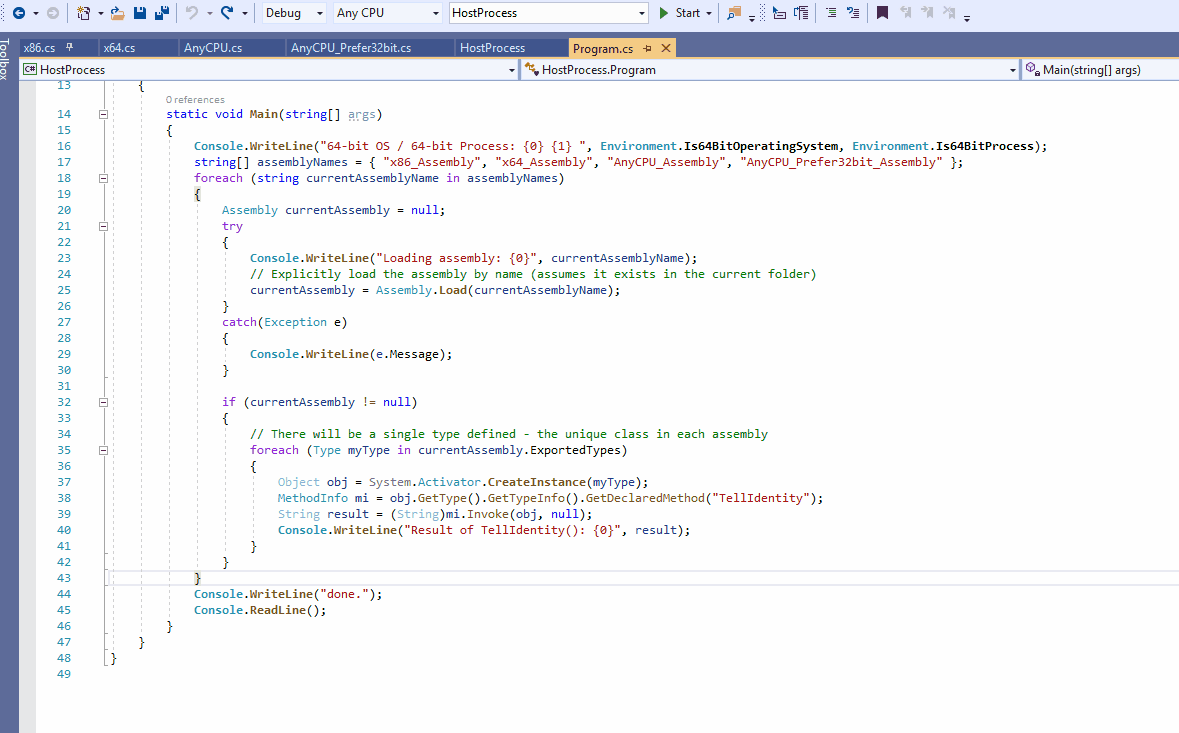
Now our goal is to see which of the 4 assembly can be loaded successfully in the host process, so for each of the assemblies – in turn – let’s use late binding so that they’re loaded manually. Next we’ll build an instance of the only type defined within (<platform>-Class), followed by invoking the TellIdentity() method within that type. Here’s the code that does this in the host process assembly:
Console.WriteLine("64-bit OS / 64-bit Process: {0} {1} ", Environment.Is64BitOperatingSystem, Environment.Is64BitProcess);
string[] assemblyNames = { "x86_Assembly", "x64_Assembly", "AnyCPU_Assembly", "AnyCPU_Prefer32bit_Assembly" };
foreach (string currentAssemblyName in assemblyNames)
{
    Assembly currentAssembly = null;
    try
    {
        Console.WriteLine("Loading assembly: {0}", currentAssemblyName);
        // Explicitly load the assembly by name (assumes it exists in the current folder)
        currentAssembly = Assembly.Load(currentAssemblyName);
    }
    catch(Exception e)
    {
        Console.WriteLine(e.Message);
    }

    if (currentAssembly != null)
    {
        // There will be a single type defined - the unique class in each assembly
        foreach (Type myType in currentAssembly.ExportedTypes)
        {
            Object obj = System.Activator.CreateInstance(myType);
            MethodInfo mi = obj.GetType().GetTypeInfo().GetDeclaredMethod("TellIdentity");
            String result = (String)mi.Invoke(obj, null);
            Console.WriteLine("Result of TellIdentity(): {0}", result);
        }
    }
}
Let’s see the output of the code above on a machine running on x64 Windows:
Test Results
Let’s put the results obtained above in table. Each row corresponds to a run of the code listing that was presented before, with the type of the hosting process on the left (blue), and the type of assembly being loaded on the top (grey):

assuming managed code
Tell Me Why
But what really happens in the example above ? How is the code in the loaded assemblies executed ? Let’s take a closer look at what goes on under the hood.
Let’s start with what kind of process is being created by Windows when an .EXE assembly is run. To determine this, we have to look first at the type of header the assembly’s image has.
Image Header
The image of an assembly – that is the .DLL or .EXE file on disk – can have one type of header – PE32 or PE32+ (PE stands for Portable Executable). If dealing with an .EXE, the PE32+ format can be run only on x64 Windows, while the PE32 one can be run either as a x86 process (on x86 Windows or under Wow64 on x64 Windows) or as a x64 one.
Analyzing the header type within an image can be done using corflags.exe or dumpbin.exe /headers, just to name 2 options. Let’s use the first option against our 4 test assemblies to see their resulting header type:
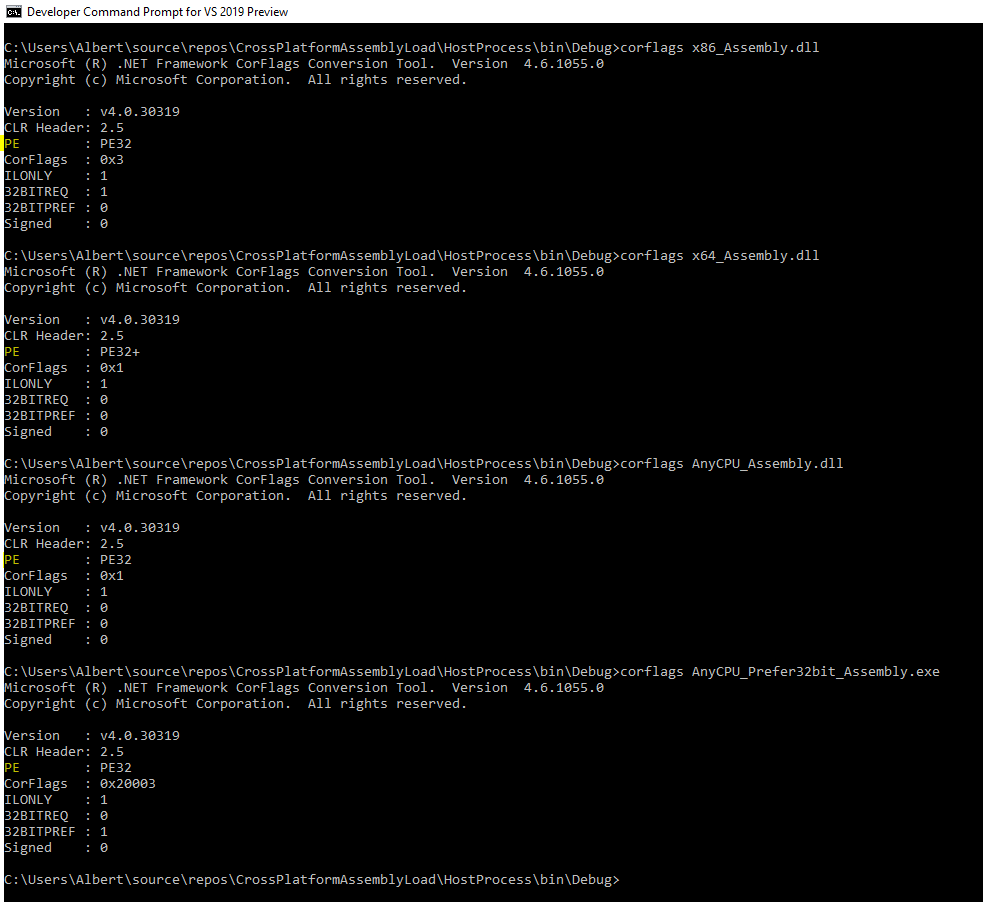
Therefore we’ll only end up with a PE32+ image only if we target x64. Any other platform target option will result in a PE32 image.
Process Type
Now that header of the assembly image is determined, let’s go back to the process being created when an .EXE is run. If we forget for a moment about .NET, and only consider native code, then a x64 Windows will:
- Start a x86 process when provided with a PE32 image
- Start a x64 process when provided with a PE32+ image
However, the kernel is very much aware of .NET, such that the rules above are slightly altered when Windows is given an AnyCPU assembly to load: despite having a PE32 header, Windows will:
- Start a x64 process when provided with a PE32 image that contains an
AnyCPUtype of assembly.
Note that the 3rd rule above only refers to AnyCPU. An AnyCPU+Prefer 32-bit will – as you have probably guessed by now – always result in a x86 process. This option simply tells Windows “Please always start this assembly as a x86 process”. Actually, if you refer back to figure 1, you’ll see that AnyCPU+Prefer 32-bit isn’t an entry within the Platform target dropdown per se, but simply a combination of AnyCPU and the tick box for Prefer 32-bit that we’ve considered separately until now. As such we’ll only consider the 3 “real” platform targets from this point on.
Let’s summarize the information about platform targets, header types and processes below:

on x64 Windows
So given the platform target chosen for the assembly in column 1, Visual Studio will produce an assembly whose image has the indicated header type in column 2. If that image is an .EXE and is run, Windows will create a process of the type indicated in column 3.
Back when we ran the tests, you can see that the first line of the output contains the type of underlying Windows system the host process code detects, as well as the type of Windows process that was created.
Enter the CLR
But what really goes on when you run an .EXE assembly ? The broad steps are below:
- Windows creates a new process – be it a x86 or x64 one, as we’ve seen before
- mscoree.dll is loaded within the new process’s address space. As per “CLR via C#“: “This DLL is affectionately referred to as ‘the shim’, and its job is to determine which version of the CLR to create“. Note that there are separate x86/x64 versions of this DLL, and the one whose “bitness” matches that of the process’ will be loaded
- A method inside ‘the shim’ initializes the CLR, loads the assembly contained within the .EXE, and calls its entry point method (Main). Note that ever since .NET Framework v4, the name of the file containing the code for the CLR itself has been changed to clr.dll. This dll also has separate x86/x64 versions, and – just like ‘the shim’ – it will be the one whose “bitness” matches that of the process’ that will be loaded
Therefore the type of process that’s started – 32-bit (x86) or 64-bit (x64) – is important, because the CLR that is loaded within it will match the “bitness” of that process. As such, if a 32-bit (x86) process is started, the x86 CLR is loaded. If a 64-bit (x64) process is started, the x64 CLR is loaded instead.
Getting to Machine Code
All managed modules – regardless of the platform target set when compiled – will contain IL (Intermediate Language). To execute a method, on its own the IL is rather useless to the CPU(s). The CPU only knows machine code. It’s the CLR JIT (just-in-time) compiler that converts the IL to native CPU instructions at runtime. Yet there’s an important aspect:
If the application is running on an x86 version of Windows or in WoW64, the JIT compiler produces x86 instructions. If your application is running as a 64-bit application on an x64 version of Windows, the JIT compiler produces x64 instructions.
CLR via C#, Chapter 1
Therefore the CLR JIT will generate machine code specific to its “bitness” only. So for example we aren’t going to get the x86 JIT compiler generating x64 instructions. Nor the other way around.
Now when the JIT compiler starts going over the IL inside an assembly, the value of the platform target that was set when the assembly was built has some serious implications. You’re actually telling to the JIT compiler:
x86: “You need to convert the IL to x86 native instructions”x64: “You need to convert the IL to x64 native instructions”AnyCPU: “I don’t really care to which type of native instructions (x86 or x64) you convert the IL”
Tying It All Together
As long as an .EXE assembly is started successfully by Windows, the CLR that’s loaded within will always be able to abide by these rules. After all, the process type (32-bit/64-bit) and the CLR (32-bit/64-bit) that get loaded within are selected by Windows based on the assembly’s platform target, specifically so that it can run.
However when you load other assemblies, you run into a problem: the CLR loaded automatically inside your own process might be unable to process the IL in the assembly that you want to load according to that assembly’s platform target.
Think about the case when your process is started by Windows as a 64-bit (x64) one, thus loading the x64 CLR, and you try to load an assembly that has x86 as platform target. Windows no longer has to start a process for this new guest assembly (after all, you’re using it inside your own process), however the x64 CLR (that got loaded initially into your process) is being told “Here’s the IL in this guest assembly – you need to compile this to x86 native instructions (as stated inside the assembly’s platform target)”. Yet your x64 CLR can only compile to x64 native instructions, not to x86 ones. And at this point we have a problem, since the CLR has no way of running the code in the guest assembly, and thus throws System.BadImageFormatException.
That’s why AnyCPU assemblies can be loaded successfully, regardless of the CLR loaded inside the host process. There’s no constraint to the machine code “bitness” the CLR JIT will generate, so you’ll end up with native instructions that can run, be it either 32-bit or 64-bit code.
Q & A
Q: That book you keep referencing – “CLR via C#” by Jeffrey Richter – that’s pretty old. Looks like it was written in 2012. Why use that as your main reference in 2019 ?
A: The book targeted .NET Framework 4.5. Fast forward to today, and the stable release as of now (March 2019) is “just” 4.7.2. The basic concepts are very much the same as back in 2012. The author itself has been involved with the .NET Framework team ever since 1999. Last and not least, searching around for opinions about the best book that deals with CLR at a low enough level and C# – at present – got me to this title.
Q: I landed at this article because of the System.BadImageFormatException. You’re only treating the case where the “bitness” involved is causing it, however there can be other causes to it, such as incompatible .NET versions for which the assemblies were created, or loading unsafe code. You’re not talking about any of these. How come ?
A: That is correct – only the cross-“bitness” is treated here. There can be an array of causes that generate the System.BadImageFormatException, and there’s actually a good document here explaining them. For the subtleties of calling unsafe code cross-“bitness”, there an excellent article from Scott Hanselman here, with a very neat example.
Q: Where in an assembly is it stated the type of code that is to be generated during JIT compiling ? Or to rephrase: where is the Platform target “stamped” inside the resulting assembly ?
A: You won’t really find the platform target used explicitly written inside the assembly, however if you refer back to figure 5, you’ll see that each platform target (including the Prefer 32-bit option) will generate a unique combination of CorFlags (including the type of PE32 header). This in turn allows you (and the CLR) to figure out what platform target was used at compile time.
Q: I don’t really understand this concept of assembly really well. I already tried reading about it around the Web, but I don’t really get it. Where I can get some information that explains it well ?
A: Read the first 2 chapters of “CLR via C#“, and you’re almost guaranteed to get it. Turn also to page 114 of the ECMA 335 standard to see a visual depiction of how assemblies relate to modules.
Q: You briefly touched about what happens when a .NET .EXE is run, but I’d like to know the steps in detail. Where can I find this information ?
A: If you really want the low-level details of what goes on when a .NET EXE is started, then you need to turn to chapter 3 of the “Windows Internals” book. Under “Image Loader” read the “Early process initialization” section. Steps 13 and 32 contain specific .NET references. For an overview of the steps, as well as how JIT compiling occurs at runtime, you’ll want the 1st chapter from “CLR via C#“.
Q: What do you meant in the Process Type section by “the kernel is very much aware of .NET” ?
A: See the answer to the previous question.
Q: In Process Type, you said that even if the image header of a .NET executable assembly is PE32, the resulting process on a 64-bit Windows will be a 64-bit (x64) one. Are you sure about this and all the 3 rules you wrote there ?
A: Yes. I actually ran the rules by Alex Ionescu, one of the authors of “Windows Internals“, and he was kind enough to confirm it.
Q: You said that only one version of the CLR can be loaded at any one time, but I’ve read that you can successfully load 2 versions of in parallel ever since .NET Framework 4.
A: As per “CLR via C#“: with .NET Framework 4, Microsoft now supports the ability to load v2.0 and v4.0 in a single Windows process, allowing components written for .NET Framework versions 2.0 and 4 to run side by side without experiencing any compatibility problems. What I meant in the article was referring to the x86 CLR vs the x64 CLR being loaded inside your process; depending on the process type that Windows creates for you (x86 or x64), there will a matching – and unique – CLR loaded.
Q: You mentioned that regardless of the type of platform for which modules are compiled, they will always contain IL. How can I check this ?
A: Refer back to figure 5: all the 4 guest assemblies have the ILONLY field set to 1. If you look at this link, it’s stated that if ILOnly is set to 1, then “The executable contains only Microsoft intermediate language (MSIL), and is therefore neutral with respect to 32-bit or 64-bit platforms”.
Q: But I can use Assembly.ReflectionOnlyLoad against the cross-“bitness” target assemblies. So the CLR sees that cross-“bitness” IL just fine, and I can obtain information about the types within.
A: You can poke at the types using the ReflectionOnlyLoad/ ReflectionOnlyLoadFrom, but once you try to execute anything – thereby invoking the CLR JIT and forcing it to compile to the “wrong” set of native instructions, you’ll get an exception.
Q: I want to know more about the PE32(+) format. Where can I find some good docs ?
A: You can start with this Microsoft article.
Q: How can 64-bit (x64) Windows run a 32-bit (x86) process ?
A: As per this article, “WOW64 is the x86 emulator that allows 32-bit Windows-based applications to run seamlessly on 64-bit Windows.[…] WOW64 is provided with the operating system and does not have to be explicitly enabled“.
Q: In the results table, I’m seeing that 2 rows are somehow mirrored. How come ?
A: When the host process is compiled for the AnyCPU platform target, the resulting process on a x64 Windows will be a 64-bit (x64) one; thus the CLR being loaded inside will also be the 64-bit (x64) one. Of all the 4 guest assemblies, it’s only the x86 one that will fail to be loaded. That’s why row 3 is identical to row 2. When the host process is compiled for the AnyCPU+Prefer 32-bit option, you’re ending up with the x86 CLR, which will only have trouble with loading the x64 guest assembly. This explains rows 1 and 4 being the same. Going further, we could even get rid of the 4th column altogether, since as a guest assembly, it doesn’t matter if the Prefer 32-bit checkbox is set: the CLR of the host process only consumes the AnyCPU-marked IL code inside, which it can always do.
Q: When you ran your tests, you’ve produced 1 assembly per source code file. But what happened to the notion introduced in the beginning, whereby a module is the result of compiling one or more source code files, and that an assembly is made up of more modules ?
A: Visual Studio will build assemblies each containing only one module. This is valid as we speak at the time of this writing (March 2019) as described in the first note in this article. This is why I’ve simplified matters and considered only assemblies containing each one module. If you want to go deeper into the whole notion of modules, and building multi-module assemblies, read the 2nd chapter from “CLR via C#“.
Q: Back when the tests were ran, the first line of the output also shows the version of the underlying Windows system. But that’s always 64-bit, regardless of the platform target chosen to compile the host process. Shouldn’t that show a 32-bit Windows when running under Wow64 ? I thought Wow64 was supposed to present a seamless 32-bit platform for the code that runs within.
A: System.Environment.Is64BitOperatingSystem is used by the host process to get the info. Let’s look at the code of this property, so see what goes on. This property lives inside the mscorlib.dll assembly, which the C# compiler will always reference (unless you specifically exclude it). But remember there’s 2 versions of CLR, depending on the “bitness”, and as such, there are 2 versions of this DLL as well. Let’s look at the x64 one using ILSpy:
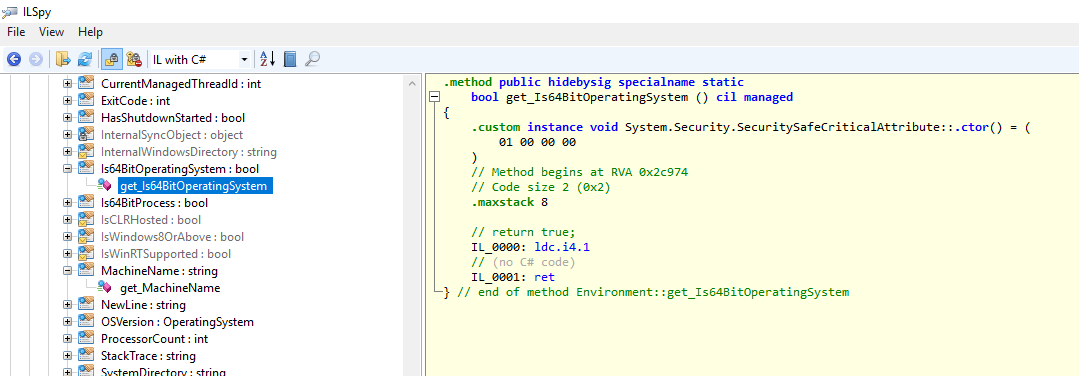
So the method beyond that property always returns true. Which makes sense: if the x64 CLR got loaded in the first place, this has got to be a x64 Windows. Now let’s look at the x86 version of the mscorlib.dll:
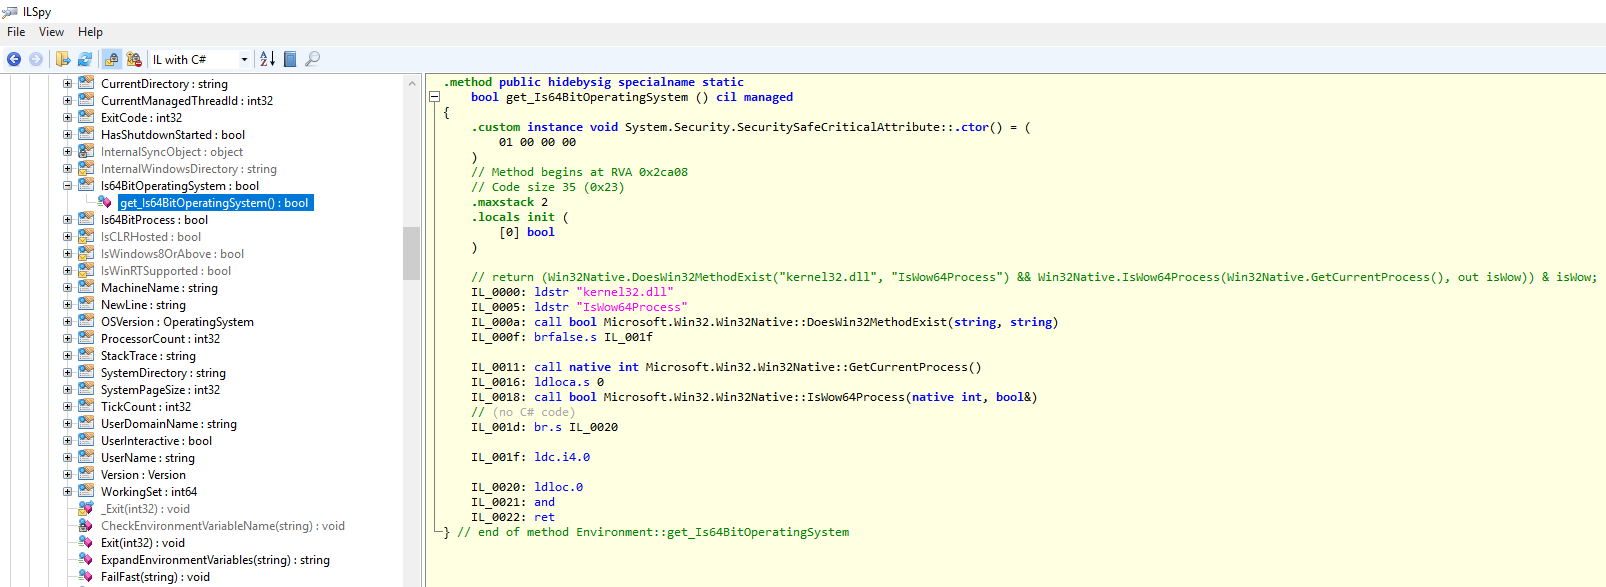
There’s significantly more code inside this version of the method. ILSpy is kind enough to decode the IL to C#, and we can see a native Windows function being queried for, then used – IsWow64Process – to understand if we’re running under Wow64. If so, it returns true (Wow64 can exist only on x64 Windows), otherwise it concludes it’s running under x86 Windows, and returns false.
Q: Are you sure there’s no extra CLR loaded inside the host process, eg when one of the 4 assemblies are loaded ? I’m skeptical and I’d rather see for myself which CLR(s) get loaded – how I can do that ?
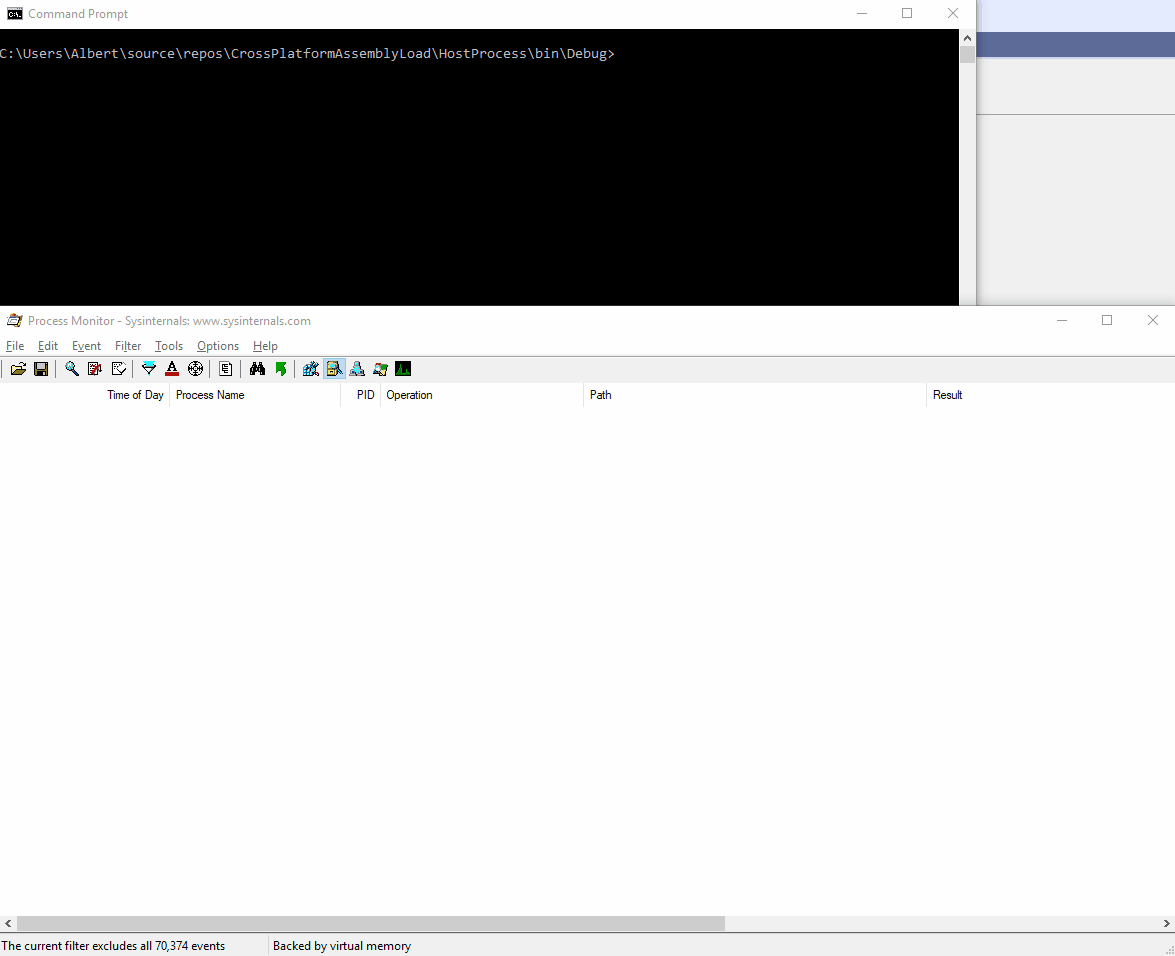
A: I’m glad you asked. Let’s first see what goes on with a x86 host process (I’ve compiled using AnyCPU and Prefer 32-bit checked to get a x86 host process). We’ll use Process Monitor to see which files are being accessed while our test code runs. The filter is set to list file events generated by the host process itself, and whose path is – in turn – mscoree.dll and clr.dll, which are the 2 tell-tale signs the CLR is being loaded. I’ve also went ahead and added a delay right after the app starts, but before the 4 assemblies get loaded. This way we get to see if any CLR pops up after the initial one is loaded:

Look at the path for clr.dll, which points to %windir%\Microsoft.NET\Framework\ and to the one for mscoree.dll pointing to %windir%\SysWOW64\. Both locations host the 32-bit files for CLR. Also pay close attention to the timestamps. Once the CLR gets loaded, there’s no subsequent activity from either of the 2 DLLs mentioned above.
Let’s analyze how things change when the host process is recompiled for x64 (this time I’ve chosen to compile using AnyCPU and Prefer 32-bit unchecked to get a x64 host process):
The path for clr.dll, which now points to %windir%\Microsoft.NET\Framework\64 and to the one for mscoree.dll pointing to %windir%\System32\. Both locations host 64-bit files for CLR. Similar to the x86 run however, no activity against the 2 DLLs can be seen after the CLR is loaded. Note: don’t be misled by the System32 naming – that’s actually the folder reserved for 64-bit DLLs under x64 Windows as explained here.
Q: How can I see when an assembly is loaded ?
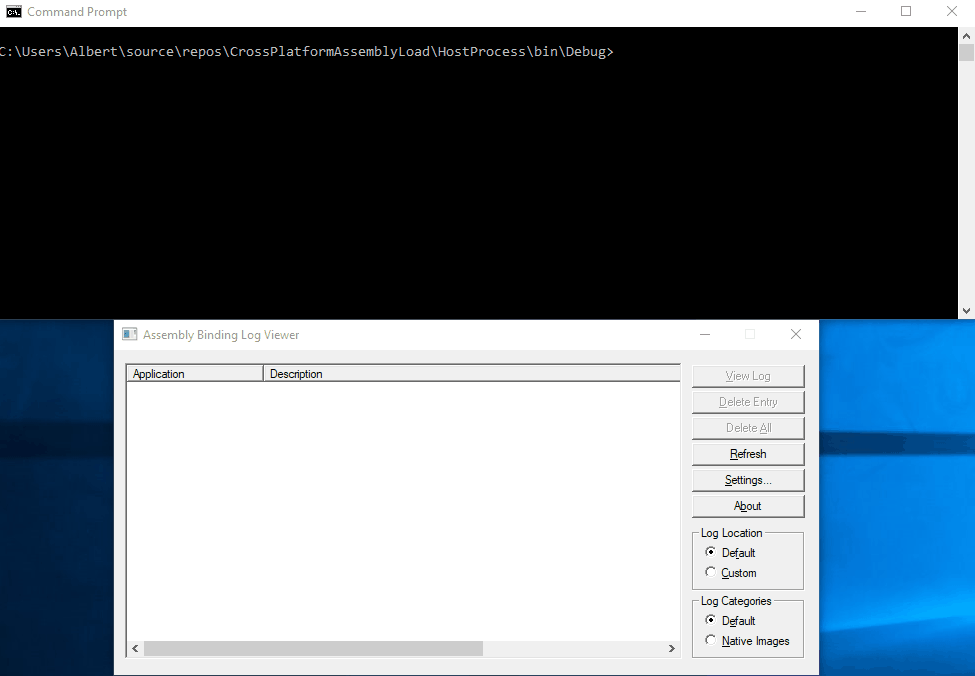
A: You’d want to use Fuslogvw.exe, the assembly binding log viewer. It can be started by launching the Developer Command Prompt for VS. The first thing is to enable logging, and the simplest way is to run as administrator (as a comment to an answer here correctly points out); you can alternatively set the ForceLog regkey specified here if running as a regular user account. Below you can see the events generated from our sample code, modified as per the previous question so that execution pauses right before loading the 4 assemblies:
The log entries themselves contain quite interesting information: here‘s the log for a successful assembly load (x64_Assembly being loaded inside the x64 host process), and here‘s the log for a failed one (x86_Assembly attempting to being load inside the x64 host process). One last thing: take care in interpreting the order of the events, since the Date/Time column is not sortable.
Q: What Visual Studio /.NET Framework version did you use ?
A: Visual Studio 2019 (Preview 4 as of March 2019) / .NET Framework 4.7.2
