A strange request comes your way. The photos of everyone in your organization’s Office 365 tenant need to be provided as .jpg files. They have to be imported into a proprietary app, and named based on an attribute that uniquely identifies to whom each belongs. It’s not clear yet if they just want all the photos as a giant .zip archive, or if their app runs in Azure and needs the photos stored in a storage account. You come across the Get-UserPhoto Powershell cmdlet, which seems to offer a quick solution, but it fails to deliver against those users that still have their mailbox on-premises. How to go about it?
TL;DR The sample code that retrieves photos from Office 365 and stores them both locally on disk, as well as in Azure Blob storage, can be found here.
The main goal of this post is to get users’ pictures from an Office 365 tenant. We’ll subsequently store them in 2 places: on disk and in an Azure storage account as block blobs. We’ll only target ‘live’ users, meaning those that have their account enabled and also have an employeeNumber. Our scenario further detailed:
- Hybrid environments (Exchange on-prem + Exchange Online) need to be supported
- A .NET Core C# app will be used
- Each picture will be saved as <employeeNumber>.jpg
We’ll tackle in order:
- 2 ways of getting photos from Office 365 – one via Powershell native cmdlets, and another involving C# and Microsoft Graph
- Retrieve the list of users with Microsoft Graph
- Discuss pagination
- Understand how to store the retrieved photos to disk and to Azure Blob storage
- Configuring the Azure app that will be used to authenticate to Microsoft Graph
- Combine all the previous points to generate the final code
- Finish with a couple of Q&As
Please note that this article is not an intro to Microsoft Graph. For a good overview read the first 2 referenced posts here.
Retrieving User Photos (the Powershell, native-cmdlets way)
The Get-UserPhoto cmdlet can be used. This is found either in the Exchange Online module (both V1 and V2) or in the on-premises version.
The catch with this cmdlet – at least as of now – is that it cannot be used to get a picture cross-premises in a hybrid Exchange environment: eg running this cmdlet in Exchange Online to obtain the photo stored in a mailbox located on-premises will simply error out with “There is no photo stored here“. The other way around, as in running the cmdlet against Exchange on-premises to obtain the photo within a cloud mailbox will yield a “The operation couldn't be performed because object <Identity> couldn't be found on <DomainController>“.
One conclusion of the above is that the cmdlet actually looks within the user mailbox to extract the photo*. In also follows that the user has to have a mailbox. And depending on where that mailbox is located, to use the corresponding option below.
Office 365:
$photo = Get-UserPhoto <UPN>
[System.IO.File]::WriteAllBytes(<FullFilePath>, $photo.PictureData)
Exchange on-premises*:
$photo = Get-UserPhoto <UPN>
[System.IO.File]::WriteAllBytes(<FullFilePath>w, $photo.PictureData)
Be sure to use the full path in WriteAllBytes , not just the name of the file, otherwise you’ll most likely find your output file stored in an obscure temporary folder within LOCALAPPDATA.
*If you have a multi-domain forest in your on-prem Active Directory, and your target mailbox is in a different domain than the Exchange server you’re querying, make sure to use Set-ADServerSettings -ViewEntireForest $true before the 2 cmdlets listed above.
Another approach is to use Get-AzureADUserThumbnailPhoto cmdlet:
Get-AzureADUserThumbnailPhoto -ObjectId <objectId> -FileName <FullFilePath>
Unlike Get-UserPhoto, this cmdlet doesn’t rely on the photo stored inside the user’s mailbox, but will instead use the data stored in Azure AD. Note that if the user objects are replicating from an on-prem Active Directory, you might end up with old photos, as the photo in the Exchange Online mailbox doesn’t get synced to the Azure AD user object’s thumbnailAttribute. In effect, you’ll run against the same limitation as the on-prem attribute*.
If you do decide to use this cmdlet, make sure you use a full path for the -Filename attribute, as using just a file name most likely won’t get you any output on disk.
Retrieve User Photos (the C#/Microsoft Graph way)
This solution will use the photo API, described here.
As of now (Aug 2020), there are 2 endpoints that Microsoft Graph exposes for its APIs – v1.0 and beta. An advantage to this solution is that – at least for the beta API endpoint as of now – querying the photo for an on-premises user will work as well, as this is cached on the Exchange Online side. As such, using this single API endpoint will retrieve the photos for all users, regardless if they’re in Exchange Online or in on-prem.
The first thing you’ll need are the right permission. Within Graph Explorer, ensure that User.Read.All is granted to your user on the “Modify permissions tab”.
The other thing to be careful about is to use the right request type. Why is this so? Because querying for what apparently seems to be the right query to get the actual photo will not bring about the expected results. Here’s a GET against the beta endpoint for https://graph.microsoft.com/beta/users/mihai.albert@mihai-albert.com/photo:

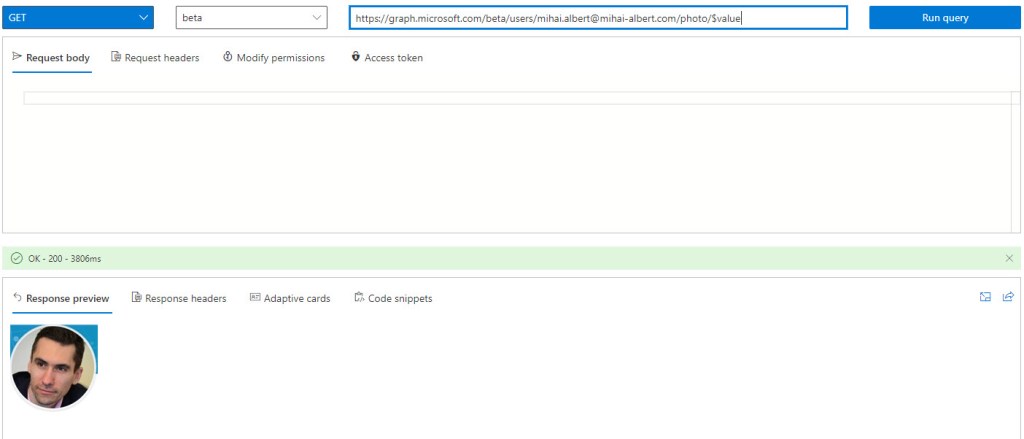
The correct query is slightly different, as seen below, and has an extra /$value. Note that the documentation given above strives to make this clear – both in content and samples.
To use this API in C# code, first the references to Microsoft Graph need to be correctly setup – see this blog post section that details everything required.
The equivalent in C# for using the URL seen above in Graph Explorer to retrieve the photo is to use IUserRequestBuilder‘s Photo property, which in turn has a Content property. We’ll see how everything comes together when putting together the code. After the actual request is built and awaited, the photo itself is made available via a stream.
Retrieve the List of Users
Microsoft Graph will also be used to retrieve the list of users. The documentation is really good, and contains C# snippets as well, as seen here, which will be perfect as the starting point.
The permissions required for retrieving the list are only User.Read.All – both for the signed-in user for Graph Explorer, as well as for the enterprise app we’ll use later. Here’s the result of running this in Graph Explorer against enabled accounts only:

We’ve mentioned from the very beginning that we’re interested in only those users that have their account enabled and also have a value stamped as employeeNumber. Ideally we’d want for both these properties to be filterable server-side, so we only get back the final set of users we’re after.
One thing to watch out for is that the employeeNumber attribute needs to be replicated to Azure AD, and this doesn’t happen using the default schema of Azure AD Connect. To have this synchronized from the on-prem Active Directory to Azure AD, directory extensions have to be used, which are described in detail here. An important thing to remember is that once replicated to Azure AD objects, the attribute is called extension _{ApplicationId}_employeeNumber, where {ApplicationId} is the id of the “Tenant Schema Extension App” Azure app that gets created when the procedure is first ran.
How can we tell which attribute can be filtered against? At first glance, it’s simple – just look for the Supports $filter in the description column of the available properties here. Yet there’s no attribute called employeeNumber in the list of properties, nor anything that talks about directory extensions.
We can however verify pretty fast whether a specific attribute is filterable or not. Take onPremisesDomainName, which is not listed as a filterable attribute – sure enough we get the following error in Graph Explorer when doing a GET against https://graph.microsoft.com/beta/users?$filter=accountEnabled eq true and onPremisesDomainName eq 'mihai-albert.com':
“Unsupported or invalid query filter clause specified for property 'onPremisesDomainName' of resource 'User'“.
Is our replicated employeeNumber affected as well? The best thing is to actually test. And as it turns out – although not specifically documented – the attribute can be filtered against. Here’s the 1-user result in Graph Explorer for https://graph.microsoft.com/beta/users?$filter=accountEnabled eq true and extension_4922b266f3ce4f7ea0ba403a0bca8fc0_employeeNumber eq '1006':

So what would be a good way to find all those that have an employeeNumber? Just filter against values of the attribute that are not the empty string (”). However an attempt to use this will end up with “Unsupported property filter clause operator 'NotEqualsMatch'“. Trying other creative ways of identifying those with a valid employeeNumber will fail as well, eg length(extension_4922b266f3ce4f7ea0ba403a0bca8fc0_employeeNumber) eq 4 will return “Unsupported Query“. Combining the eq operator with the classic wildcard (‘*’) will also fail.
Note that it’s not that the filter syntax is wrong in any of our attempts. If that would be the case, we’d get an “Invalid filter clause” straight away. I got hit with this frequently due to the reflex of using -eq in Powershell, instead the expected eq in $filter‘s ODATA syntax.
To the best of my abilities, I was not able to find a way to filter against the employeeNumber on the server side. So we’ll only get all the enabled users sent across by the API, which then we’ll have to filter locally against a valid employeeNumber.
How will the filter be specified in the C# code? By using IGraphServiceUsersCollectionRequest‘s Request‘s Filter method. We’ll see this further in the final code .
One legit question that might pop up is why didn’t we retrieve the photo itself with the rest of the attributes when querying for the list of users? Because the attribute isn’t there to begin with for this API – even if you explicitly mention it using the select query, nothing is returned. Which makes sense, as each user’s photo stored in the list of returned users would have bloated the response’s size significantly.
Pagination for the List of Users
As soon as our list of returned users gets past a few dozen users, it’s normal to expect that not all results will fit into one single response page, and consequently pagination will be used. The mechanism has very good documentation here, where it’s described that each API response that doesn’t fit into a single page will have the @odata.nextLink property filled in. And if you look back to figure 3, you’ll see it right there. Getting the next set of results is as simple as requesting that property’s value, verbatim.
You might ask yourself what is the limit of the number of users returned per query, in order to properly dimension the queries. Which is a problem, since the docs linked above clearly state in the context of Microsoft Graph that “different APIs might have different default and maximum page sizes“. But as we’ve seen with Graph Explorer above, we do get the link to the next page of results along the current page’s users, so we don’t really care what’s the limit for the number of results. And when we’ll get to the C# code, we’re not even going to have to concern ourselves with what’s in the link itself.
Storing the Pictures to Disk
For each photo, based on the stream provided by the Graph photo API, we’ll just copy it to a FileStream pointing to a file on disk. That’s it.
Upload to Azure Blob Storage
To keep things simple, we’re going to upload as a block blob each user image previously retrieved. The official Microsoft documentation around the Azure Blob storage .NET library here can be used as a very nice starting point.
The hierarchy model for Azure Blob is quite simple: at top we have the storage account, one level below there’s containers, and the next level beneath are blobs. As such, all the blobs – one blob corresponding to one image – will be placed within a container called “photos”, which resides in a storage account called “office365photos”.
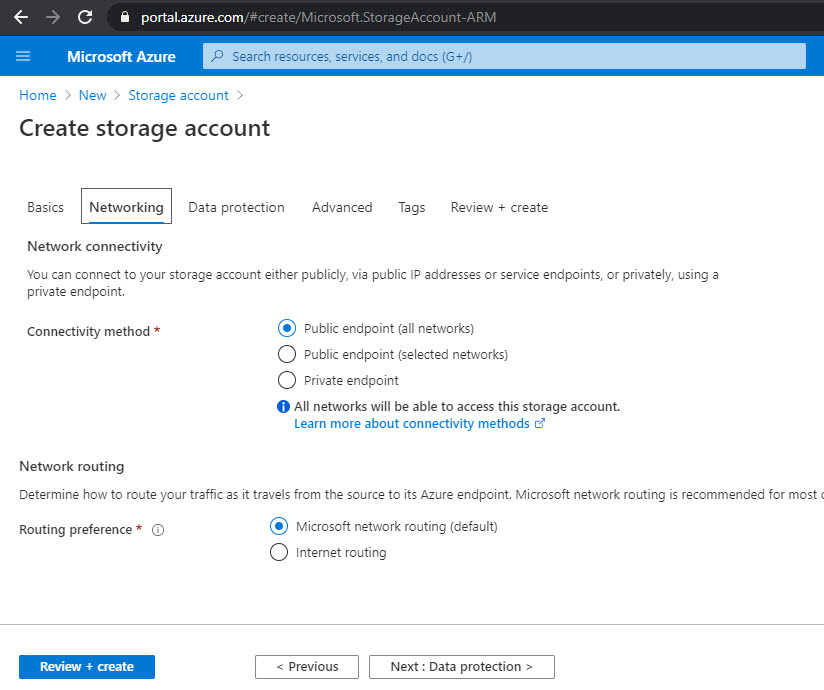
The security levels for both can be left at the default values: Private (no anonymous access) for the container, while the storage account can be set to receive traffic from anywhere*:
In terms of prerequisites to use the Azure Blob storage .NET library in our code, a single NuGet package needs to be installed, namely Azure.Storage.Blobs.
While uploading the photos, the traffic generated – from Azure’s standpoint – is considered ingress, so we’re not going to be charged.
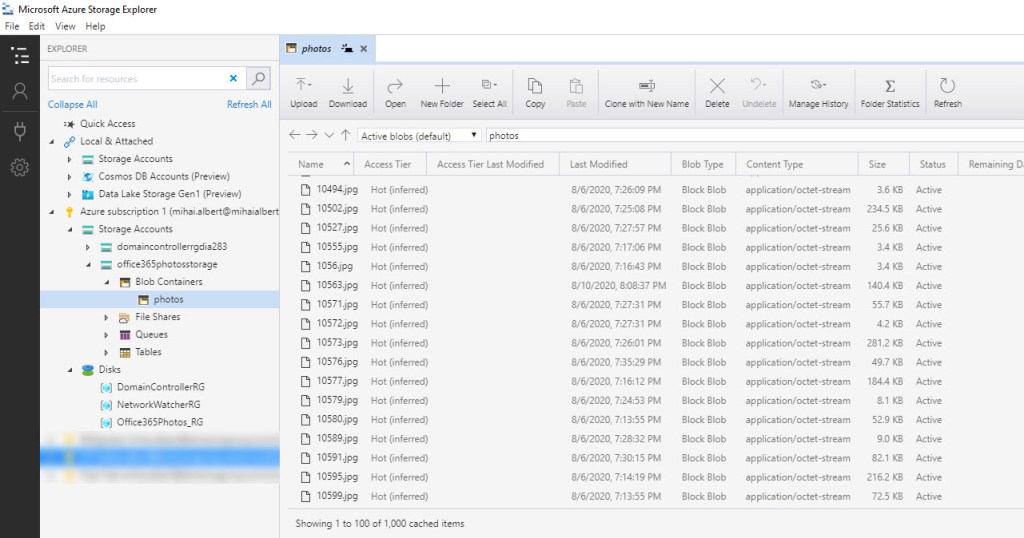
When the code completes, we’d expect a similar outcome to what’s below. Notice Azure Storage Explorer being used to see the objects in a more “organized” manner:
The code that will write to Azure Blob storage is straightforward. First, we’re hardcoding the connection string to the storage account. The string can be easily located as seen below (either of the 2 values are usable):

Next, based on the connection string and the name of the container (“photos”), we’ll build a BlobContainerClient object, which in turn is used to create a BlobClient object that will use the stream previously provided by the Graph photo API, and store it to a block blob.
The Azure App for Connecting to Microsoft Graph
The examples seen so far in Graph Explorer were using a specific user account to run all queries. But in our code, we’ll need an identity that won’t need to authenticate manually or provide multi-factor codes. And for that, an Azure enterprise app will do just fine. How an Azure enterprise app is configured for this use-case has been discussed at length in a previous blog post, including its registration, a discussion around the permissions model and how it’s used from C# code. Most of what’s in that link applies here as well, with the notable distinction that in terms of permissions, the app will only need User.Read.All granted to the Microsoft Graph API (including the admin consent). Be aware that without this permission, attempting to await on the request to get the initial users will result in an exception thrown: “Insufficient privileges to complete the operation“. In case you’re wondering, there’s no need for additional Exchange permissions to be granted, even though you’ll find some available under “Supported legacy APIs” in the enterprise app’s “API permissions” blade.
Note that we’re just using the Azure Enterprise application to authenticate to Microsoft Graph only, when retrieving the pictures. For the storage account, we’re using the connection string to authenticate directly when uploading the photos.
The Code
The code is listed below, right beneath a quick overview of what’s going on inside.
We’re authenticating using the Azure app to Microsoft Graph, then we’re building the request that will retrieve the list of users that have their account enabled. Next the request is issued against the Graph API and, for each user in the result set, we try to extract the employeeNumber; if the value is valid, then we add the pair of the user’s Azure AD object’s id and its employeeNumber to a dictionary. As long as there’s a next page with results, a new result set is processed, otherwise we move on to the next stage.
Based on the hardcoded target storage account’s connection string, we get a handle to the “photos” container. Processing each user in the dictionary – which we know has its account enabled also has a valid employeeNumber – we retrieve each photo from Microsoft Graph as a stream, then subsequently store it first to disk, then to Azure Blob storage.
Notice that the photo stream is rewinded after being copied to disk. If this is not done, UploadAsync will stall (a GitHub issue is currently opened here for this).
In terms of how fast the code completes, given that each photo is requested/stored individually, the total time taken is quite high. For example, running against 4000+ photos worth ~500 MB took roughly 3 hours on a spotty Internet connection.
The code does the job that we’ve set out to do, but there are some issues that don’t make it production grade:
try/catchis not used everywhere, specifically for the 2asyncnear the end that write to disk and Azure Blobs, respectively. Any exception raised by any of these actions will get the code to crash- There’s no consideration to throttling. As the documentation states here, once you run into it, HTTP 429 responses will start being sent back, together with a
Retry-Afterheader specifying how much the requester should wait before the next call. Global service limits, as well as per-service ones, are laid out in the link above. For the code described here, when ran against a larger number of mailboxes (4000+), no limit was hit, most likely due to the fact that it takes usually more than 1s to pull the photo from Exchange Online, then push it to Azure Blobs. Yet the total run time was around 3h. - You’ll note the connection string present in clear, another red flag. A proper solution should be used to store this safely, eg in Azure Vault
Q&A
Q: In the description of Get-UserPhoto it’s specifically stated that “User photos are stored in the user’s Active Directory account and in the root directory of the user’s Exchange mailbox“. But your article states that for a hybrid environment, Get-UserPhoto ran against an Exchange on-prem endpoint for a cloud mailbox would fail. Wouldn’t the AD attribute for the object stored in the on-premises Active Directory contain the photo as well?A: There is indeed an attribute in the on-premises Active Directory, called thumbnailPhoto, which stores a user’s picture as well. I’m not saying that one cannot use it to extract the photo, only that Get-UserPhoto errors out in this scenario, which suggests that it can only extract the image from the target mailbox; otherwise, it would be able to default to the thumbnailPhoto AD attribute. As for extracting the photo from the this attribute, you can use:
$thumbnailPhoto = (Get-ADUser <Identity> -Properties thumbnailPhoto).thumbnailPhoto
[System.IO.File]::WriteAllBytes("C:\Users\<...>\filename.jpg", $thumbnailPhoto)
An important note is that the pictures for users that have their mailbox in Exchange Online – and thus update their image there – won’t get synced back to the on-prem AD in the thumbnailPhoto attribute. So obtaining the images stored there will most likely turn out old photos. If you do use the Get-ADUser cmdlet however, make sure to use the -DomainController parameter if you’re in a multi-domain forest.
Q: I’m using top to filter the list of selected users, but notice that if I couple this with pagination, eventually all the results get returned. Is this correct?
A: Yes. You might expect for the first N results only to be returned, but the net outcome is that all the users matching the filter are provided back, in subsequent pages that each contain N results.
Q: How do I get to use the query option in code? Eg retrieving only the first N users, as the previous question asked.
A: You’ll need to define list of query options, as below (example for N=10):
var option = new List<QueryOption>();
option.Add(new Microsoft.Graph.QueryOption("top", "10"));
Then pass this list to the Request method. For the code discussed in the article, this becomes:
var userRequest = graphClient.Users
   .Request(option)
   .Filter("accountEnabled eq true");
Q: Can I use the UPN to index into the retrieved users collection?
A: Yes. Aside the Azure AD object id, the UPN of the user can be used as well. As it’s guaranteed to be unique, you won’t get into a situation when more than 2 objects are retrieved for the same one.
Q: I’m using ProfilePhoto photo = await graphClient.Users[<UserName>].Photo.Request().GetAsync() to get the photo for a user, but when I look inside this variable, there’s no photo. Just some dimensions, but not much that can be used. Why is this so?
A: That is the equivalent of querying for https://graph.microsoft.com/beta/users/<UserName>/photo. If you use Graph Explorer to check the result, you’ll find that there’s just a few attributes, but no photo:
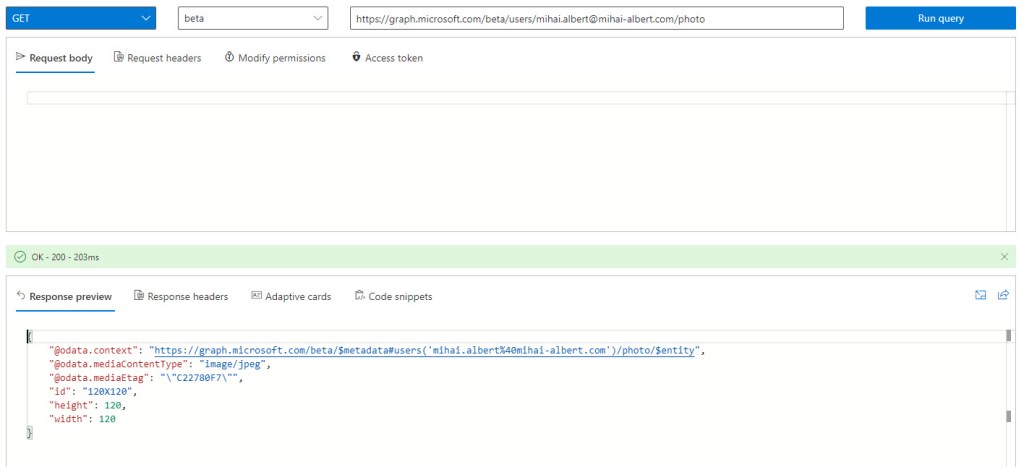
What you want to use in your code – and what you find in the final code version in this post – is graphClient.Users[userId].Photo.Content.Request().GetAsync() which returns a stream, that can be further easily manipulated.
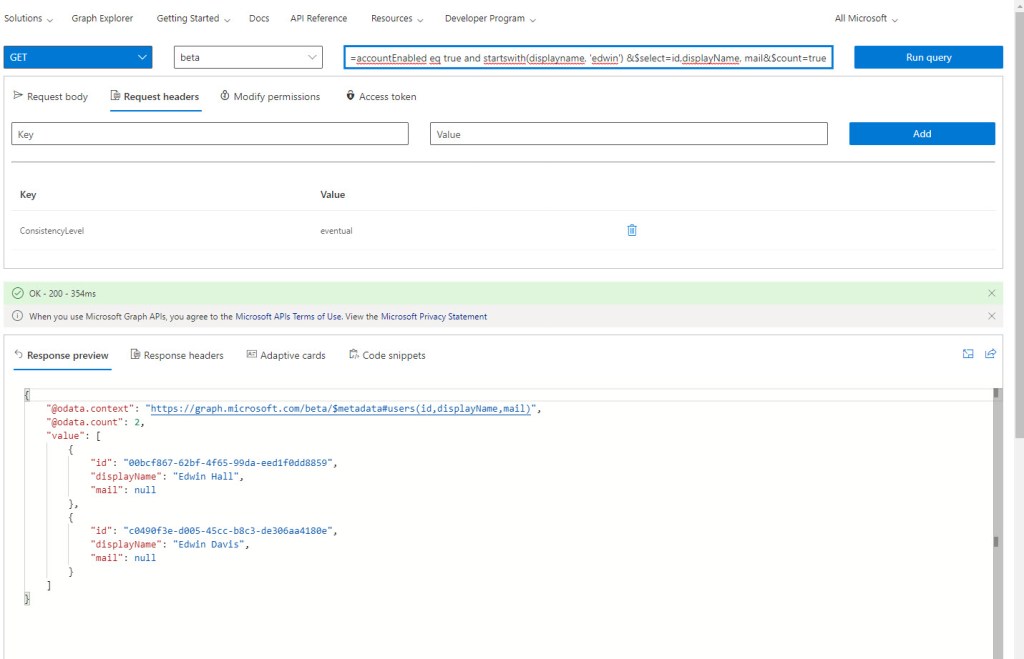
Q: I’m trying to get the number of users that my Graph filter query returns, and I’m using $count=true, but I never get the number back, just the users themselves. What’s wrong?
A: First of all, you need to use the beta endpoint; trying to use the v1.0 endpoint will return a “This request is not supported by the service“, as the count API is currently not included. From the documentation for beta, you’ll notice that a request header is required as well: ConsistencyLevel with a value of eventual, as seen in this sample. At the time of this writing the documentation wrongly states that the header is only required with $filter requests that also specify $query, but regular $filter requests will fail to return the number of objects if the header isn’t added in addition to $count=true. For our example, here’s the result of the query against https://graph.microsoft.com/beta/users?$filter=accountEnabled eq true and startswith(displayname, 'edwin') &$select=id,displayName, mail&$count=true. Note the header specified:
Q: In the article, a storage account that allows access from all networks is created. Doesn’t this pose a security risk?
A: No. Even if the source IP is allowed, authorization is still required, as described here.
Q: For programmatic access to Microsoft Graph and Azure Blobs storage, NuGet packages need to be installed. But what does this operation really consist of?
A: Take a look at this post, which discusses in depth installing and restoring NuGet packages, with an emphasis on what goes on when using Visual Studio.
Q: I’m seeing something wrong in the Microsoft Graph documentation or that doesn’t make sense. How can I go about it?
A: There are still glitches, and you can see it from the number of GitHub issues that make it to the corresponding repository (1.5k at the time of this writing). Actually one of the examples for the List users API is problematic, and I’ve opened an issue here. If you spot an error and want to open an issue, do it from the respective documentation page, by scrolling to the bottom and choosing “This page”. You’ll also see the same advice if you try to open an issue directly from the “Issues” tracker – make sure to read what’s in there carefully, otherwise your request will be closed instantly (as the text explicitly mentions, and as I found out the hard way).

Hello, how do I remove user photo and set default using this approach
LikeLike
It seems a method to directly remove the photos is not yet available. Although 3 years old, the SO thread here https://stackoverflow.com/questions/43855894/microsoft-graph-api-exchange-online-users-photo-remove offers a workaround though. As of now, it appears that there’s still no delete method, as per the documentation https://docs.microsoft.com/en-us/graph/api/resources/profilephoto?view=graph-rest-1.0&tabs=http, so the same 1×1 transparent pixel image would have to be used.
LikeLike