You want to retrieve a list of all your AWS EC2 instances, complete with all their private and public IPs. You want to do this across your whole AWS organization, thereby targeting all the AWS accounts and all the regions enabled for each. And you’d also want to use C# for the job.
This post will detail how to do this, starting from explaining the base concepts and going all the way to building the code. The output – alongside basic console text – will consist of a .json file containing the following attributes for each EC2 instance:
- Instance id
- Instance type
- All private IP addresses
- All public IP addresses
- Parent AWS account name
- Parent AWS account id
If you’d like to skip directly to the C# code for retrieving private and public IP addresses for all EC2 instances using IAM users, go here. For the C# code that uses SSO users, go here.
This post is actually the AWS equivalent of what was presented in a previous entry on this blog, where the list of all Azure VMs – together with their public and private IPs – was retrieved for an entire Azure tenant, across all its subscriptions.
We’ll see 2 approaches in getting to our goal, one using IAM users and another using SSO users. This will result in 2 snippets of code, each with its own backstory. Let’s break down what are we going to discuss, in order:
- Assumptions and expectations, what will be in the scope of the article and what won’t
- Possible approaches to retrieve the data we’re after
- The networking model for an EC2 instance
- Permissions in AWS
- IAM
- Permissions under IAM
- How roles are assumed
- Iterating through regions and accounts
- The implications of regions and STS
- Build the code that uses IAM users
- The credentials that must be configured for running the IAM code
- Code for retrieving EC2 instance networking data using IAM users
- How to automatically deploy the roles required in all the accounts
- SSO
- Q&A
Assumptions and expectations
Let’s state the scope of what we’re going to discuss and what will – and won’t be – implemented:
- We’re only talking about IPv4, not IPv6. Therefore if you see “IP address” anywhere in the article, it means “IPv4 address”
- The code in this article has been tested on Windows (with .NET Core 3.1, .NET 5, and .NET Framework 4.7.2) and on macOS (with .NET 5). The rest of the concepts and the AWS CLI commands described work just fine cross-platform, but just keep in mind that most of the screen captures have been taken on a Windows box, thus explaining the folder paths
- The code presented is not automation-ready. Particularly the SSO code needs a token that has to be manually obtained prior and placed in the code
- Do not use this as production code! Both code snippets presented in this article work as expected on multiple platforms however there’s a number of critical shortcomings from a production-grade code perspective, such as access tokens embedded in clear text in the source code, exception handling not covering all operations, etc.
- You’ll see resources stored under the master/management account in the test AWS organization depicted throughout the article. This is simply for illustrative purposes, as storing resources in that particular account is to be avoided as per the documentation
- We won’t be touching the “EC2-Classic” networking model. As new AWS accounts cannot use it for 7+ years now, this shouldn’t be a big concern
- We’ll not talk about nor consider throttling in this article. Not because it isn’t important, but because the post is already long as-is
- We’ll keep things simple, and won’t run things in parallel. As such our code will be going by region by region, and account by account – one at a time. Again, this is being left out because of the size of the post
- Time limits for the temporary credentials aren’t considered. Should the AWS organization be large enough, this will become a problem*
- Although we’re looking at the scenario where AWS SSO is integrated with Azure Active Directory as its IdP provider, a step-by-step guide of how to achieve this is not included, but links are provided in the respective section
Possible Approaches
If you try to use the AWS management console for getting a quick overview of what private and public IPs your EC2 instances have, you’ll be in for a surprise. As AWS has strict isolation between regions, using the default EC2’s “Instances” view won’t get you the expected results: not only that the data shown will be scoped to one region only, but networking info only includes one private IP and one public IP only, regardless if you have multiple assigned on those EC2 instances.
There are workarounds to get the management console to show EC2 instances across all the regions, as this rather up-voted StackOverflow thread shows, however as of now (Dec 2020) there’s no IP data included in the view. Last and not least, the EC2 instances per only one AWS account are shown.
But isn’t there a service that will be able to aggregate all the info we’re after, and simply provide an interface for us to query? A similar search went on for Azure in a previous post, and a solution was found that was at least 2 orders of magnitude faster than the rest. Turns out that for AWS the closest thing is a service called “AWS Config”. The downside is that it’s paid, and doesn’t support more than 500 results per query, making it a bad approach for what we want. It’s certainly no real counterpart to Azure Resource Graph (ARG).
AWS CLI is the next contender, and as we’re about to see we’re going to get quite far in what we’re able to extract. But eventually, things become too cumbersome, particularly when we’ll have to cycle through the AWS accounts, and we’ll turn to the AWS SDK for .NET and we’ll write the C# code required.
EC2 Networking Base Concepts
Our goal is to get the networking data for all the EC2 instances, specifically the public and private IPs for each. Since an EC2 instance can have multiple network adapters and multiple addresses* for each, we’ll have to look beyond the “stock” configuration found when quickly deploying one: a single network adapter that has one primary auto-assigned private IP with a corresponding auto-assigned public IP. Let’s take a look at the sample configuration below.
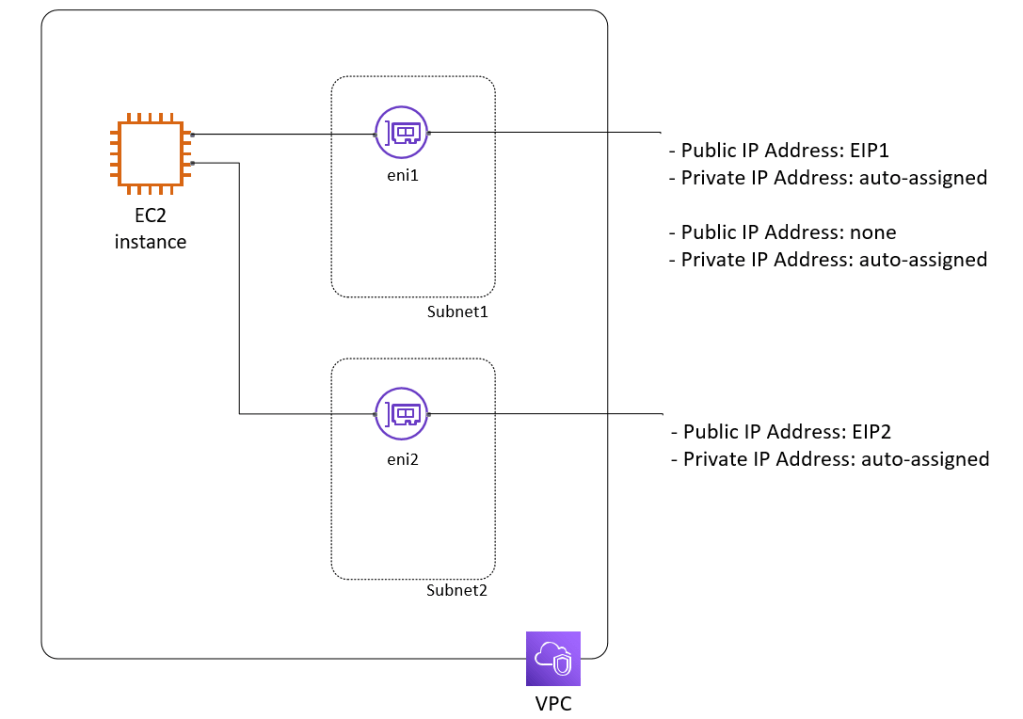
This EC2 instance no longer has the auto-assigned public IP present, as it has been replaced by an EIP (elastic ip). The first network adapter – or ENI (elastic network interface) – has an additional auto-assigned private IP, but this one doesn’t have any mapped public IP address. The second ENI has an auto-assigned private IP from a different subnet, and a corresponding EIP assigned to it.
Although not pictured, both subnets are in the same availability zone otherwise, they couldn’t be “hooked” to the same EC2 instance.
How can we generalize on this EC2 instance sample seen above, so that we know how to treat any EC2 instance configuration we’ll encounter? As follows: we know that for any instance, we’ll have to iterate through its ENIs (elastic network interfaces) and for each, remember every private IP address and its corresponding public IP – should one exist, of course. The aggregated list of private/public IPs is what that EC2 instance has assigned as a whole, and what we’d like to output eventually.
If you’ve worked mostly in Azure so far, and AWS is new grounds for you, you might rightly ask how do the networking terms in the diagram above relate to Azure? Basically, the AWS VPN (virtual private cloud) is the equivalent of the Azure virtual network, the AWS EC2 instance is the counterpart of the Azure virtual machine, while the AWS’s ENI (elastic network interface) is what a vmNic is for Azure. In fact, the example shown above is very similar to the one we’ve used for Azure previously here, with only the icons and entity names being different.
Drawing another parallel with Azure’s virtual machines, there’s no explicit name in AWS for an EC2 instance. If using the console wizard to provision a new instance, you’ll see that no explicit name is ever asked, and all you’ll end up with is an id that uniquely identifies it. The documentation however clearly states that tags can be used for this purpose, but that “the console may organize resources according to the Name tag, but this tag doesn’t have any semantic meaning to the Amazon EC2 service“. As such, with the name possibly missing from our target EC2 instances, we’ll be collecting their instance ids, which are bound to exist and to be unique. One concept that is imported to grasp is the notion of “reservation”. This is not about AWS “reserved instances”, but how instances themselves are logically grouped from the standpoint of how they were launched. The documentation for the AWS CLI command that retrieves EC2 instances – aws ec2 describe-instances – states the following: “The ID of the instance’s reservation. A reservation ID is created any time you launch an instance. A reservation ID has a one-to-one relationship with an instance launch request, but can be associated with more than one instance if you launch multiple instances using the same launch request. For example, if you launch one instance, you get one reservation ID. If you launch ten instances using the same launch request, you also get one reservation ID“. A more friendly explanation is found on this StackOverflow thread.
Why is this important? Why do we care about reservations, as regularly using the EC2 instances doesn’t require knowledge about them? Because when the time comes to write the C# code to retrieve the EC2 instances, we’ll have to iterate through the reservations themselves in order to get to the EC2 instances contained within.
Back to collecting IP addresses – for the private ones, things are pretty simple, as we’re just going to iterate through each ENI’s list of private IP addresses. Each entry is guaranteed to exist and be a valid IP address. However not every single private IP address will have a corresponding public one. If a public IP does exist, it can either be an auto-assigned one – if it corresponds to the first private IP of the first ENI (elastic network interface) – or an EIP (elastic IP). The good part is that we’re going to be able to treat either case the same, as we’ll check the association of each private IP, and extract the public IP from there.
We’ll go into further detail about the IPs when we’ll build the code later on. But now, let’s discuss permissions.
Permissions
If you’re coming from the Azure world, how permissions work in AWS might look strange. It sure did that way for me in the beginning. With Azure, having the global admin role for a tenant (and self-elevating oneself as described here) would allow you access across all the VMs in all the subscriptions. Alternatively, having been granted the Reader role at Tenant Root Group level would grant read-only access across all subscriptions for the VMs. One single permission would take care of everything.
In AWS, it’s not that simple. The equivalent notion of an Azure subscription – the AWS account – keeps things more separated. Unlike Azure, assigning one sole out-of-the-box permission that would allow you access across all accounts is more or less tricky, depending on which authentication source you choose, as we’re about to see.
Don’t get tripped by the “account” term. In the AWS world, “account” refers to a container for resources (as stated here https://aws.amazon.com/organizations/faqs/ under “Q: What is an AWS account?“). It’s not the user account concept, found for example in Azure AD. This is why next when talking about users, there won’t be any “account” word to go with that.
There are 2 approaches that we’re going to analyze, depending on the type of user that queries for the list of the EC2 instances: IAM users and SSO users. Let’s start with IAM.
Permissions: IAM Users
For IAM (Identity and Access Management) users, what’s important to know is that by default, every AWS account has its own user “store”. In turn, an IAM user defined in one account will – by default – be limited in what it can do to that specific account. If you want to use an IAM user to access resources in a different account, then usually* the solution is to use roles.
Roles are collections of permissions that a user can assume. They’re explained very well in this AWS link, and it’s worth extracting the following:
An IAM role is an IAM identity that you can create in your account that has specific permissions. An IAM role is similar to an IAM user, in that it is an AWS identity with permission policies that determine what the identity can and cannot do in AWS. However, instead of being uniquely associated with one person, a role is intended to be assumable by anyone who needs it. Also, a role does not have standard long-term credentials such as a password or access keys associated with it. Instead, when you assume a role, it provides you with temporary security credentials for your role session.
What’s important to note is that in AWS roles are not cumulative, as they are for example in Azure or in Microsoft Exchange. In Azure, it’s clearly stated here that “Azure RBAC is an additive model, so your effective permissions are the sum of your role assignments“. Not so with AWS: one can assume a single role at a time. The best analogy I’ve found for this – present in both Amazon’s own docs (here and here) and Pluralsight courses – is hard hats. One user can wear one hat at a time only. Note that it doesn’t prevent assuming different hats subsequently, but only one can be worn at a time.
Another thing to note about the notion of role in AWS is that it’s categorized as an identity, along with users and groups, as described here. Coming from the Microsoft world – particularly Active Directory and Azure AD – I did experience a small shock reading this, since there a role is not seen as an identity, but simply as a set of permissions granted to a “regular” identity, such as a user.
Coming back to our goal: we’d like to go through all the AWS accounts and get information about all the EC2 instances contained in each. For this, we’ll use a single IAM user, contained in the master/management account*. Granting permissions in each of the accounts will be done through roles. Consider the diagram below, which will reflect our workflow:
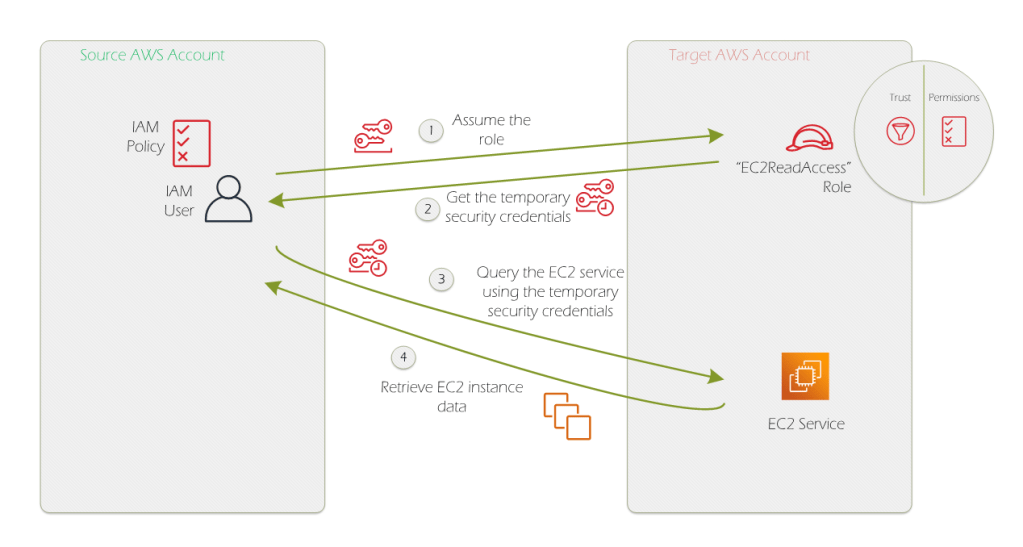
Let’s quickly go over the concepts depicted. We’ll go over the actual settings in a few paragraphs.
- IAM User: the user that will be assuming the target role
- IAM Policy: this allows the IAM user to assume the role in the target account. Since we’ll be using
*as the account id particle in the ARN (Azure Resource Name) of the resource, then this effectively translates to be able to assume the “EC2ReadAccess” role as it’s defined in every target account. It attaches to the IAM user where this is defined (for our setup, it’ll be in the master/management account) - Role: There are 2 parts:
- Trust policy: dictates from which account are principals allowed to assume the role*. The ARN contains the account id of the master/management account, where the IAM user is defined. Note that wildcard characters aren’t supported in the ARN in this context (see the note under “Principal” here)
- Permissions policies: lists the permissions granted to the principal once the role has been assumed. In our case, this consists of a single policy – the AWS managed policy “AmazonEC2ReadOnlyAccess” – which gives the necessary access to retrieve EC2 instance data
- Long-term security credential: this is the access key* for the IAM user. Note that this can’t be used directly to access the final resources (EC2 instance data), but are only good for obtaining temporary credentials – via assuming the role – that will provide in turn the respective access
- Temporary security credential: the key obtained by assuming the role, which grants the permissions within the role that allows reading EC2 instance data
Expanding on the operations captured within the diagram back in figure 2:
- Use the long-term security credentials of the IAM user (one of its access keys) to begin assuming the “EC2ReadAccess” role. The trust policy attached to the role allows access for principals from the master/management account, which includes our IAM user, as it’s included in that account’s directory. As the trust condition is met, the IAM user can successfully assume the role
- Assuming the “EC2ReadAccess” role simply sends back to the requesting identity a set of temporary security credentials. When used to authenticate, these allow the set of rights that the role has, which translates to the permissions within the “AmazonEC2ReadOnlyAccess” managed policy. In the hard hat analogy, this step simply sends back to the user the hard hat for the role
- The temporary security credentials are used to request information from the EC2 service about its instances. Remember that the IAM user’s access key (long-term security credentials) doesn’t confer the EC2 rights, but it’s only when assuming the “EC2ReadAccess” role that the corresponding permissions are present. For the analogy, the user is now “wearing” the hard hat used to represent the role. From the view of AWS, the role is now requesting the EC2 information – not the IAM user
- Since the role has the correct permissions, AWS sends back the EC2 instances’ info requested
The source AWS account in the diagram is the master/management account, as it’s there where our IAM user is defined. The target AWS account seen in the diagram will actually represent the case of all the accounts, as they’re cycled through one by one. However, note that the “EC2ReadAccess” role will have to be defined in each and every account in order for the approach to work.
Throughout this article, we’ll use a simple setup to see all the concepts in action, with one AWS organization consisting of 3 accounts:
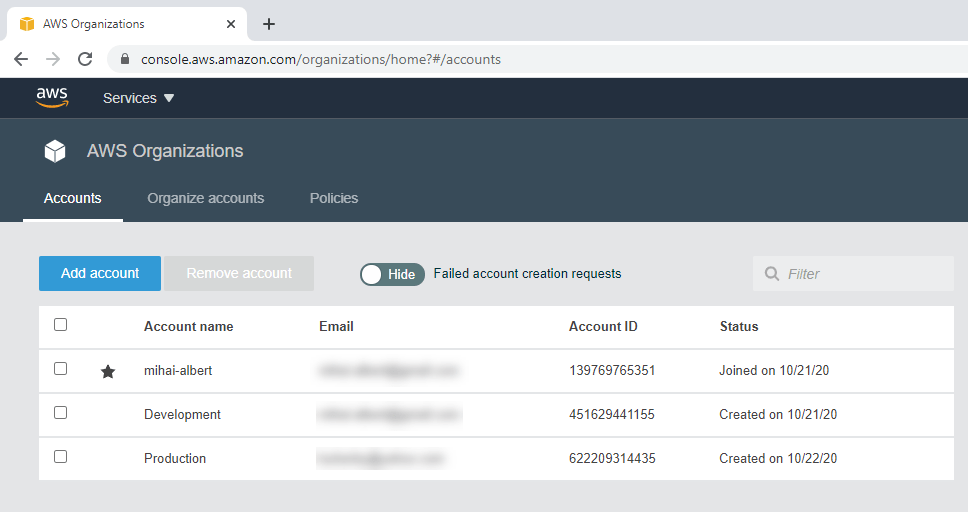
We have a single IAM user, defined in the master/management account:

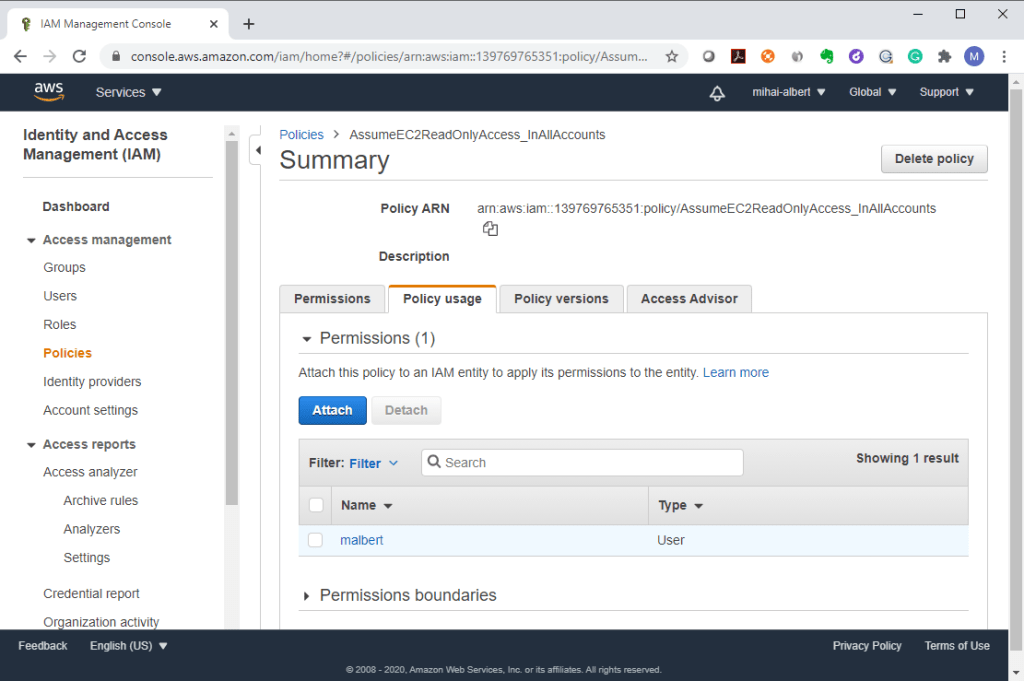
In the master/management account, we define an IAM policy with one permission: allow calling the AssumeRole API against a role named “EC2ReadAccess”. The wildcard character in the resource ARN matches any AWS account, thus resulting in any user who has this IAM policy attached to assume a role named “EC2ReadAccess” in any AWS account.
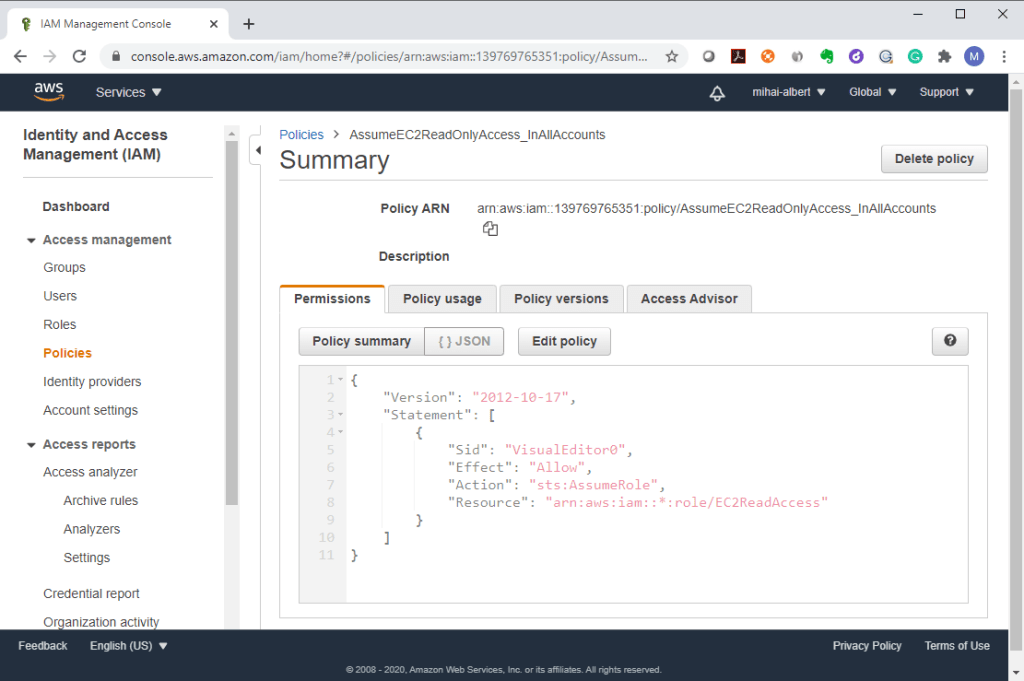
We link the IAM policy to the only IAM user defined in the master/management account:
The role has 2 parts – the permissions and the trust policy. The configuration of the instance defined in the “Development” AWS account is below:
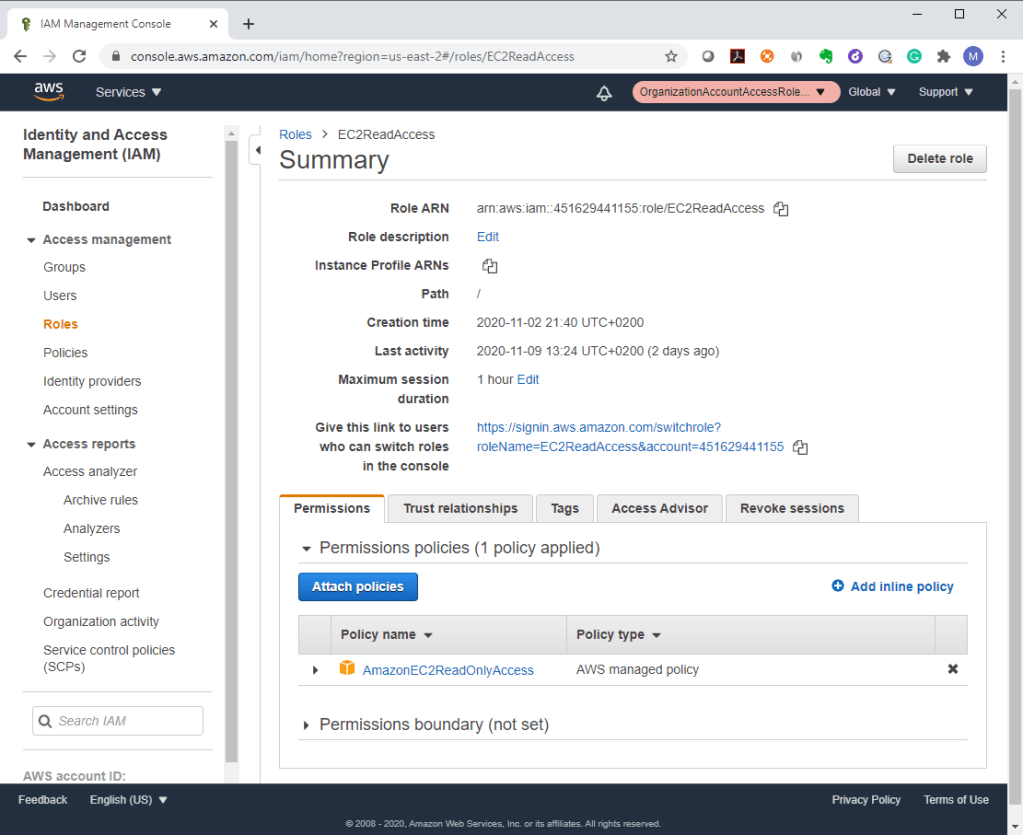
A single policy dictates the permissions of the roles: the “AmazonEC2ReadOnlyAccess” one. You’ll notice that there are additional services specified within, aside EC2 to which we need read access:

Back to the role, the trust policy ensures that principals from the master/management account are allowed access:
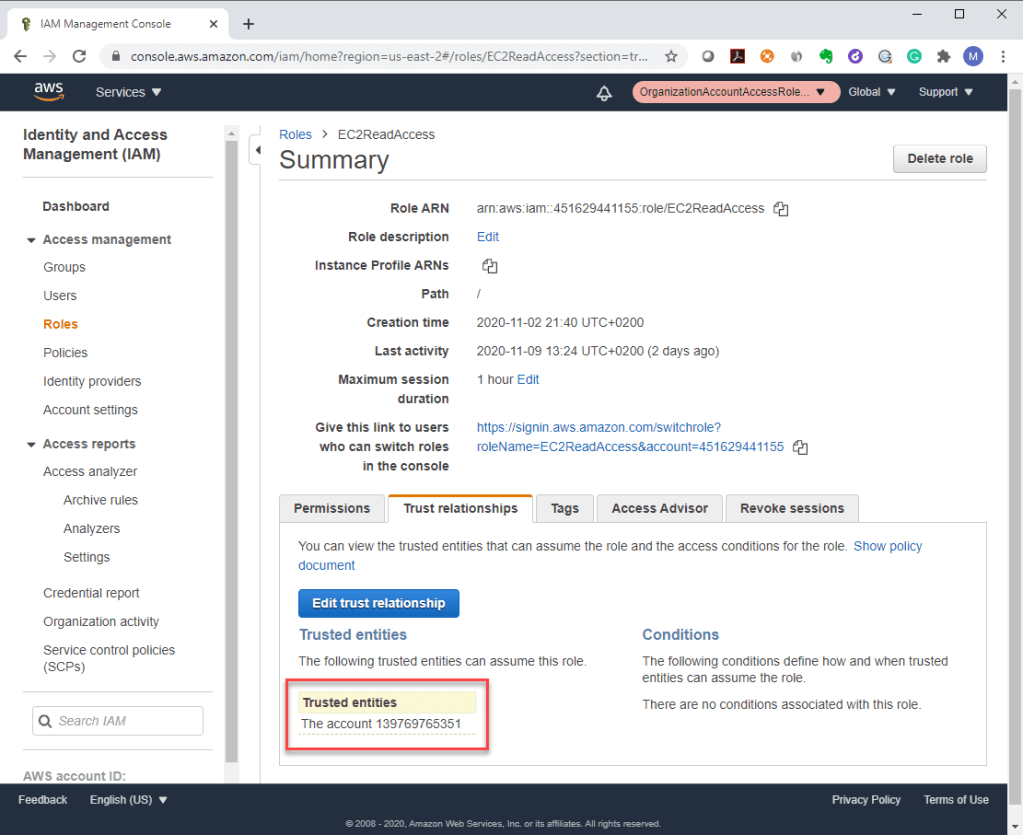
Remember that a role needs to be defined in each and every AWS account, in order for the IAM user assuming it to have permissions in that AWS account. We’ll see how to do that automatically further down.
One last word – if the things described in this section still aren’t clear, take a look at this excellent article posted in the AWS documentation itself. Having a grasp on the concepts described so far will be important next, both for the remaining IAM section as well as the SSO one.
Permissions: Assuming Roles In Action
Let’s see how assuming a role is done in the AWS Management Console. We’re first going to login using the root account, only to show that the root account can’t be used to switch to a role. We’ll then log out and login using the IAM user, and use the option to switch roles, which is going to be active this time. We’ll assume the “EC2ReadAccess” role within the “Development” AWS account (451629441155), and use it to list the EC2 instances in the current region.
One of the things I kept getting wrong in the beginning was that I tried logging in with the IAM user directly in the “Development” account, which would obviously fail, as the IAM user doesn’t exist there, but only within the master/management account. An additional incentive to make the movie below:
Switching over to the AWS CLI, let’s see how a role can be assumed here.
We’ll first add a profile* in the credentials file, containing the access key of our IAM user:
[malbert (IAM)]
aws_access_key_id=<AWS_ACCESS_KEY>
aws_secret_access_key=<AWS_SECRET_KEY>
To assume the role, we need the ARN of the role within the “Development” AWS account. You can find this back in figure (the first printscreen with the role’s ARN visible). We’ll run: aws sts assume-role --role-arn "arn:aws:iam::451629441155:role/EC2ReadAccess" --role-session-name AWSCLI-Session --profile "malbert (IAM)"
As a side-note, the role-session-name value is useful for tracking purposes, as described here.
The output is shown below:
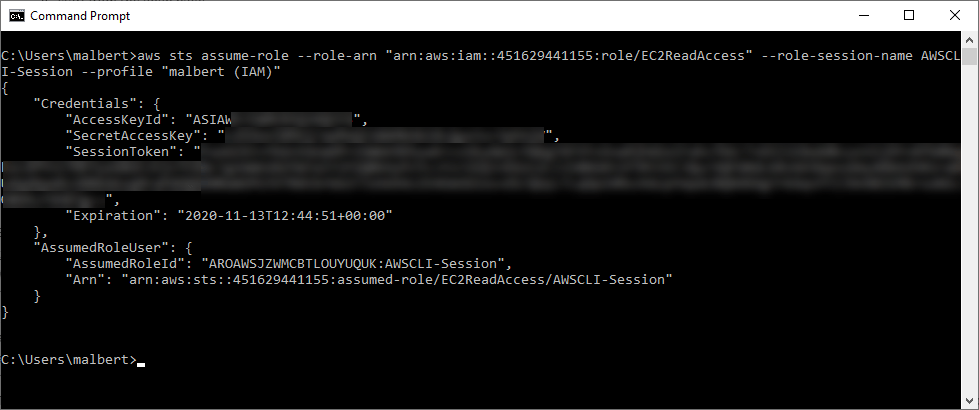
Notice there are 2 JSON objects returned – Credentials and AssumedRoleUser. From the first one, copy all 3 values to the credentials file and create a new section for a new profile based on the values returned previously:
[TempCredsFromAssume]
aws_access_key_id=<AccessKeyId_from_CLI_output>
aws_secret_access_key=<SecretAccessKey_from_CLI_output>
aws_session_token=<SessionToken_from_CLI_output>
What’s with the 3rd field? Isn’t an access key id and the secret access key enough to authenticate? Turns out there’s an extra piece of info that goes with temporary credentials, as explained here: “Temporary security credentials consist of an access key ID and a secret access key, but they also include a security token that indicates when the credentials expire“. Don’t forget to include the session token in the profile otherwise, you’ll get An error occurred (InvalidClientTokenId) when calling the GetCallerIdentity operation: The security token included in the request is invalid.
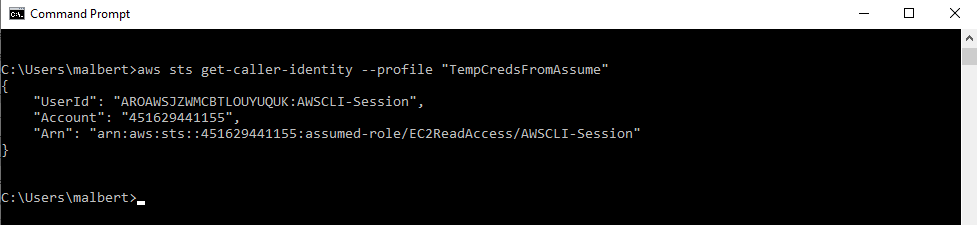
Once the credentials file is saved, run the following command to make sure the role can be used based on the temporary security credentials just retrieved: aws sts get-caller-identity --profile "TempCredsFromAssume". The output follows:
Next, the final command can be issued to get the EC2 instances* within the “Development” account, against a specific region: aws ec2 describe-instances --profile "TempCredsFromAssume" --region us-east-2

Notice that in the output, the instances themselves are grouped under reservations, just as the previous section foretold. We’ll come back to this aspect when building the code.
By now you probably spotted there’s something different in how the management console workflow is versus the one via CLI: there are no explicit temporary credentials required when using the management console. All that’s needed when using “Switch Roles” is the name of the role that needs to be assumed, and the id of the target AWS account. It looks that the console is smart enough to consume the temporary credentials generated by the “assume” permission granted to the IAM user. How can we get similar behavior from the CLI? It’ll be cumbersome to handle those temporary credentials every time a new role is assumed, particularly when switching to .NET code.
Luckily, there’s a “linked” profiles concept in place that handles this case, very well described here. We’ll modify our credentials file by removing the former “[TempCredsFromAssume]” entry and replacing it as seen below. Here’s the final credentials file:
[malbert (IAM)]
aws_access_key_id=<AWS_ACCESS_KEY>
aws_secret_access_key=<AWS_SECRET_KEY>

[Development-EC2ReadAccess]
role_arn = arn:aws:iam::451629441155:role/EC2ReadAccess
source_profile = malbert (IAM)
The result is that when using this “Development-EC2ReadAccess” profile, the credentials of the IAM user are used to assume the role, then the temporary security credentials get leveraged behind the scenes to access the EC2 service. Here’s again the command that checks the identity after using the profile we’ve just declared, and then the command returning the EC2 instances using the same profile. Note the same results being returned as back in figures 11/12:

Iterating Through Regions and Accounts
Back in the “Permissions: Assuming Roles In Action” section we did the following: using an access key, we assumed the “EC2ReadAccess” role in the “Development” AWS account. By “assumed”, we mean that we’ve contacted the STS service using the access key, and requested the temporary credentials required to perform the operations granted by the “EC2ReadAccess” role in the “Development” AWS account. We’ve then used these temporary credentials and authenticated to the EC2 service, and then retrieved information about all the EC2 instances.
We didn’t pay special attention to the regions involved; we only made sure we’ve specified a region when running the aws ec2 describe-instances command otherwise, it would have errored out* with You must specify a region. You can also configure your region by running "aws configure".
However, our goal is to get every EC2 instance in all the regions, and do this across all accounts.
As stated clearly in the documentation “each AWS Region is isolated and independent of the other Regions“. So whatever EC2 instances are seen when selecting one region, it won’t include any instances in other regions. There are specific workarounds to see a “combined” view consisting of multiple regions – such as the management console’s Tag Editor view – but the bottom line is that each region has to be queried independently.
Contrast this to Azure, where one can easily retrieve all virtual machines in a subscription, regardless of their region. Actually, we didn’t even had to consider regions when we previously discussed this topic for Azure.
Back to AWS, there’s one extra hurdle: there’s no guarantee that the same list of regions applies to all accounts. AWS currently has 17 regions that it deems legacy global regions, which are enabled by default. Aside from these, there’s a number of regions that aren’t enabled by default but are left to the discretion of the account owners if they are to be enabled or not. The legacy global regions can’t be disabled, but the others can be toggled on or off. Different AWS accounts can have different configurations of enabled regions.
It’s time to look closer at the service that provides the temporary credentials when assuming a role, and the interactions with the regions.
Regions and Endpoints in STS (Security Token Service)
So when assuming a role we’re going to the STS service and getting back temporary credentials that will grant access to resources which the initial user wouldn’t directly have using its access key. We haven’t touched upon it yet, but an STS endpoint has to provide those temporary credentials back. As long as we’re using the default configuration AWS provides, and operate within the regions that come enabled by default, all is well. But consider that you go ahead and enable a new region – say “Africa (Cape Town)” af-south-1. The docs here go on to tell that “Session tokens from the global STS endpoint are valid only in AWS Regions that are enabled by default“. This new region isn’t enabled by default, therefore by using the global STS endpoint, we’ll be getting back temporary credentials that won’t work to query the EC2 service for this target region.
The last link referenced though does recommend using the regional STS endpoints instead of the global one, for the 3 reasons expanded there (latency, redundancy, scope).
Let’s take a closer look at the STS endpoints.
Querying the global STS endpoint works only by specifying the us-east-1 region (or its “alias”, aws-global (described here and also defined in C:\Program Files\Amazon\AWSCLIV2\botocore\data\endpoints.json for a CLI Windows install) in the aws sts command. Using any other region with the global endpoint will result in An error occurred (SignatureDoesNotMatch) when calling the AssumeRole operation: Credential should be scoped to a valid region, not <region>. Once obtained from the global endpoint, the temporary credentials will work against any of the legacy global regions (and if the region compatibility of session tokens for the global endpoint in the account where the IAM user exists is set accordingly, to all regions).
An example: consider we use the IAM user we’ve created in the master/management account (id 139769765351) to query the global STS endpoint – https://sts.amazonaws.com – in order to get temporary credentials for the “EC2ReadAccess” role we’ve defined in the “Development” account (id 451629441155). As we’re using the global STS endpoint, we must use the us-east-1 region, as follows: aws sts assume-role --role-arn "arn:aws:iam::451629441155:role/EC2ReadAccess" --role-session-name AWSCLI-Session --endpoint-url https://sts.amazonaws.com --region us-east-1 --profile "malbert (IAM)". Next, we can use these temporary credentials (by storing them in the credentials file for example, under the name “[TempCreds]”) to query the EC2 service in any of the legacy global regions. Here’s how the command looks for querying the eu-west-3 region: aws ec2 describe-instances --profile TempCreds --region eu-west-3. This will work as expected. But consider querying for a region that has been manually enabled previously under the “Development” account – like af-south-1: aws ec2 describe-instances --profile TempCreds --region af-south-1. This will error out with An error occurred (AuthFailure) when calling the DescribeInstances operation: AWS was not able to validate the provided access credentials. This occurs because the IAM service where my IAM user exists (the master/management account) has the STS region compatibility of session tokens for the global endpoint policy set to only the legacy global regions, which makes the temporary credentials the STS service hands out useless against the af-south-1 region. Toggling the policy to “All AWS Regions” in the account where my IAM user exists (139769765351), and re-requesting the temporary credentials will work just fine for the af-south-1 region. You’ll also notice that once issued, the session token is longer – as the documentation states (here: “Tokens that are valid in all AWS Regions include more characters than tokens that are valid in Regions that are enabled by default“) – as it’s valid across all regions this time.
Let’s look at how things work when regional STS endpoints are queried. In this case, the temporary credentials handed back are guaranteed to work across all regions. Let’s take another example: consider we use the same IAM user we’ve created in the master/management account (AWS account id 139769765351) to query the regional STS endpoint for the “EU West (London)” eu-west-2 region – https://sts.eu-west-2.amazonaws.com – in order to get temporary credentials for the “EC2ReadAccess” role we’ve defined in the “Development” account (AWS account id 451629441155). But let’s throw a wrench in the works, and disable the regional endpoint for this region under the master/management account (139769765351). Will an error be thrown, or will valid temporary credentials be handed back to the IAM user? As we’re querying a regional STS endpoint, the token policy we’ve looked at in the previous example has no bearing on this one, as the temporary credentials handed back are valid across all regions. But wouldn’t the STS endpoint itself – being disabled in the account where the IAM user is located – prevent requesting those credentials in the first place? Testing turns out that’s not the case. My guess is because the regional STS endpoint in the target account (“Development”) is still enabled, and it’ll be this instance of the service that will hand back the temporary credentials for the role we’re after since it’s in this account where the target role exists in the first place.
It appears as the workflow is something along the lines:
- The IAM user’s access key is used to authenticate to the regional STS endpoint for the chosen region. The STS service will validate the credentials just fine. Validating the access key (long-term credentials) doesn’t appear tied to the status of the regional endpoint.
- The regional STS endpoint for the IAM instance of the “Development” account is enabled, so it’ll provide the temporary credentials for the “EC2ReadAccess” role within the “Development” account back to the requesting IAM user
Now let’s slightly change the example, and have the IAM user assume the “EC2ReadAccess” role within the same account (the master/management one). All we’ll change in the previous command is the id of the target role’s account, as follows: aws sts assume-role --role-arn "arn:aws:iam::139769765351:role/EC2ReadAccess" --role-session-name AWSCLI-Session --endpoint-url https://sts.eu-west-2.amazonaws.com --region eu-west-2 --profile "malbert (IAM)". This time an error (HTTP 403) is thrown back: An error occurred (RegionDisabledException) when calling the AssumeRole operation: STS is not activated in this region for account:139769765351. Your account administrator can activate STS in this region using the IAM Console.
This time it looks like the flow was:
- The IAM user’s access key is used to authenticate to the regional STS endpoint for the chosen region. The STS service will validate the credentials just fine (testing on my side revealed that if the wrong access key is supplied, then the error changes to
An error occurred (SignatureDoesNotMatch) when calling the AssumeRole operation: The request signature we calculated does not match the signature you provided. Check your AWS Secret Access Key and signing method. Consult the service documentation for details.(also an HTTP 403)) - The regional STS endpoint for the IAM instance of the master/management account is disabled, so the “STS is not activated” error above is returned
Bottom line: whether a regional STS endpoint is activated for a specific region only dictates whether temporary credentials are issued back or not for the role in that account. The regional STS endpoint will not prevent an IAM user from authenticating against it, despite that endpoint being disabled in the account where the IAM user exists. To link these last two ideas: temporary credentials for a role in a target account will be handed out just fine, as long as that account’s corresponding STS regional endpoint is enabled, regardless of that same regional endpoint’s state in the IAM user’s account.
Another thing worth noting is that there’s just one API call to the regional endpoint when assuming the target role – easily seen using the --debug parameter in the command. There’s not one call for authenticating against the IAM user’s AWS account, then another to retrieve the temporary credentials in the target role’s AWS account.
Keep in mind that if you’re assuming a role for a specific region in an AWS account that has the said region enabled, the account where the IAM user resides needs to have the same region enabled (note that we’re talking about the regions enabled at the account level, not the regional STS endpoints). An example: consider that in the “Development” account the region af-south-1 is enabled. In the master/management account this region is not enabled. To assume the “EC2ReadAccess” role in the “Development” account against the af-south-1 region using the IAM user “malbert” defined in the master/management account we run: aws sts assume-role --role-arn "arn:aws:iam::451629441155:role/EC2ReadAccess" --role-session-name AWSCLI-Session --profile "malbert (IAM)" --region af-south-1. What we’ll get back is the following error: An error occurred (InvalidClientTokenId) when calling the AssumeRole operation: The security token included in the request is invalid. The problem is – as I’ve confirmed with AWS Support – that the new region also has to be enabled in the account where the IAM user exists; in the example above, this is the master/management account where the af-south-1 region needs to be enabled*. Make sure you give it some time after enabling the region (1-2h), as based on my tests it’s guaranteed not to work immediately afterward.
Turns out there are quite a few gotchas with STS. What’s the best solution for iterating through our EC2 instances across all regions under one account? Should we go with the global STS endpoint, or with regional ones? The global endpoint suffers from the fact that the temporary credentials it issues are valid only in the legacy global regions; enable one of the newer regions, and those credentials no longer work against those regions. Sure, the token policy can be changed so the temporary credentials work against all regions, but we’re talking about changing this within all accounts, which might be problematic (think security/corporate policy). We could use the regional endpoint for each of the regions where we’ll be searching for EC2 instances; yes, the tokens will be slightly bigger, but that’s not such a big concern. What’s more troubling is that some of those regional endpoints might be disabled, which will start breaking things, as we’ve seen above. There’s also the issue that whatever new zones are enabled in the target accounts, they have to be enabled as well in the account that hosts the IAM user, in order for the regional STS endpoint to be able to return the temporary credentials.
How to move forward then? What if we use a regional endpoint that cannot ever be disabled? The one for us-east-1 can never be disabled, as the management console explicitly tells; nor can the region be ever disabled. Reviewing the issues we’ve run into previously:
- The temporary credentials are guaranteed to work in every region, as they were issued by a regional STS endpoint
- This particular regional STS endpoint for
us-east-1cannot be disabled, so we don’t have to worry whether the account where the role is or the IAM user’s account have them enabled; that simply can never be the case. The endpoint will always be able to provide back the temporary credentials - The
us-east-1region can never be disabled, so there’s no concern about the state of that region in the account where the IAM user is homed - There’s no need to touch the token policy for any of the accounts involved, as we’re using a regional endpoint
As such, we’ll go with this approach. For each account, we’ll assume the “EC2ReadAccess” role once by querying the regional endpoint for us-east-1 as described above, which will hand back temporary credentials. With these credentials, we’ll be able to authenticate to the EC2 service and query each of the enabled regions to extract information about all the EC2 instances within that account.
Iterating Through Regions and Accounts (cont.)
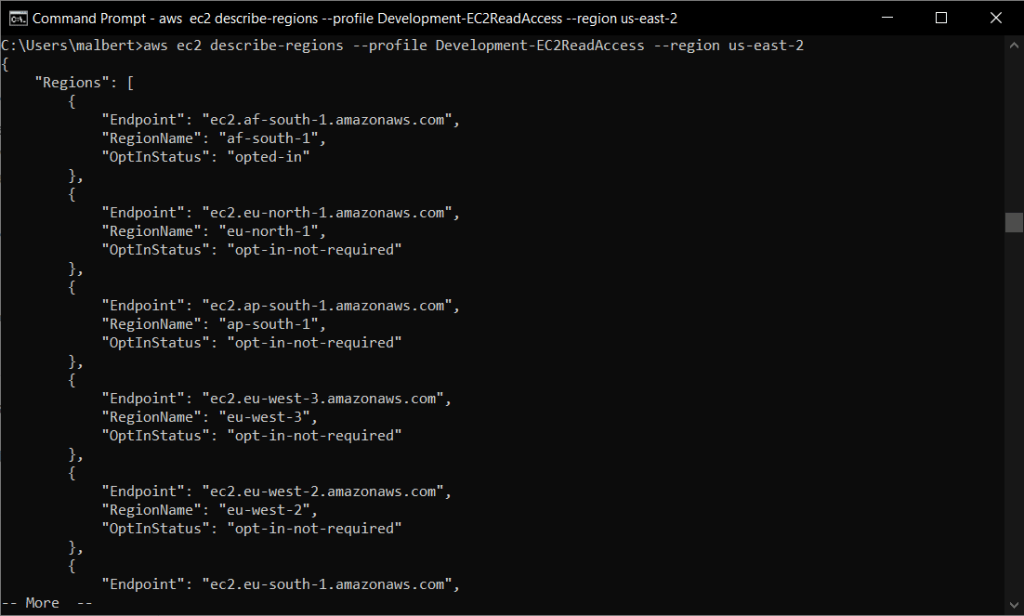
But how do we get the list of enabled regions per each AWS account? It’s only for these regions that we want to get EC2 instance data. We’ll simply use the EC2’s “describe-regions“, as in: aws ec2 describe-regions --profile Development-EC2ReadAccess --region us-east-2. Output below:
Yet the command looks a bit strange, isn’t it? You have to specify a region in order to get the enabled regions within an account. And no, you cannot omit it, as you’ll get the dreaded You must specify a region. You can also configure your region by running "aws configure". Let’s leave this for now, as we’ll come back to this problem when building the C# code.
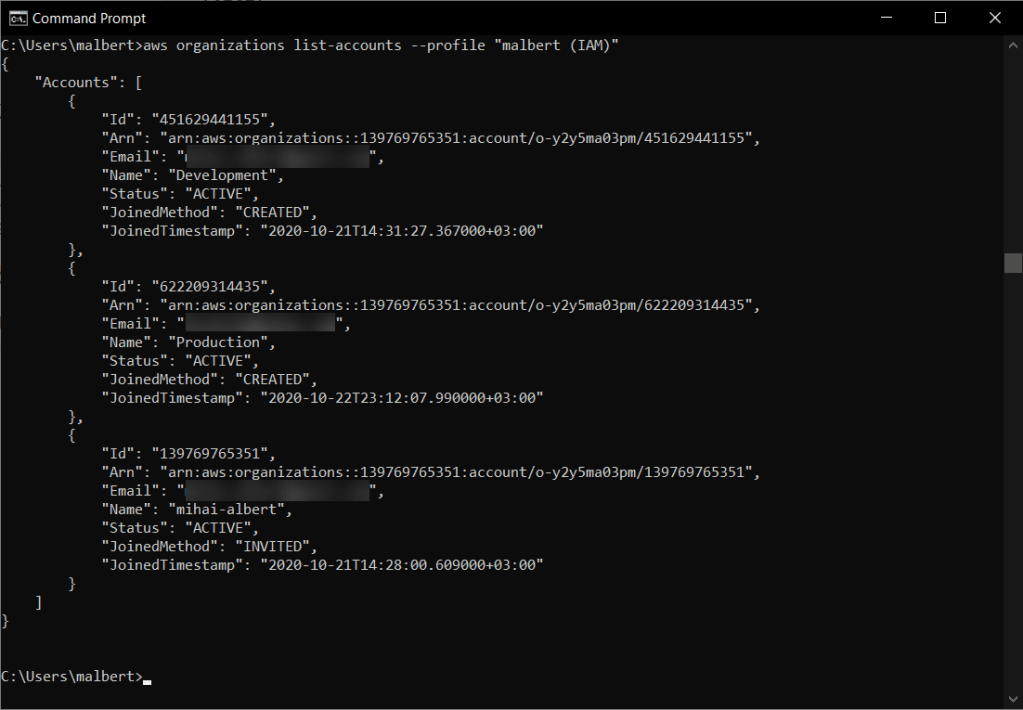
As for iterating through accounts, we’ll use: aws organizations list-accounts --profile "malbert (IAM)". Output below:
There’s one permission that we need in order to list the accounts. Here’s our IAM user configured as required:

We’ve gone quite far in using the CLI, but at this point, we’re going to switch to using C#. Why not continue to obtain a mini-script consisting of AWS CLI commands that would get all the EC2 instances and their data? Because it’s getting too cumbersome: obtaining the regions enabled can be done quickly, but iterating through accounts and assuming the target role in each is not that straightforward, as knowledgeable people already commented here. Not to mention the post-processing of the private/public IPs for each instance.
Building the code for retrieving EC2 instances using IAM users
At a high level, what we’re going to do is get the list of AWS accounts, and for each assume the target role to get temporary credentials, followed by enumerating the regions that are enabled, and extracting the list of EC2 instances for each.
In order to get the list of regions enabled for the EC2 service under a specific AWS account, the describe-regions CLI command can be used, just as we’ve seen previously, or its async equivalent in the AWS SDK for .NET: DescribeRegionsAsync. This method however is found on an AmazonEC2Client object, which represents our target EC2 service. Building an instance of AmazonEC2Client object requires a set of credentials and…a region. But how to choose this region, since we want a list of enabled regions in the first place? How to solve this chicken-and-egg problem? Simply use the one region that’s always enabled and cannot ever be disabled: us-east-1.
Getting a list of accounts in the AWS organization is done using an AmazonOrganizationsClient object. This one needs a region as well, so we’ll pass us-east-1, based on the same reasoning that this region is always enabled by default and cannot be disabled. Then we simply call the ListAccountsAsync method, which will retrieve all the AWS accounts within the organization*.
For each account in the list of accounts, we’re building an AmazonSecurityTokenServiceClient object (against the ever-present us-east-1 region) and calling its AssumeRoleAsync method to get the credentials for the “EC2ReadAccess” role, whose ARN we’re constructing based on the account id we’re in. This will simply give us the temporary credentials to be used under that account. This set of credentials will be stored in a Amazon.SecurityToken.Model.Credentials object and will be reused for each enabled region under the current account.
The catch is that we explicitly have to use a AmazonSecurityTokenServiceConfig object configured with StsRegionalEndpointsValue.Regional, so that we use the regional STS endpoint for the us-east-1 region, which in turn issues temporary credentials that are valid in all the regions, regardless of the token policy set for the account, as discussed in depth in the “Regions and Endpoints in STS (Security Token Service)” section. Don’t call the AmazonSecurityTokenServiceClient constructor that only specifies the region*, as what this does is to contact the global STS endpoint – since it detects that us-east-1 is a legacy global region – and provides back temporary credentials that – should the token policy be left to its default value in the respective account – won’t work in newer regions that were manually enabled. As soon as the code tries to contact the EC2 service in one of those specific regions, you’ll run into Amazon.EC2.AmazonEC2Exception: 'AWS was not able to validate the provided access credentials.
With the temporary credentials valid for the specific AWS account we’re targeting, the next step is to contact the EC2 service for the region we’re iterating through. We’ll build an AmazonEC2Client object, and supply the credentials previously retrieved, along with the current region. Calling its DescribeInstancesAsync will result in the EC2 instance data to be retrieved.
Within the instance data we’re going to find all the info required to build our list of private and public IPs. The quickest way to see how things work is to take a sneak peek into what the instance data actually contains. Here’s a debug session within the code, right when a new instance is encountered:
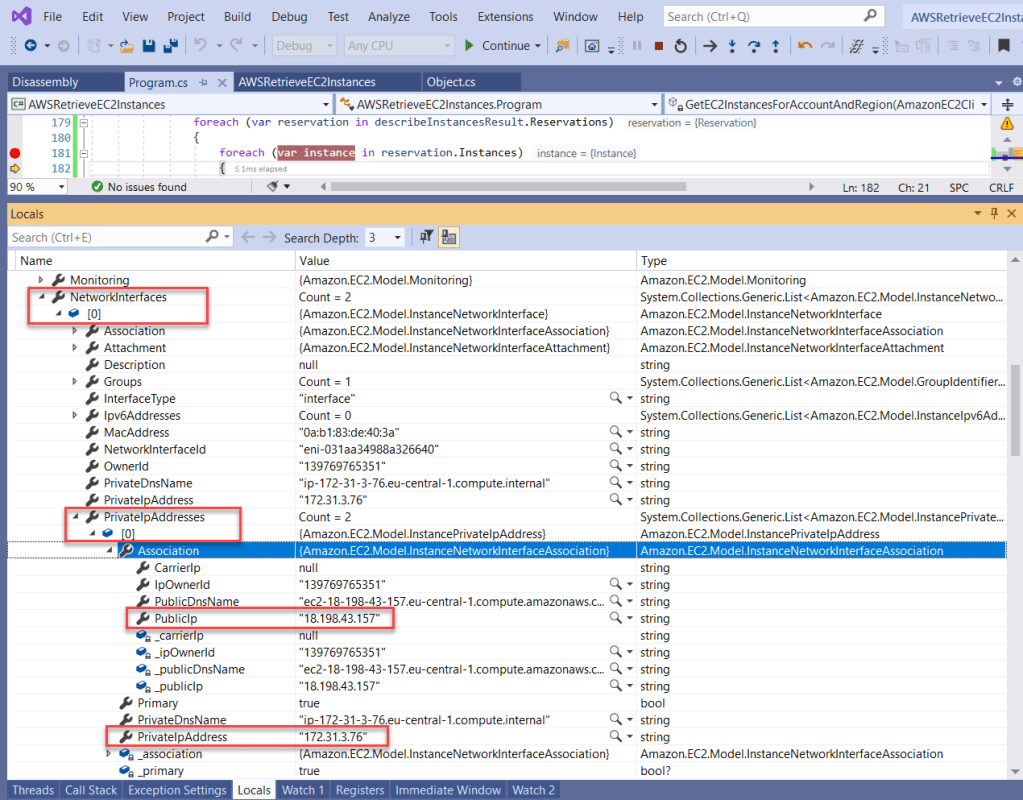
Under the Instance object, there’s a property called NetworkInterfaces, which is actually a List<InstanceNetworkInterface> that contains all the ENIs (elastic network interfaces) for that EC2 instance. Inside this entry there’s a PrivateIpAddresses property, which is a List<InstancePrivateIpAddress> that contains all the private IP addresses configured on the ENI. Each private IP address entry has an Association property which – should a public IP be mapped to the respective private IP – will contain a PublicIP property.
So all we’ll have to do to build the list of IPs is just to iterate through the 2 lists defined above (ENIs and private IPs), collect each private IP, and – should an associated public IP exist – take that as well.
All this instance data obtained per each account and each region is added to a list which – when the code completes – will contain all the EC2 instance data across all the AWS accounts and the enabled regions inside each, which was our end goal.
A glance over the methods the code will be broken into:
Main: iterates through the list of accounts, and for each account goes through its enabled regions, and collects info about all EC2 instances in eachGetAWSAccounts: gets the accounts present in the current AWS organization. The organization is identified based on the default credentials, as detailed in the next sectionGetEC2ReadAccessRoleCredentials: builds the role ARN in the supplied account id and gets the temporary credentials. The access key used is implicit, therefore either environment variables or the default profile must be used, as described in the next sectionGetEC2EnabledRegions: gets the regions enabled for the account where the supplied credentials are validGetEC2InstancesForAccountAndRegion: gets the EC2 instances for the supplied AmazonEC2Client object, itself build against a specific account and region. Explicitly builds the list of private/public IPs for each instance and returns all the instances found. Takes anAccountparameter, but only in order to extract the AWS account information and add it to the EC2 instance’s data
Credentials required for running the IAM code
Running the code described previously will require the credentials of an IAM user. This user should be allowed to list the accounts within the organization (see figure 16) and assume the “EC2ReadAccess” role that must already exist under each of the accounts (and that we introduced back in section “Permissions: IAM Users”).
Specifying the credentials of this IAM user can be done in 8 ways currently, as listed here. For our code, once compiled, 2 options can be quickly used. The first is to place the access key inside the .aws\credentials file. You can do this either manually, or by using AWS CLI’saws configure to quickly create this, as described here. Just make sure your credentials file ends up with a default profile, as follows:
[default]
aws_access_key_id=<AWS_ACCESS_KEY>
aws_secret_access_key=<AWS_SECRET_KEY>
The second way is to use environment variables in the console used to run the executable file, as described here. If you’re running the code from within Visual Studio, you can use the project’s properties “Debug” tab to specify the environment variables to be used when invoking the resulting process.
Code for retrieving EC2 instances using IAM users
Requirements for running the code:
- Create a new ‘console app’ type of project and place the code below in the default
.csfile. The code supports both .NET Core/.NET 5 and .NET Framework - SDK for the chosen framework installed (.NET Core/.NET 5 or .NET Framework)
- NuGet packages:
AWSSDK.EC2,AWSSDK.SecurityToken,AWSSDK.Organizations. These 3 are enough if you’re working with .NET Core/.NET 5. If you’re targeting .NET Framework, then you’ll also needSystem.Text.Json - An AWS role defined in every account within the organization, called “EC2ReadAccess”. How to provision this automatically to all the accounts is described in the section “Automatically deploying IAM roles to all accounts” below
- An IAM user allowed to assume the role described above
- Ensure you have valid credentials for the IAM user defined above, as specified in the “Credentials required for running the IAM code” section. There’s no access key to be placed in the code, as this is automatically picked up from the system settings
IAM code follows:
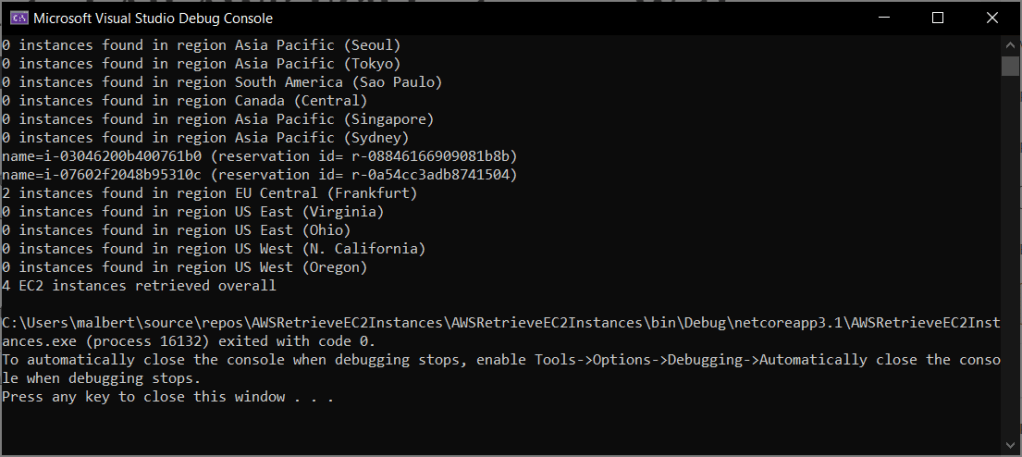
Partial console output:
Sample output of .json file:
[
  {
    "InstanceId": "i-08d63831da0b07bcc",
    "InstanceType": "t2.micro",
    "PrivateIpAddresses": "172.31.17.200",
    "PublicIpAddresses": "",
    "AWSAccountName": "Development",
    "AWSAccountId": "451629441155"
  },
  {
    "InstanceId": "i-063e42032aaef6e4e",
    "InstanceType": "t2.micro",
    "PrivateIpAddresses": "172.31.35.17",
    "PublicIpAddresses": "54.187.3.95",
    "AWSAccountName": "Development",
    "AWSAccountId": "451629441155"
  },
  {
    "InstanceId": "i-03046200b400761b0",
    "InstanceType": "t2.small",
    "PrivateIpAddresses": "172.31.3.76,172.31.9.210,172.31.15.7,172.31.9.189,172.31.8.195",
    "PublicIpAddresses": "18.198.43.157,18.198.233.241,52.59.78.34",
    "AWSAccountName": "mihai-albert",
    "AWSAccountId": "139769765351"
  },
  {
    "InstanceId": "i-07602f2048b95310c",
    "InstanceType": "t2.micro",
    "PrivateIpAddresses": "172.31.1.74,172.31.8.248",
    "PublicIpAddresses": "",
    "AWSAccountName": "mihai-albert",
    "AWSAccountId": "139769765351"
  }
]
Automatically deploying IAM roles to all accounts
One problem is how to provision our role that grants EC2 permissions (“EC2ReadAccess”) in all the target accounts. Sure, for the 3 accounts in the test AWS organization it’s quick work to create the role in each. But increase the number of accounts to a few dozen, and one needs to think of an automated way to do it.
One solution is to use AWS CloudFormation. We need just 3 objects:
- A CloudFormation template that describes the role
- A stack that will be based on the previous template
- A stack set that will deploy the stack defined previously across all the accounts of the organization
If you’re using CloudFormation Designer, simply expand “IAM” and drag a “Role” entry (hard hat icon) to the canvas, and edit the “Properties” entry so that it matches what’s seen below (JSON format is shown). Take care to update the id of the account where your IAM user is homed in.
"Properties": {
                "ManagedPolicyArns": [
                    "arn:aws:iam::aws:policy/AmazonEC2ReadOnlyAccess"
                ],
                "RoleName": "EC2ReadAccess",
                "AssumeRolePolicyDocument": {
                    "Version": "2012-10-17",
                    "Statement": [
                        {
                            "Effect": "Allow",
                            "Principal": {
                                "AWS": "arn:aws:iam::139769765351:root"
                            },
                            "Action": "sts:AssumeRole",
                            "Condition": {}
                        }
                    ]
                }
            }
There are 3 properties* defined. One is the name of the role. The other 2 represent each one of the parts required by our role: the trust policy and the permissions policy, respectively.
You’ve noticed by now that ManagedPolicyArns contains the ARN of the permissions policy, which will point to the “AmazonEC2ReadOnlyAccess” managed policy discussed already. The AssumeRolePolicyDocument is simply the trust policy, which you can copy verbatim from an existing role (back in figure 9 simply click the “Edit trust relationship” button to see the JSON). Our trust policy simply allows principals in account 139769765351 (the master/management account of the test organization) to assume this role, as we’ve seen at length previously in the “Permissions: IAM Users” section.
Save the template – either on the disk or in an S3 bucket.
With the template done, it’s time to place all the resources – in our case just the blueprint of our role – inside a CloudFormation stack. Create a new stack (choose “With new resources (standard)”) and reference the template we’ve just created. Leave the other options and parameters to the default, and create the stack. Once done, the provisioning process will push the resources within – in our case just the “EC2ReadAccess” role – to the current account where the CloudFormation stack has been defined.
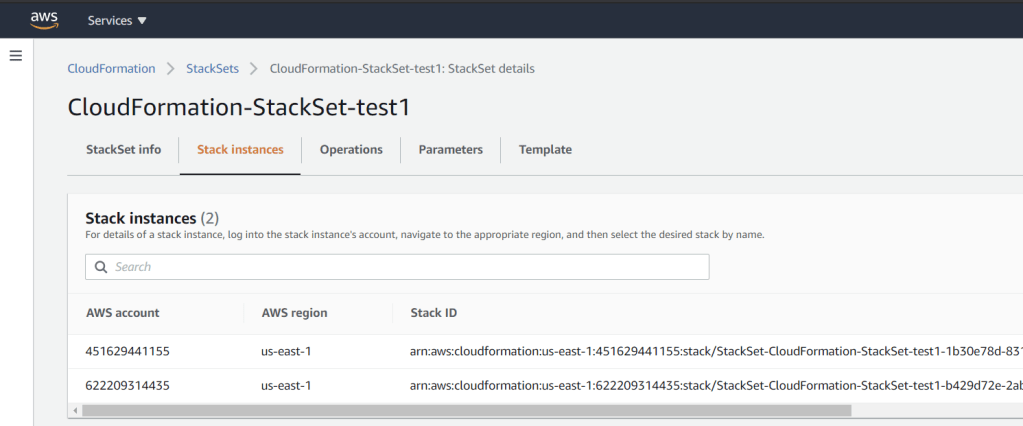
The last step is to use a CloudFormation stack set to push the stack to all the remaining accounts within the AWS organization. Leave the default settings (if you’re prompted to enable “Trusted access with AWS Organizations”, accept this). Make sure you’re using the “Deploy to organization” option, and choose “US East (N.Virginia)” as the region. Why this region, particularly since objects in IAM – such as the role we’re defining – are global objects, not tied to a particular region? After all, IAM doesn’t need nor support region selection in the management console. The thing is that you must select at least one region to continue, so we’ll use that one (which translates to us-east-1) based on our previous discussion that this will be enabled by default, and cannot be disabled.
Once the stack set completes deploying, you should find stack instances successfully configured for all the accounts except the one where the stack was initially provisioned. Here’s how this looks like for my test organization – as the stack was initially deployed in the master/management account, the stack instances show up only for the other 2 AWS accounts – “Development” and “Production”:
Permissions: SSO
If you search for the SSO* service – named AWS Single Sign-On – within the list of all AWS services, you’ll see this listed alongside the IAM one. The thing is that AWS SSO is a full-fledged service, as opposed to just an “add-on” that would come on top of the IAM service. It’s defined at the AWS organization level, and by default, it has its own directory of users and groups.
If logging using the root user or an IAM one in the management console required going to https://console.aws.amazon.com, the portal URL for SSO is different. Its URL is of the form https://subdomain.awsapps.com/start. By default the subdomain automatically generated by AWS is in id form (eg for my test AWS organization, the URL is https://d-9a672b8496.awsapps.com/start) but can be changed to something more human-friendly.
As it has its own users and groups, as well as its dedicated user portal for access, AWS SSO doesn’t hijack whatever is defined in the IAM service, but only offers an additional way in.
Permissions are granted using “permission sets”, and the nice thing is that they can be easily made to span multiple accounts, unlike IAM. Permission sets translate to IAM roles defined within the chosen AWS accounts (yes, there is a link between AWS SSO and AWS IAM). As this article goes on to say: “Permission sets ultimately get created as IAM roles in a given AWS account, with trust policies that allow users to assume the role through AWS SSO.“
Here’s the user portal start page when logging in with an SSO user:

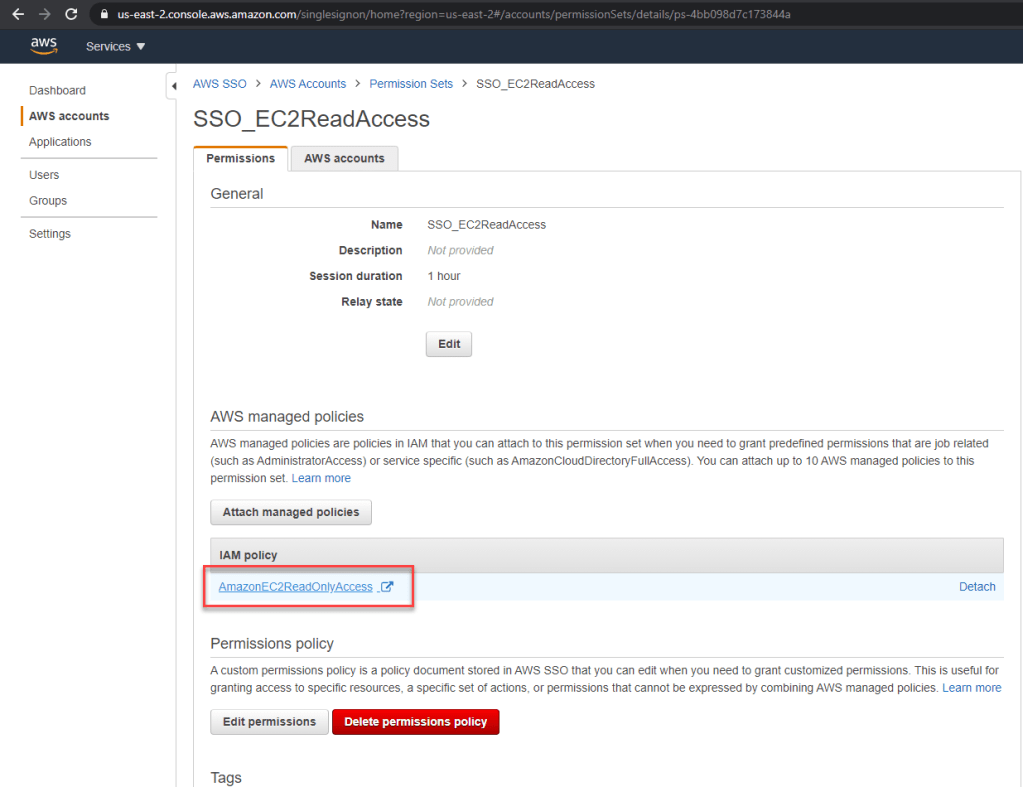
The “Development” AWS account has been expanded, showing the roles that the user can assume. In the current configuration, there’s a single permission set created and assigned to this AWS account: “SSO_EC2ReadAccess”.
Looking at this permission set’s definition, we can see that’s referencing the same AWS managed policy we’ve been using in the previous IAM section – “AmazonEC2ReadOnlyAccess”:
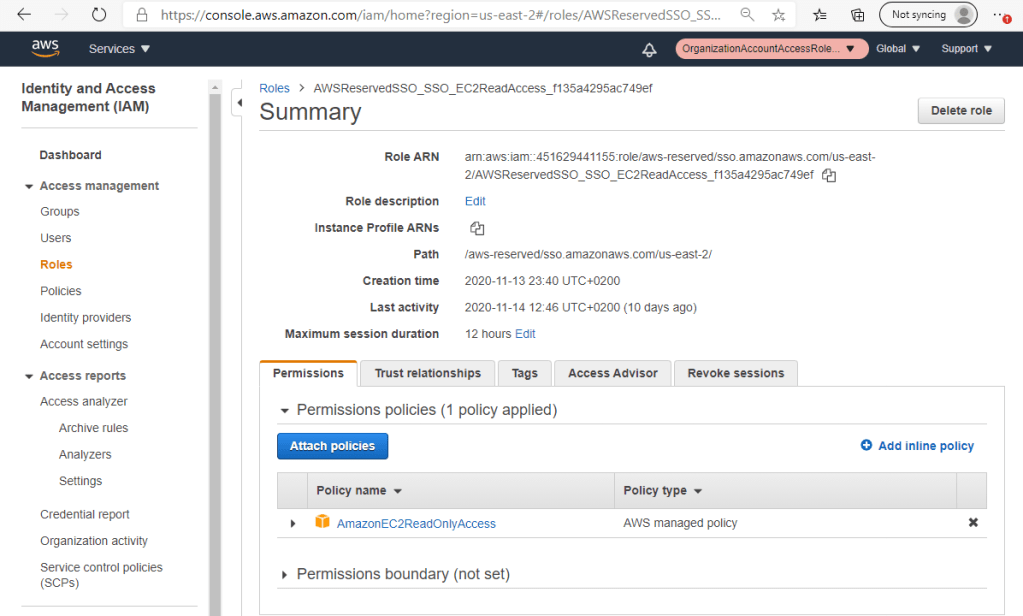
As I’ve provisioned this permission set against all 3 AWS accounts in my test organization, an IAM role will show up under each AWS account targeted. The IAM roles created under each account will have their names based on the permission set; in our case, each role will be named “AWSReservedSSO_SSO_EC2ReadAccess_<64bitguid>”.
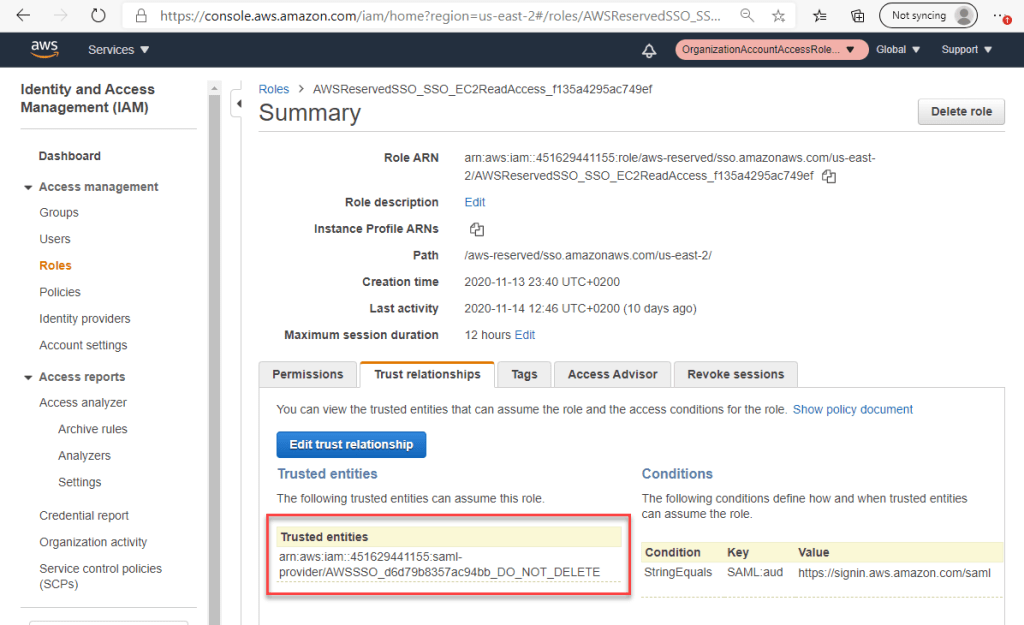
Let’s take a look at the role configuration within the “Development” account, as it shows up in IAM. The permission part is identical to what we’ve seen previously in figure 7 – it contains the AWS managed policy (“managed” meaning supplied by AWS) granting EC2 read-only access:
The second part of the role configuration is slightly different. We no longer have the master/management account’s id specified as a trusted entity as could be seen back in figure 9 but instead, a cryptic ARN that’s tied to the AWS SSO service which – just guessing here – allows the SSO principals access to assume the role. You’ll also see a condition specified, that’s referencing the audience attribute of a SAML token:
Notice that we don’t have to explicitly care about granting permissions for assuming the role to principals anymore, unlike our IAM user which had to be granted a specific policy – seen back in figure 5 and in our diagram (back in figure 2, next to “IAM User”). Instead, SSO users are simply assigned to specific AWS accounts, and have one or more permission sets assigned to them in those respective accounts.
Let’s now try and think what’s needed in order to get programmatic access via AWS SSO.
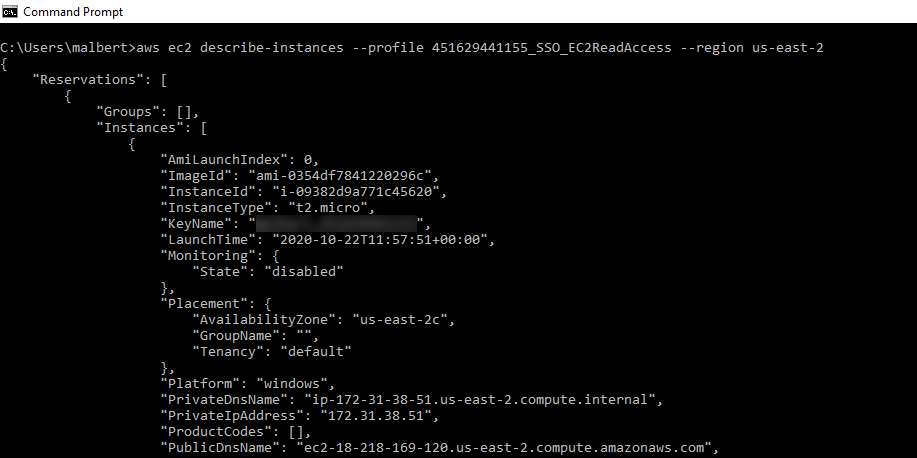
Getting an access key from the SSO portal is quite simple – just select the desired AWS account and click the “Command line or programmatic access” link for the role you’d like to assume. We’ve seen this for the “Development” account back in figure 20. Once the link is opened, the ready-to-paste text can be used directly, either in the credentials file, or via CLI parameters, environment variables, etc*. Here’s the result of placing the SSO credentials from the “Development” AWS account in the credentials file, and using the same command as before against this new profile: aws ec2 describe-instances --profile 451629441155_SSO_EC2ReadAccess --region us-east-2. Notice the same result as the one back in figure 12.
So once a key is obtained, using it appears to be identical – whether it came from an IAM or an SSO one. There’s a catch for SSO though: the access keys differ for each account, regardless it’s for the same permission set. So in our test AWS organization, the key for the “SSO_EC2ReadAccess” permission set under the “Development” account is different than the key for the “SSO_EC2ReadAccess” permission set that’s under the “Production” account. So we’re facing a problem: it’s no longer a single key to be used – as was the case with IAM users in the previous section – but one that is different with each role assumed under each account.
This complicates matters as we want to quickly iterate through all the accounts and retrieve all EC2 instances. What we’d need is a common thing that grants access to all the permission sets that a user has access to.
AWS SSO with Azure AD as IdP
At this point, we’re going to consider a specific setup: the one where AWS SSO is configured to use Azure Active Directory as its Identity Provider (IdP). In other words, we’ll be able to login to AWS using user accounts that exist in Azure AD. Once authenticated, whatever roles were granted to that specific user will be listed on the start page, just like it was discussed in the “Permissions: SSO” section.
We’re not going to go into too much detail regarding the Azure-AWS SSO integration, but these articles are good to follow: https://docs.microsoft.com/en-us/azure/active-directory/saas-apps/amazon-web-service-tutorial and https://docs.aws.amazon.com/singlesignon/latest/userguide/azure-ad-idp.html. One thing that I had to do eventually was to upload the metadata file extracted from AWS (AWS SSO->Settings->SAML 2.0 authentication) to Azure’s portal “Enterprise Application” blade’s Single sign-on menu.
Something worth noting is that just before changing the IdP provider you’ll get the following warning:
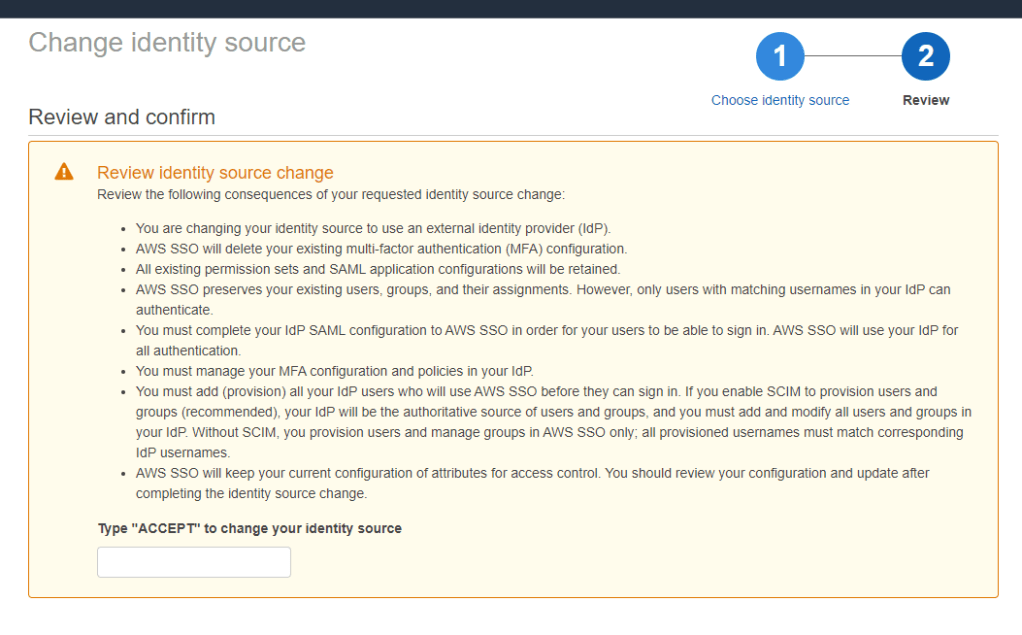
Since I didn’t configure automatic provisioning of the users in my test organization, all I had to do next was to create a user whose username matches the UPN of the Azure user to provide access, as the warning above instructed. The process of logging in to AWS now becomes:
Back to our search for a common thing that grants access to the permissions sets assigned to a user – under this new scenario there is one such thing actually issued to a user when logging to the user portal: its SAML token. Having the SAML token gets us access in turn to all the roles corresponding to the permissions sets assigned to our user, so we’ll use this in code in order to assume the role we’re after within each AWS account.
Getting a token
But first, let’s get a token. There are at least 2 ways of doing this: first, by extracting the token from within the browser, while the authentication occurs, or second, use the OIDC (OpenID Connect) workflow to get one.
The first method is actually listed here, and it consists of spotting the POST request that gets the token. The simplest way of tracking it is just to find the 2nd instance of sso-token within the list while logging on to the AWS SSO start page in Developer Tools mode, as seen below with Chrome:
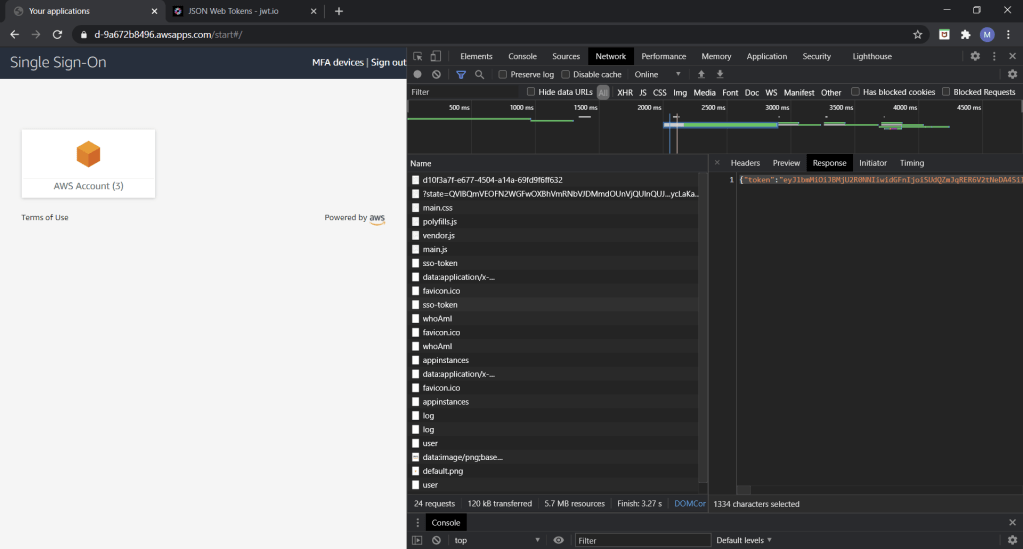
During my tests I’ve run across instances where thesso-token isn’t shown, due to a last page refresh. Simply check “Preserve log” and the entry will be always kept.
From the JSON object within the response, only extract the value corresponding to the token name. The second method is about doing the manual steps involved in OIDC. Before getting into details, let’s briefly talk about regions and AWS SSO. The important thing to keep in mind is the region the AWS SSO service is configured to use. If we don’t have the right information, we’ll come across some strange messages when trying to get the token*. For my test organization, this happens to be us-east-2, as that was the region I had selected in the management console when I initially enabled AWS SSO for the organization (as documented here).
If you don’t know the region, you can easily find it out, using one of the 2 methods below:
- Simply login to the SSO portal, and you’ll be able to spot the region in the AWS URLs being redirected through. For example in movie 2, the
us-east-2region can be clearly seen at the 10-second mark - If you have sufficient rights, go to “AWS SSO” -> “Settings” -> “SAML 2.0 authentication” and look for the “AWS SSO ACS URL” and “AWS SSO issuer URL”
Back to OIDC, what is AWS’s implementation actually about? The AWS CLI’s aws sso-oidc help text has the answer: “AWS Single Sign-On (SSO) OpenID Connect (OIDC) is a web service that enables a client (such as AWS CLI or a native application) to register with AWS SSO. The service also enables the client to fetch the user’s access token upon successful authentication and authorization with AWS SSO.“
There are 3 commands that can be used, and we’ll make use of all to finally obtain the user’s token, in the following order:
aws sso-oidc register-client --client-name CLI_test --client-type public --region <your_SSO_region>aws sso-oidc start-device-authorization --client-id <previously_obtained> --client-secret <previously_obtained> --start-url <your_SSO_start_url> --region <your_SSO_region>- Open a browser and navigate to the value seen in the
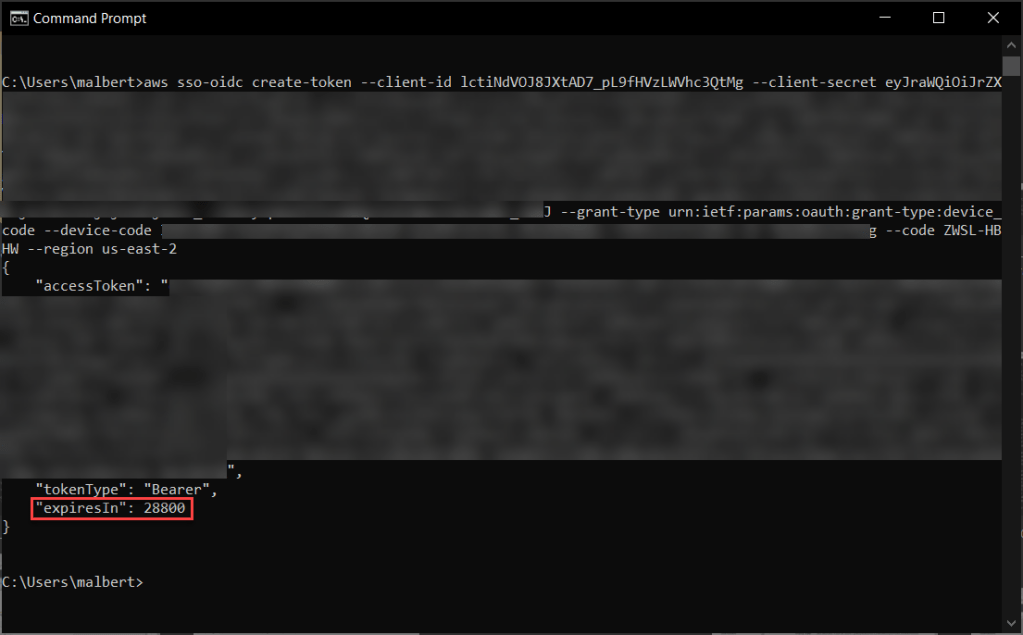
verificationUriCompletevalue obtained earlier. On the “Single Sign On” screen, click the “Sign in to AWS CLI”. You should get a message telling you that “You have been successfully signed in to the AWS CLI” aws sso-oidc create-token --client-id <previously_obtained> --client-secret <previously_obtained> --grant-type urn:ietf:params:oauth:grant-type:device_code --device-code <previously_obtained> --code <previously_obtained (userCode)> --region <your_SSO_region>
If everything goes well, you should see JSON output that contains an accessToken entry – its value is the SAML token. If you’re getting any error, have a look at the possible issues here.
Building the code for retrieving EC2 instances using SSO users
Now that we have the SAML token, we’ll just use it in code to authenticate to the SSO service, and then in turn assume a specific role we’re after – which corresponds to a permission set – in all the AWS accounts we have access to.
The code will be similar in part to what we’ve done previously for IAM users, particularly retrieving the EC2 data which is almost identical.
Unlike the IAM code, here we no longer care about the correct regional STS endpoints for authentication. Our only job is to supply the correct region when building the unique AmazonSSOClient in the beginning. Once the GetRoleCredentialsAsync method gets called in order to retrieve the temporary credentials for each of the AWS accounts (targeting the hardcoded “SSO_EC2ReadAccess permission set*), a request will be made to an SSO endpoint*. What’s more, those temporary credentials will actually work against regions that have been manually enabled under the respective AWS account, without any concern as to which endpoint was contacted and whether the session token is valid, like we had to watch out for when writing the IAM code.
Obtaining the enabled regions per each AWS account is done similar to the IAM code, by calling DescribeRegionsAsync against an AmazonEC2Client built against the region that we know is always active (us-east-1). Then we iterate through all these regions, and for each build an AmazonEC2Client against the current region and reusing the temporary credentials obtained earlier (once per AWS account). Calling DescribeRegionsAsync retrieves the EC2 instance data for that respective region, which we incrementally add to a list of objects that – when the code completes – will contain info about all the EC2 instances under all the AWS accounts and their corresponding enabled regions.
Code for retrieving EC2 instances using SSO users
Requirements for running the code:
- Create a new ‘console app’ type of project and place the code below in the default
.csfile. The code supports both .NET Core/.NET 5 and .NET Framework - SDK for the chosen framework installed (.NET Core/.NET 5 or .NET Framework)
- NuGet packages required:
AWSSDK.EC2,AWSSDK.SSO. These 2 are enough if you’re working with .NET Core/.NET 5. If you’re targeting .NET Framework, then you’ll also needSystem.Text.Json - Manually get an access token as described here, and place this as the value for the
providedAccessTokenvariable - Identify your SSO region as described in the 2nd half of this section, and replace the
RegionEndpoint.USEast2present in the code accordingly. Using the wrong value will throw an exception* - Obtain the name of the role you’ve been assigned against all the accounts, as seen on your user portal start page, and assign this value to the
ssoRoleNamevariable. Using the wrong value will throw an exception*
The outputs – both for console and the json file exported, are similar to what the IAM code produced and can be found there.
SSO code follows:
Q&A
Permissions
Q: Where can I read about the various ways of using AWS credentials, such as profiles, credential files, etc?
A: There is an excellent article here https://aws.amazon.com/blogs/security/how-to-use-a-single-iam-user-to-easily-access-all-your-accounts-by-using-the-aws-cli/ that describes the credential providers for AWS, and the order they’re processed. From the article: “The AWS CLI will look for credentials on each call in this order: command-line options, environment variables, AWS credentials file, CLI configuration file, and instance profiles“
Q: In which account do the SSO users “live” in? Eg for IAM users, they would “live” in one account, and could be granted permissions across different accounts.
A: The SSO users live within the SSO service itself, not the IAM one. However, the permission sets they can be granted translate into IAM roles. Explained in the 2nd paragraph here https://docs.aws.amazon.com/singlesignon/latest/userguide/permissionsetsconcept.html.
Q: Can multiple roles be used at the same time by a user? Or expressed in another way – can a user assigned 2 or more roles use the set of permissions conferred by all those roles at once?
A: Short answer: no. The roles can be used independently, but a user cannot use 2 or more roles at once. See https://stackoverflow.com/questions/48876077/assume-multiple-aws-iam-roles-are-a-single-time
Q: Can permissions be granted cross-account in AWS only by using roles?
A: No. Using roles is just one way to achieve this. Another one is to use resource-based policies, as described here https://docs.aws.amazon.com/IAM/latest/UserGuide/id_roles_compare-resource-policies.html. Do note that not every service though supports resource-based policies: the article here https://docs.aws.amazon.com/IAM/latest/UserGuide/reference_aws-services-that-work-with-iam.html specifically states that resource-based policies aren’t supported for the STS service.
Q: Can an IAM role be renamed?
A: A role cannot be renamed, as described here https://stackoverflow.com/questions/42488833/rename-an-iam-role. You’ll have to delete and recreate the role.
Q: Can an IAM policy be renamed?
A: No, a policy can’t be renamed either: https://stackoverflow.com/questions/45598401/how-to-rename-an-aws-customer-iam-policy
Q: Back in figure 5, the explicit permissions assigned to the IAM users is sts:AssumeRole. What’s “sts”?
A: STS stands for “security token service”. It’s AWS STS that provides temporary security credentials. As such, using IAM roles relies on AWS STS.
Q: Is the trust policy for a role required in case of inter-account resource access?
A: Yes. This article https://awscli.amazonaws.com/v2/documentation/api/latest/reference/sts/assume-role.html states very clearly the need for the trust relationship for the roles: “To assume a role from a different account, your AWS account must be trusted by the role. The trust relationship is defined in the role’s trust policy when the role is created. That trust policy states which accounts are allowed to delegate that access to users in the account.“
Q: For the profiles within the credentials file, I somehow get an extra attribute added for each of them, called toolkit_artifact_guid. What triggers this one to show up?
A: It’s due to Visual Studio’s “AWS Explorer”. There’s a Stack Overflow thread about it here https://stackoverflow.com/questions/46308386/what-does-toolkit-artifact-guid-mean-in-aws.
Q: Are SSO identities supported in AWS Explorer?
A: Federated identities are not currently – as of Dec 2020 – supported in AWS Explorer. I’ve opened an issue for this here https://github.com/aws/aws-toolkit-visual-studio/issues/128.
Q: I’d like to get a better understanding of the IAM service in AWS. Where should I look?
A: I strongly recommend watching the Pluralsight courses by Brian Eiler around Identity and Access Management. Also, have a look here https://aws.amazon.com/iam/faqs/ and https://aws.amazon.com/blogs/security/now-create-and-manage-aws-iam-roles-more-easily-with-the-updated-iam-console/ for a very nice description of roles
Q: Is the AWS SSO username case-sensitive?
A: If not yet integrated with any IdP provider – eg using the built-in directory – then the username is indeed case-sensitive.
Q: Once an IdP provider is configured, can the users defined within the AWS SSO built-in directory used to login?
A: The users in the builtin SSO directory can’t be used for logging in anymore, as all the authentication requests will be forwarded to the IdP provider. However, they won’t be deleted, and can still be found there.
Q: Why didn’t you use the AssumeRoleWithSAML method, described here https://docs.aws.amazon.com/STS/latest/APIReference/API_AssumeRoleWithSAML.html?
A: I planned on doing so initially, but noticed that the roles’ ARNs have to be specified. This is a problem, as those would have to be retrieved first, and their cryptic format (“Role ARN” at the top of figure 22) can’t really be deduced from the permission set as it appears in the SSO service (in our case, “SSO_EC2ReadAccess”).
Q: Where can I find more information about the AWS SSO service?
A: Start with the official FAQ here https://aws.amazon.com/single-sign-on/faqs/. Have a look at this article https://docs.aws.amazon.com/singlesignon/latest/userguide/iam-auth-access.html
Q: How does the SSO service have so many permissions against all the accounts, so that it can “push” the permission sets across all AWS accounts?
A: This is very well described here https://docs.aws.amazon.com/singlesignon/latest/userguide/using-service-linked-roles.html. A small snippet from the beginning of the article: “AWS Single Sign-On uses AWS Identity and Access Management (IAM) service-linked roles. A service-linked role is a unique type of IAM role that is linked directly to AWS SSO. It is predefined by AWS SSO and includes all the permissions that the service requires to call other AWS services on your behalf“.
Q: I remember reading about some tokens that could only be used in specific regions. Was that about AWS SSO?
A: Most likely it’s about the IAM’s STS service, which issues tokens. Have a look here https://docs.aws.amazon.com/IAM/latest/UserGuide/id_credentials_temp_enable-regions.html about which tokens can be used where depending on which regions are enabled or not.
Q: Can’t I just use aws sso configure in order to get the SAML token (when using SAML integration, of course)?
A: You won’t get the SAML token when running that CLI command, but only get a profile created that allows you to assume a specific permission set’s corresponding role in a specific AWS account.
Q: I’m getting Amazon.SSO.AmazonSSOException: 'The requested role with name <name> does not exist' when calling AmazonSSOClient‘s GetRoleCredentialsAsync. I know I’m using the correct name for the role, since I’ve checked within the IAM console for the exact name of the role in the target account (AWSReservedSSO_<role_name>_<64bitguid>).
A: Make sure you’re using the permission set name, not the names of the IAM roles as they gets provisioned in the target accounts. For my AWS test organization, the name of the permission set used is “SSO_EC2ReadAccess”, while the name of the IAM role provisioned in each of the 3 AWS accounts is “AWSReservedSSO_SSO_EC2ReadAccess_<64bitguid>”, with the guid different across the accounts.
Q: I’m getting the following exception when running the SSO C# code: Amazon.SSO.Model.UnauthorizedException: 'Session token not found or invalid'. What’s wrong?
A: Check that indeed your SAML token is valid and was copied correctly (see the “Getting a token” section). Also make sure you’re using the correct region when building the AmazonSSOClient, as using the wrong one will result in the same exact message; have a look at the “Getting a token” section for how to identify the correct region.
Q: Are the roles’ ARNs (Amazon Resource Names) case sensitive?
A: Yes! This goes both for IAM roles, as well as the SSO permission sets. For IAM, trying to use a misspelled role ARN will throw an error. Here’s what I get when using the wrong case for just a single letter: User: arn:aws:iam::139769765351:user/malbert is not authorized to perform: sts:AssumeRole on resource: arn:aws:iam::451629441155:rOle/EC2ReadAccess. For SSO, trying to run AmazonSSOClient‘s GetRoleCredentialsAsync with the wrong case for the permission set name will result in an exception; here’s what I get when one letter’s case is wrong: Amazon.SSO.AmazonSSOException: 'The requested role with name SSO_EC2ReadAccesS does not exist'. This is also documented here https://docs.aws.amazon.com/singlesignon/latest/userguide/permissionsetsconcept.html.
Q: What are AWS access keys and what are the best practices around them?
A: This article https://docs.aws.amazon.com/general/latest/gr/aws-access-keys-best-practices.html describes things very nicely.
Q: Can I use the access keys of the root user to assume roles?
A: According to the documentation here https://docs.aws.amazon.com/STS/latest/APIReference/API_AssumeRole.html, this is not possible. In code, if you attempt to call AmazonSecurityTokenServiceClient‘s AssumeRoleAsync with a root user’s access key you’ll get Roles may not be assumed by root accounts.
Q: Can I login with an SSO user within the AWS CLI?
A: Yes. This is detailed here https://docs.aws.amazon.com/cli/latest/userguide/cli-configure-sso.html. The post announcing this feature, back when it appeared, is here https://aws.amazon.com/blogs/developer/aws-cli-v2-now-supports-aws-single-sign-on/.
Q: How long are the temporary credentials issued when assuming an IAM role valid?
A: As this article https://awscli.amazonaws.com/v2/documentation/api/latest/reference/sts/assume-role.html states: “By default, the temporary security credentials created by AssumeRole last for one hour.” Note that the IAM code listed in the article doesn’t take this into account, and for large AWS organizations that take long to iterate through all accounts you might run into problems.
Q: How long are the AWS SSO access tokens valid for?
A: They’re valid for 8h by default. Have a look below at one such token obtained using the 2nd method discussed in the article (only the 3rd command is shown). Note that we’re talking about the token that AWS SSO hands back right when the user logs in. This is not the access token issued by the IdP (Identity provider), as in Azure by default this is valid for 1h, nor the time limit for the assumed roles, which are detailed here https://docs.aws.amazon.com/singlesignon/latest/userguide/howtosessionduration.html.
Q: When using the IAM user in the master/management account to assume the role within the same account, are both the IAM policy attached to the IAM user and the role’s trust policy required?
A: From this article https://awscli.amazonaws.com/v2/documentation/api/latest/reference/sts/assume-role.html, regarding same-account resource access: “A user who wants to access a role in a different account must also have permissions that are delegated from the user account administrator. The administrator must attach a policy that allows the user to call AssumeRole for the ARN of the role in the other account. If the user is in the same account as the role, then you can do either of the following: [1] Attach a policy to the user (identical to the previous user in a different account) [2] Add the user as a principal directly in the role’s trust policy“. So only keeping one of the 2 entities should do, in this intra-account scenario.
EC2 instances
Q: Why am I getting instances that have already been terminated in the describe-instances output?
A: Note that using describe-instances could result in instances that have been terminated to still show up 1h after the event took place, as described here https://awscli.amazonaws.com/v2/documentation/api/latest/reference/ec2/describe-instances.html
Q: How many adapters and private IPs can a specific instance type have?
A: The detailed table is here https://docs.aws.amazon.com/AWSEC2/latest/UserGuide/using-eni.html#AvailableIpPerENI
Q: When an EC2 instance is stopped, are the private/public IPs still kept?
A: The private IPs are always kept when an EC2 instance is stopped. As per https://docs.aws.amazon.com/vpc/latest/userguide/vpc-ip-addressing.html#vpc-private-ipv4-addresses: “A private IP address remains associated with the network interface when the instance is stopped and restarted, and is released when the instance is terminated“. For public IPs, if we’re talking about the one that gets automatically assigned to the primary ENI (should the subnet be configured to do so (by default it is) or if the launch operation for the EC2 instance specifically mandated this), then that public IP (there can only be one such address per instance) will get taken away when the EC2 instance is stopped. If the public IPs considered are EIPs (elastic IPs), then those will not be released when the machine is stopped, and will be kept associated with their respective ENIs (elastic network interfaces). This is covered here https://docs.aws.amazon.com/vpc/latest/userguide/vpc-ip-addressing.html#vpc-public-ipv4-addresses.
Q: What does “primary private IP” address means?
A: This notion is described here https://docs.aws.amazon.com/vpc/latest/userguide/vpc-ip-addressing.html#vpc-private-ipv4-addresses: “a primary private IP address from the IPv4 address range of the subnet is assigned to the default network interface (eth0) of the instance“. In the same article, a limitation of the primary private IP address is listed: “unlike a primary private IP address, you can reassign a secondary private IP address from one network interface to another. A private IP address remains associated with the network interface when the instance is stopped and restarted, and is released when the instance is terminated“.
Q: Can elastic network interfaces (ENIs) be detached and attached to other EC2 instances?
A: Yes. This is specifically stated here https://docs.aws.amazon.com/vpc/latest/userguide/VPC_ElasticNetworkInterfaces.html: “You can create a network interface, attach it to an instance, detach it from an instance, and attach it to another instance. A network interface’s attributes follow it as it is attached or detached from an instance and reattached to another instance“. This is somewhat different than Azure, where “the network interfaces you add to a VM can’t currently be attached to another VM” as described here https://docs.microsoft.com/en-us/azure/virtual-network/virtual-network-network-interface-vm#constraints. However in AWS “you cannot detach a primary network interface from an instance” as per the same article above, whereas in Azure there’s no such restriction.
Q: I have an EC2 instance with one ENI (elastic network interface), that’s set to automatically receive an auto-assigned public IPv4 address. If I add another private IP address, do I also get additional auto-assigned public IP addresses?
A: There are 2 cases: 1) you add a private IP address on the same ENI, case 2: you add a private IP address on a new ENI. Neither case will get you a new auto-assigned IP, even though the underlying subnet might have the attribute that dictates whether auto-assigned public IPs are handed out set. But for case 2, you have to be careful: even though the public IP corresponding to the primary private IP is temporarily kept, if the instance is stopped and restarted then the public IP is lost, as AWS detects the machine has now 2 ENIs, and won’t auto-assign any public IP, leaving you with none. This is described here https://docs.aws.amazon.com/AWSEC2/latest/UserGuide/using-instance-addressing.html#concepts-public-addresses. Remove the extra ENI and stop/start the instance, and you’ll get the auto-assigned public IP back.
Q: Can I allocate an EIP (elastic IP) to a private IP on an ENI (elastic network interface) that already has an existing pair of private/public IP assigned?
A: Yes. When associating an EIP you can select the specific ENI, and the particular private IP address to which you want it assigned.
Q: Can I move an ENI (elastic network interface) to a different subnet?
A: No. As stated here https://docs.aws.amazon.com/AWSEC2/latest/UserGuide/using-eni.html ENIs can’t be moved to different subnets: “[…]as network interfaces are specific to subnets“. This is different in Azure, where a vmNic can be associated to a different subnet.
Q: What’s a public subnet?
A: From here https://docs.aws.amazon.com/vpc/latest/userguide/VPC_Scenario2.html: “A public subnet is a subnet that’s associated with a route table that has a route to an Internet gateway“.
Q: Where can I learn more about VPCs (virtual private clouds) and subnets?
A: Start here https://docs.aws.amazon.com/vpc/latest/userguide/VPC_Subnets.html
Miscellaneous
Q: When building the AmazonSecurityTokenServiceClient object, I’m passing the region as well. However, I can see that the requests to the service are still being sent to the global STS endpoint https://sts.amazonaws.com for some of the regions. Why aren’t these requests sent to the regional endpoints? (eg https://sts.eu-west-2.amazonaws.com)
A: If you’re simply passing the region to the AmazonSecurityTokenServiceClient constructor, then the resulting AmazonSecurityTokenServiceConfig‘s StsRegionalEndpoints property will have a value of Legacy. This in turn controls the endpoint used for the legacy regions. As per the documentation here https://docs.aws.amazon.com/sdkfornet/v3/apidocs/items/SecurityToken/TSecurityTokenServiceConfig.html: “StsRegionalEndpoints should be set to StsRegionalEndpointsValue.Legacy to resolve to the global sts endpoint (only for legacy global regions) or StsRegionalEndpointsValue.Regional to resolve to the regional sts endpoint. The default value for StsRegionalEndpoints is StsRegionalEndpointsValue.Legacy.” Considering a slightly modified version of the code shown in the article, whereby credentials are obtained per each region, followed by connecting against the EC2 service for that region, below is the output from Visual Studio while debugging under 2 scenarios – the first with the regional endpoints being used (StsRegionalEndpoints = StsRegionalEndpointsValue.Regional) and the second with the global endpoint used for the regions enabled by default (StsRegionalEndpoints = StsRegionalEndpointsValue.Legacy). Note that even if the setting controlling the use of the regional endpoint is set to Legacy, the underlying API is smart enough to use the regional endpoint ap-northeast-2 region, because that’s not a legacy global region, just as the documentation mandates.

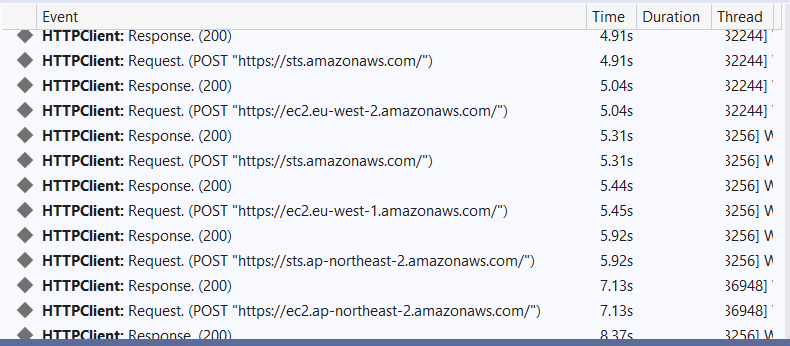
Q: I’ve created a new AWS account about a month back. I’m trying to launch an instance in this account under one of the regions that are enabled by default, but I’m running into the error below. What’s wrong?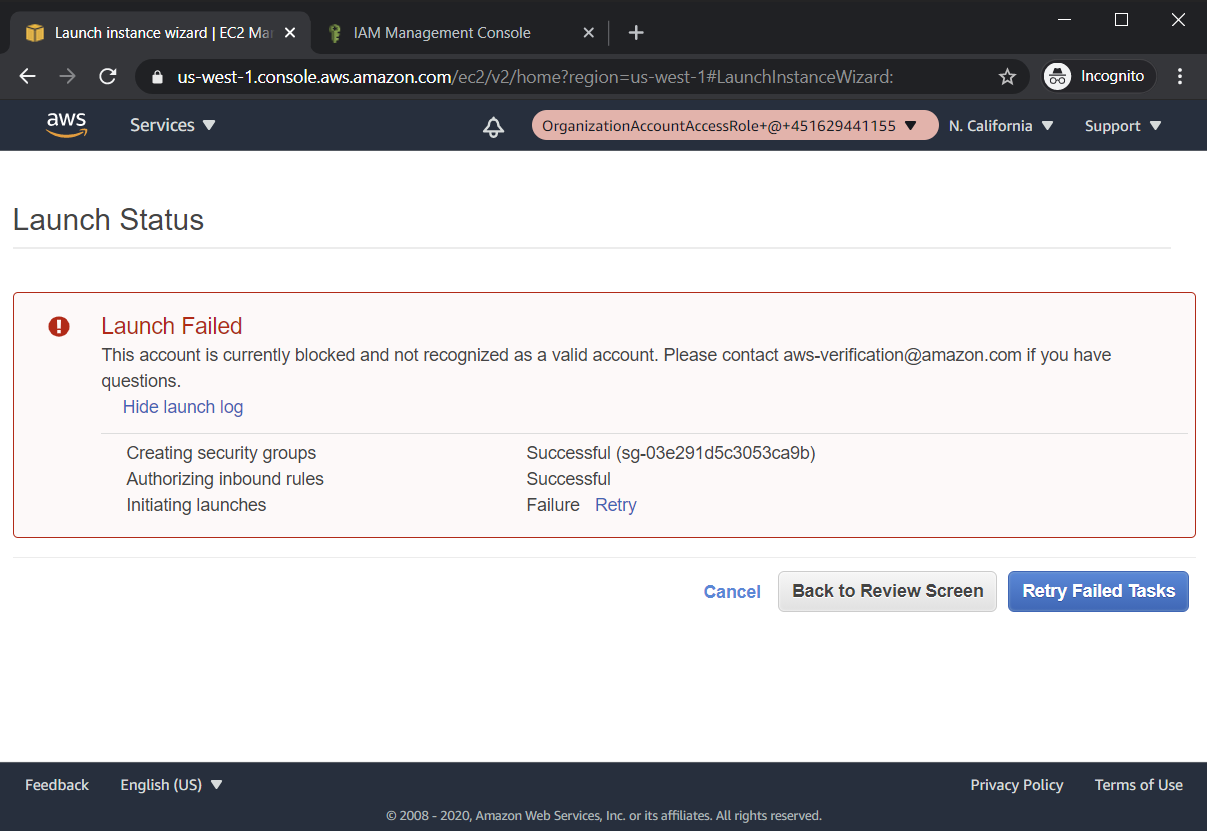
A: I’ve run into this myself, and eventually talked to AWS Support. Turns out it takes a few months for all the regions to be available for a new account (the reason is that this is a protection against surcharges by accident). By default, one cannot provision resources but in a limited number of regions. For my test accounts for example, only 3 regions are currently available: Oregon, Frankfurt, and Ohio. You can send an email to aws-verification@amazon.com to explain your scenario and ask for more regions to be enabled faster. Note that this isn’t about activating or querying resources under a specific region, but creating resources under the said regions. For my test organization, trying to create an EC2 instance under an already enabled region – but that’s not within the 3 mentioned above – resulted in the error above.
Q: I have an AWS organization composed of multiple AWS accounts. Can different regions be enabled for a specific service (eg EC2) under different accounts?
A: Sure. The list of regions enabled for a specific service can differ from account to account. For example, for IAM’s STS, the procedure for enabling or disabling the service in specific regions is discussed here https://docs.aws.amazon.com/IAM/latest/UserGuide/id_credentials_temp_enable-regions.html.
Q: Why use the us-east-1 region to retrieve the list of enabled regions per AWS account?
A: If you look in the IAM management console under “Account settings, it’s the only one that has a status of “Always active”, aside from the “Global Endpoint” generic one.
Q: When retrieving the list of enabled regions for a particular AWS account, why not start from the full list of known regions, and only keep those that are valid for the respective account?
A: This is indeed possible, and the plan would be to go through all the defined regions (RegionEndpoint.EnumerableAllRegions) and attempt to contact the STS service in order to get the temporary credentials when assuming the role. Those that work, ok, and those that don’t – eg because they aren’t enabled – will throw exceptions which we’ll handle silently.
The main problem with this approach is the time spent trying to interact with regions that aren’t enabled, and consequently waiting for the exceptions generated in turn.
Q: What endpoint is used by AWS SSO when AmazonSSOClient‘s GetRoleCredentialsAsync method is called?A: If you’re debugging using Visual Studio, you can easily capture this using the Events tab of the “Diagnostic Tools” window. In my AWS test organization, this is the endpoint used when the method is called against the “Development” AWS account: https://portal.sso.us-east-2.amazonaws.com/federation/credentials?account_id=451629441155&role_name=SSO_EC2ReadAccess
Q: I’ve seen that this post uses a hardcoded string for the permission set name, which is used to assume the backing IAM role within each account. But how can I retrieve the names of the permission sets for a given AWS account?
A: Use the code below. The last variable will contain a RoleList property, which is actually a List<Amazon.SSO.Model.RoleInfo>. The permission sets are included within. Take care to check if NextToken is null, as done in the blog post, as multiple result pages can be returned.
ListAccountRolesRequest listAccountRolesRequest = new ListAccountRolesRequest()
 {
       AccessToken = "<SAML_token>",
       AccountId = "<AWS_account_id"
};
var accountRolesResponse = await amazonSSOClient.ListAccountRolesAsync(listAccountRolesRequest);
Q: I’m running the aws sso-oidc create-token command, but running into the following message: An error occurred (InvalidGrantException) when calling the CreateToken operation:. What might be causing this?
A: Make sure you’re using the correct value for the grant-type parameter in the command, as seen in the “Getting a token” section. The same error is shown if you’re trying to run the correct command twice, eg after you’ve previously run it successfully to obtain a SAML token.
Q: I’m running the aws sso-oidc create-token command, but running into the following message: An error occurred (AuthorizationPendingException) when calling the CreateToken operation:. What is the issue?
A: Make sure you’ve used a browser to navigate to the verificationUriComplete value obtained from the aws sso-oidc start-device-authorization command, as seen in the “Getting a token” section. Once you’ve successfully signed in to AWS CLI, proceed with the aws sso-oidc create-token command.
Q: I’ve used a browser to navigate to the verificationUriComplete value obtained from the aws sso-oidc start-device-authorization command, as seen in the “Getting a token” section, but the page displays the following error: invalid_grant Invalid grant provided
A: Make sure you’re using the correct region where AWS SSO was originally configured. How to find out which one you have is also explained in the “Getting a token” section. Further details about the underlying cause of the issue are discussed here https://github.com/aws/aws-cli/issues/5058#issuecomment-623625562.
Q: What if I’m trying to assume a role within a target AWS account B using an IAM user in another account A, but the --region parameter refers to a region that’s enabled in account A, but not in account B. Will this succeed?
A: Let’s take region af-south-1, which currently (Dec 2020) doesn’t come enabled by default. In AWS CLI, the action would translate to aws sts assume-role --role-arn "arn:aws:iam::<id_of_account_B>:role/<role_name>" --role-session-name AWSCLI-Session --region af-south-1. If you run this you will get the following error: An error occurred (AccessDenied) when calling the AssumeRole operation: User: arn:aws:iam::<id_of_account_A>:user/<user_name> is not authorized to perform: sts:AssumeRole on resource: arn:aws:iam::<id_of_account_B>:role/<role_name>. You need to have the region enabled both in accounts A and B.
Q: What’s the endpoint used behind the scenes by AmazonOrganizationsClient‘s ListAccountsAsync?
A: If you’re using Visual Studio, you can easily see this while debugging using the Events tab of the “Diagnostic Tools” window. For the IAM code in this article, the endpoint is going to be https://organizations.us-east-1.amazonaws.com, as we’ve specifically chosen this region.
Q: How can I retrieve a list of all the regions that exist within AWS using AmazonEC2Client‘s DescribeRegionsAsync? I can see that this only returns the list of enabled regions within the respective AWS account.
A: Indeed – by default, only the enabled regions are returned, as detailed here https://docs.aws.amazon.com/cli/latest/reference/ec2/describe-regions.html. To retrieve all possible regions, use new DescribeRegionsRequest() { AllRegions = true } as the parameter for DescribeRegionsAsync.
Q: What is the master or management account?
A: As described here https://docs.aws.amazon.com/organizations/latest/userguide/orgs_getting-started_concepts.html, the management account is “the account that you use to create the organization“. The former name of the management account is the master account, and in order to avoid confusion, the article keeps both the old name and the new one where the concept is referenced.
Q: Can IAM users be stored in different regions within the same account?
A: No, unlike other services, the IAM service does not require region selection, as it’s explicitly stated in the management console if you click on the region drop-down. Therefore, there’s a single global “version” of its data, including the users defined, that applies to that respective account.
Q: What properties can be used to define an IAM role within a CloudFormation stack?
A: All the properties for an IAM role are explained very well here https://docs.aws.amazon.com/AWSCloudFormation/latest/UserGuide/aws-resource-iam-role.html?icmpid=docs_cfn_console_designer. If you’re looking for other types of objects, just look at the tree on the left on the documentation page, and you’ll find entries for all the objects that the CloudFormation designer can use.
Q: I’ve deployed a CloudFormation stackset and specified a particular region that’s not enabled in all my AWS accounts (eg af-south-1). Now the status of the deployment operation is failed, and I can’t change the region anymore. What can I do?
A: I’ve ran into this in my test organization, and had to do a bit of head-scratching to fix this. The problem is that deleting the stacks from the stack set prompts one to enter an AWS OU id. In my case, I don’t have my accounts structured under OUs, but instead they exist in the default root. By luck, I’ve stumbled across this post https://forums.aws.amazon.com/message.jspa?messageID=945017 and then the definition of the IDs here https://docs.amazonaws.cn/en_us/organizations/latest/APIReference/API_MoveAccount.html, which offered the way forward. The solution is to specify the last part of your organization id (found under “AWS Organizations” -> “Organize accounts”, go to the right and take the last part of the ARN of the root (in my case it’s “r-aom6”), and the wizard will remove the stacks successfully, plus clear the errors for those stacks that couldn’t be deployed to the region in the first place (since those weren’t enabled in the first place in some of the AWS accounts).
Q: I’m looking at AmazonEC2ReadOnlyAccess managed policy’s description in the management console, which reads: “Provides read only access to Amazon EC2 via the AWS Management Console.” But you’re using this programmatically as well. How come?
A: I noticed that too, and in the beginning, I thought I was on the wrong track regarding the correct permission policy to use – but in practice, it works just fine; after all, it’s the actual permissions granted inside that matter, not the description.
Q: Why doesn’t the CLI work across regions and is limited to only one per command?
A: As per this answer https://github.com/aws/aws-cli/issues/1777#issuecomment-181502727 “Since the CLI is a wrapper over service APIs, we can’t do multi-region searches unless the service supports it […]“. And the EC2 currently doesn’t support this.
Q: Why not show the CLI commands that would retrieve all the EC2 instances across all accounts and regions?A: I tried this initially, but things become cumbersome fast using the CLI. Iteration through the regions enabled within one AWS account can be done quickly, as shown here https://github.com/aws/aws-cli/issues/1777#issuecomment-246016300, but adding the additional iteration over all the accounts is not that straightforward. I’ve eventually asked this over a Stack Overflow thread https://stackoverflow.com/questions/64669426/how-to-iterate-through-multiple-aws-accounts, but the unanimous reply versus using CLI was basically “don’t do it”.
Q: I’m using Fiddler to observe the traffic generated by AWS CLI, but the commands hang inexplicably. What’s going on?
A: I’ve observed this myself, but not sure what the cause is. From my troubleshooting, it doesn’t appear to be the SSL interception done by Fiddler, as specifying --no-verify-ssl doesn’t resolve the issue.
Q: Can I specify the access key and secret access key directly on the command line in AWS CLI? What’s the parameter name to supply the credentials?
A: You can’t do this from AWS CLI, as stated in this article https://docs.aws.amazon.com/cli/latest/userguide/cli-configure-options.html: “You can’t use command line options to directly specify credentials, although you can specify which profile to use“
Q: Is using really necessary in the C# code when building the various clients?
A: This https://aws.amazon.com/blogs/developer/object-lifecycles/ post specifically for the AWS SDK for .NET tells that having using “[…]makes sure that we dispose of the underlying .NET web streams. (If these are not properly disposed of, you may eventually not be able to make any service calls at all.)“
Q: Isn’t it bad to return from a using block? I’m seeing this quite a lot in the code snippets here.
A: As long as whatever is being returned is not the variable within using, it’s ok. StackOverflow thread here https://stackoverflow.com/questions/662773/returning-in-the-middle-of-a-using-block
Q: Why are you supplying empty credentials when building the AmazonSSOClient (AnonymousAWSCredentials) in the SSO code? I thought the access token is enough to authenticate to SSO.
A: This was a bit confusing, at least for me, which is why I’ve opened this https://github.com/aws/aws-sdk-net/issues/1744 GitHub issue in the AWS SDK for .NET repo. One of the links inside the discussion points to the need of using empty credentials, but so far – as of Dec 2020 – I haven’t been able to understand the reasoning behind having to provide this in the first place. Others have hit upon this though, as seen here https://stackoverflow.com/questions/40630491/how-to-call-assumerolewithsamlasync-without-amazonsecuritytokenserviceclient/40751214. As for an alternative to AnonymousAWSCredentials, should you need one for whatever reason, BasicAWSCredentials(null, null) will do the job just fine.
Q: Why are you using System.IO.File.WriteAllText instead of System.IO.File.WriteAllTextAsync?
A: The problem is that the latter doesn’t exist for .NET Framework. Both code snippets in this article were written with the idea of having them running on both .NET Core/NET 5 and .NET Framework. Should a plan exist to eventually backport the async method to .NET Framework, I don’t know.
Q: Is the AWS CLI required for building and running any of the C# code in this post?
A: No, AWS CLI doesn’t have to be installed on the machine where the code is compiled. However, for the IAM code, the credentials must be accessible as discussed in the article here.
Q: Where can I find the global options for the aws command, such as --no-verify-ssl or --debug?
A: They’re here: https://awscli.amazonaws.com/v2/documentation/api/latest/reference/index.html#options.

{“User: arn:aws:iam::89********12:user/SdrServiceAccount is not authorized to perform: sts:AssumeRole on resource: arn:aws:iam::72********90:role/EC2ReadAccess”}
Am getting this above exception from —-> var response = await stsClient.AssumeRoleAsync(assumeRoleRequest);
Please tell me what needs to be done?
Thanks
LikeLike
Based on the error message, the IAM user is not allowed to assume the “EC2ReadAccess” role in other accounts. Take a look at figures 5/6 and make sure you assign a policy that allows it.
LikeLike