What happens from the moment you launch a .NET Core application, until the very first managed instruction is executed? How do we get from the simple act of running an .exe to having the managed code executing as part of a .NET Core application?
This is what this post sets up to explain in detail, dealing with:
- Why bother going into such detail
- What are the ways to run a .NET Core app
- Ways to build the .NET Core app
- How the application actually loads once it’s run
- See compiled sample code in action
- Implication of bitness
- Base types
- How things differ from starting an app under .net framework
- The future (seen as of March 2020)
Before diving in, keep in mind the following assumptions for this post, and unless stated otherwise:
- Windows 10 x64 only is considered in this post
- The sample and the details discussed are based on a .NET Core Console Application
- The article will go straight to the point; there’s no intro on what .NET Core is, what managed code is, what is C#, etc.
- The example and workflow is particularly looking at a runtime-dependant executable
Despite having scoped things as above, note that the main concepts will apply just fine to other platforms and architectures on which .NET Core runs.
Why Bother?
First, let’s answer the “why?”. Why would anyone care what happens under the hood, when starting a .NET Core app? A few answers below:
- Running code in the cloud (eg Azure Functions, Amazon AWS Lambda, etc): code uploaded to Azure Functions will not miraculously run by itself once there. The lines aren’t interpreted one by one, but instead they’re compiled, and the resulting assembly is loaded within a .NET Core host that’s part of the underlying IIS (w3wp.exe) process assigned to your App Function. As of now, you’re charged against the memory used by the underlying process, not what your code is actually using, as was discussed here. Understanding that the respective .NET Core host will load far more than just your assembly is key in explaining the increased monetary charges
- Other technologies use the concepts that will be described next. Speaking about ASP.NET Core with .NET Core, “C# 7.0 in a Nutshell” goes on to say:”[…]Unlike the .NET Framework, .NET Core can be packaged with the web application and xcopy-deployed (self-contained deployment)“. What exactly is packaged inside and how are those files used will answer how that is possible.
- Set the right expectations if you’re porting your app from .NET Framework to .NET Core. The way an app is started by the operating system has changed significantly, the way it’s built is also different. Knowing them will provide errors arising from making the wrong assumptions
- Portability – running on various platforms, and not requiring an underlying framework installed – becomes intuitive when looking at how the app starts in detail
- Sheer curiosity
Ways to Run a .NET Core App
There are 2* ways to launch a .NET Core app:
- Use dotnet.exe (aka the “muxer”):
dotnet.exe <.dll assembly> - Run the actual app: An
.exeon Windows, or an executable file on Linux or MacOS. Note that for older versions of .NET Core the executable might not exist in the first place
For a console app, both methods will invoke the managed method used as entry point – the static Main method.
Ways to Build a .NET Core App
Before discussing how to actually generate the application’s executable, let’s quickly look at what type of .NET Core apps are there, and what each type consists of. According to the Microsoft docs, .NET Core has 2 types of apps:
- runtime-dependent application: This consists of the following components, and for it to run requires the .NET Core to be already installed:
- A cross-platform binary, which is a
.dllfile (the assembly referenced in the previous section) - Dependencies and runtime configuration
.jsonfiles - An executable, which is not cross-platform
- A cross-platform binary, which is a
- self-contained application: This consists of all the files required to run the application on another machine regardless if it has the required .NET Core version installed. This will include an executable (platform-specific), the app’s assembly (
.dll), dependencies and runtime config (.json), the .NET Core libraries and the runtime itself (CoreCLR). Starting with .NET Core 3.0, this can be published as a single-file.exe*
What is understood exactly by “platform”? Specific versions of OSes, such as Windows x64, Windows x86, Linux x64, Linux ARM, macOS x64, etc.
The example we’ll be looking at in this post is a runtime-dependent application, targeting .NET Core 3.0 on a Windows x64. As seen above, this type of app consists of more than just an executable. Trying to run just the executable, without the .dll being present will not work:

Attempting to run the executable with the .dll present, but without the .runtimeconfig.json file alongside will also result in an error:

In regards to building the application itself, there are at least 2 ways of generating the files that a .NET Core application consists of:
- Invoke
dotnet.exe publish - Build the application’s solution using Visual Studio
To get a runtime-dependent executable – targeting .NET Core 3.0 or later – simply building the solution in VS will generate one for the current platform. Targeting anything before .NET Core 3.0, a manual “Publish” must be used from within Visual Studio, as just building the solution will not result in an executable generated, but just the .dll assembly. For the later case, an SDK version of 3.0 or greater is needed (note that SDK and runtime versions are not the same thing).
The fact that before .NET Core 3.0 was out (along with its SDK) a runtime-dependent executable was not generated is well known, as this was baffling regular people (here and here), as well as Microsoft employees alike (in this GitHub thread).
As stated, we’ll only be looking at a simple runtime-dependent example in this article, but starting with .NET Core 3.0, if you’re going with a self-contained app, there are 3 options in Visual Studio’s publishing wizard to further tweak the result: Produce single file *, Enable ReadyToRun compilation * and Trim unused assemblies (in preview).
Load Up
So we run our console application by using either of the methods above. What would we expect to happen next? The thing is that at this point all we have is a native application that started executing. There’s nothing currently that can understand – let alone run – managed code. The machine this native code is running against expects machine code, not IL (Intermediate Language). And managed code cannot be run out of thin air – it needs the .NET Core Runtime (CoreCLR) to run it. It’s in this context that our native app simply serves as a host for where the managed code will eventually execute.
Using the very good documentation here, the following takes place:
- If the
.exewas just ran, then a native application has just started executing. It has its own entry point – amainfunction – which “[…] does just one thing: it finds the hostfxr library and passes control to it“. Ifdotnet.exewas used to start the app, it too passes control to thismainfunction. Essentially, these hosts (either the.exeapp ordotnet.exe) “are basically just wrappers around functionality provided by hostfxr“. - In turn,
hostfxr“[…]finds and resolves the runtime and all the frameworks the app needs. Then it loads the `hostpolicy library and transfers control to it.“. Some more data about this library (link here): “The hostfxr is responsible for selecting the appropriate runtime when executing a .NET Core application. For example, an application built for .NET Core 2.0.0 uses the 2.0.5 runtime when it’s available” - The host policy library “implements all the policies to actually load the runtime, apply configuration, resolve all app’s dependencies and calls the runtime to run the app […]“
- The managed code method which serves as the entry point (
Main, not to be confused with the nativemainfunction defined above) is JIT-compiled to native code and executed - In turn, the required types, as well as methods called are JITed as needed
Let’s put all the steps above in a diagram:

Let’s see all this unfolding for a real example next.
Action !
To look into what goes on when a .NET Core app starts, we’ll use a simple code snippet, that just adds 10 mil ints to an ArrayList. This has been used several times in different posts on this blog, albeit targeting .NET Framework, and analyzed in depth from a performance standpoint, concluding with how fast generics are and why are they better than ArrayList. We’ll now use it against .NET Core for watching how we get from launching the .exe to running the first line of managed code.
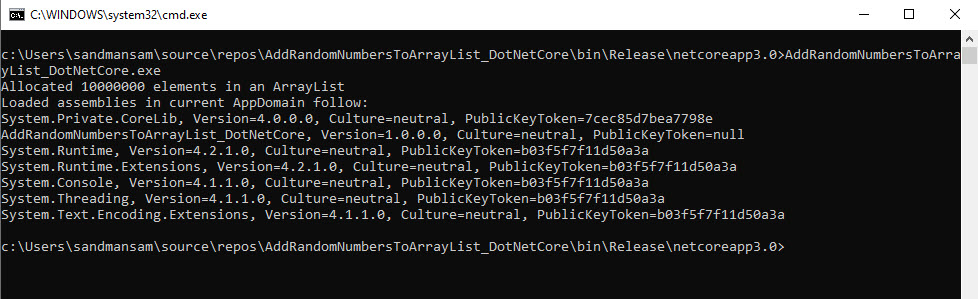
We’ll add just a few lines of code so that we also get the list of assemblies loaded in the current AppDomain, which will come in handy further on. The code:
using System;
using System.Collections;

namespace AddRandomNumbersToArrayList_DotNetCore
{
    class Program
    {
        static void Main(string[] args)
        {
            const int noNumbers = 10000000;  // 10 mil

            ArrayList numbers = new ArrayList();
            Random random = new Random(1);  // use the same seed as to make
                                            //  benchmarking consistent

            for (int i = 0; i < noNumbers; i++)
            {
                int currentNumber = random.Next(10);  // generate a non-negative
                                                      //  random number less than 10
                object o = currentNumber;  // BOXING occurs here

                numbers.Add(o);
            }

            Console.WriteLine("Allocated {0} elements in an ArrayList", numbers.Count);
            Console.WriteLine("Loaded assemblies in current AppDomain follow:");
            foreach (System.Reflection.Assembly assembly in AppDomain.CurrentDomain.GetAssemblies())
            {
                Console.WriteLine(assembly.ToString());
            }
        }
    }
}
The result of running this is below:
We’ll use 2 tools next: PerfView *, which will show who calls who and when, in terms of functions and modules, and ProcMon, which will yield a timeline of relevant events such as files read or loaded, threads that have been created etc.
PerfView’s “CPU Stacks” CallTree view will be used. What this view does it simply takes the CPU stacks that have been collected during the trace – which by default is one stack every 1 ms – and aggregates these in an intuitive view. In a way of saying, it “stacks” the stacks. An example:
A->B->C
A->D
A->B->E
A->B
A->B->D
Consider the simplified 5 stacks above that have been captured. Each letter designates a function, while -> means that a function called another one. If we group (or “stack”) the data, we’ll have a first node A (since this is the function that always calls other functions), with 2 sub-nodes: B and D. A calls B 4 times overall, which will make B show up with 80% inclusive cost (80% of the stacks either have B as the function running when the stack was captured (it was a “leaf” in the 4th stack) or any stacks that “terminate” in any of its callees (1st, 3rd and 5th)) making it a sort of hotspot in terms of functions called. Since we also have precise data about when the sampling is performed for each CPU stack, information about when a specific function called another will be available as well.
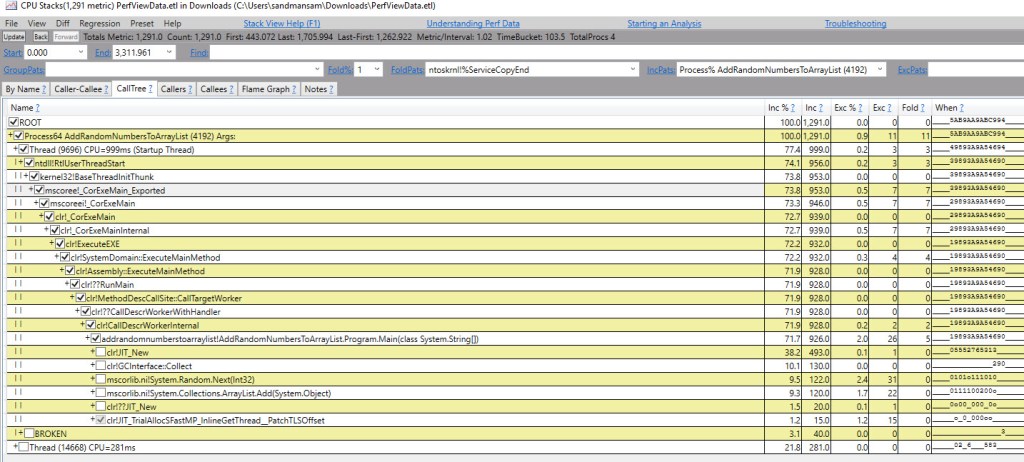
Coming back to our sample code, here’s PerfView’s “CPU Stacks” CallTree view after running against our sample code – the colours used to highlight the functions called by each component are the same as those used in the diagram in figure 3.

Going component by component, we’ll start off with what happens when the .exe (violet highlight) runs. The OS (Windows) creates a process, and within this a thread. The very first function belonging to our process’s main thread is ntdll.dll!RtlUserThreadStart. Quite normal, as usually “stack views start with the thread start function ntdll.dll!_RtlUserThreadStart at the base and expand outward” (as per Windows Performance Analyzer’s docs here) *. Also from “Windows Internals”: “RtlUserThreadStart uses the address of the actual image entry point and the start parameter and calls the application’s entry point.“
BaseThreadInitThunk is – as per Windows Internals – the “Kernel32 thread initialization thunk function“. It’s also an expected function at this point, as detailed here.
Next, the main function in our own native module – discussed previously – starts executing. It calls 2 more functions in turn, after which control passes to the hostfxr module (red highlight) which eventually invokes hostpolicy (orange highlight), which in turn loads CoreCLR (green highlight). JIT Compilation is performed (blue), then our Main method starts executing (grey).
Within Main, you can recognise some of the methods that our sample invokes (Random.Next and ArrayList.Add).
Aside from the callers/callees seen above – which validate the diagram in figure 3 in terms of who passes control to whom – there’s also information in PerfView about when the functions were invoked. This time information is not that useful for the first blocks, which are “daisy-chained” in terms of control, each being the callee for the previous one, and the caller for the next one; it won’t make sense for the callee to start executing before its caller. But the first function belonging to our Main managed method block (coreclr!JIT_New entry within the grey highlight), as well as the first function for the JIT Compile block (blue) are both called by coreclr!CallDescrWorkerInternal. How can we check that indeed the functions that performed the compilation have been called before our code within the Main managed method? The “When” column holds the key: if you look closely the 0s you see in this column (0 = the function took between 1% and 10% of the total CPU time spent in that time slice) for the functions that belong to the JIT Compile group are slightly ahead of any number signalling activity for any of the functions invoked by our `Main method. Therefore PerfView shows that the JIT compilation occurred before that native code executed as part of Main – just as expected.
Though PerfView “CPU Stacks” is a very powerful tool, it won’t really show what files are accessed, their path and in which order this occurred. This can provide valuable info, such as which version of .NET Core was loaded, when are the dependencies read in the startup sequence, what are the specific assemblies that end up being loaded and in what order, etc. Luckily ProcMon can do all of this. For each event logged we also get the CPU stack as well, allowing to see what caused the respective operation.
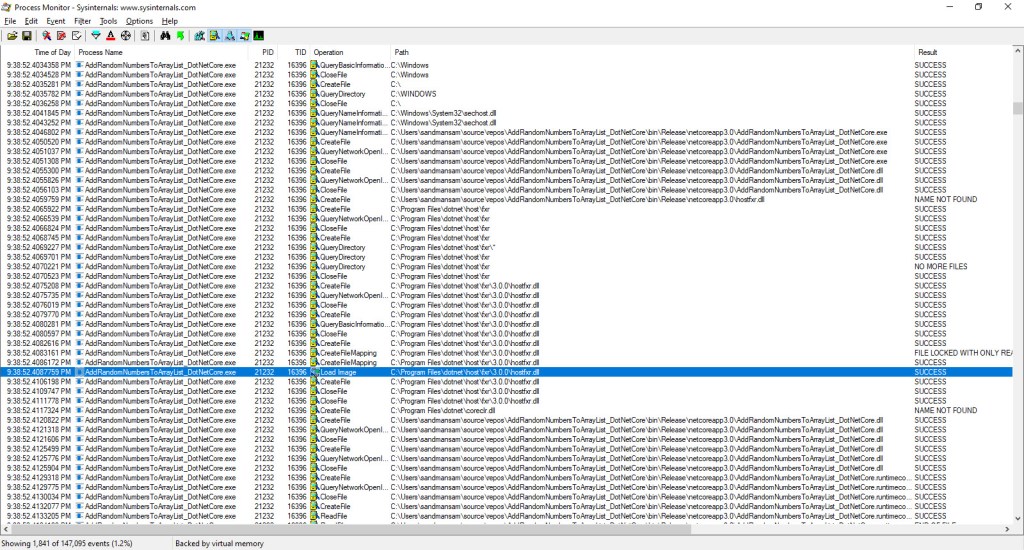
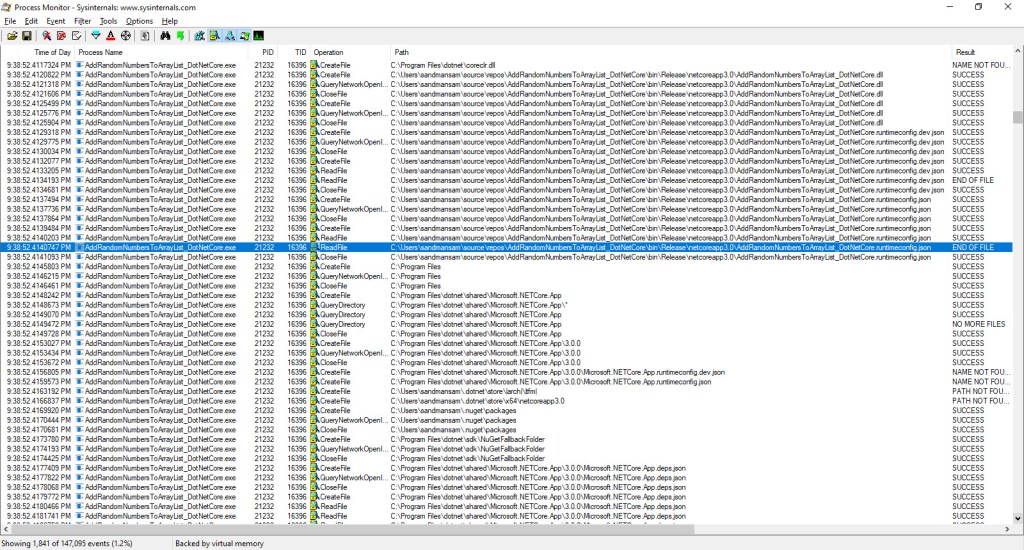
Here’s what ProcMon captures from the moment our app is started until it completes:
- A process is created and within it, our app’s startup thread. This thread starts executing, and loads the
.exeimage within the process’s virtual address space - The host FXR library image is searched and loaded (the paths search order can be found here)
- (The module that initiates loading
hostfxr.dllis our own native app) - The host FXR library reads the
.runtimeconfig.jsonof the app and learns that 3.0 .NET Core framework must be loaded - Host FXR reads
Microsoft.NetCore.App.deps.jsonfrom .NET Core’s own folder, then loads the host policy library - The host policy library now reads
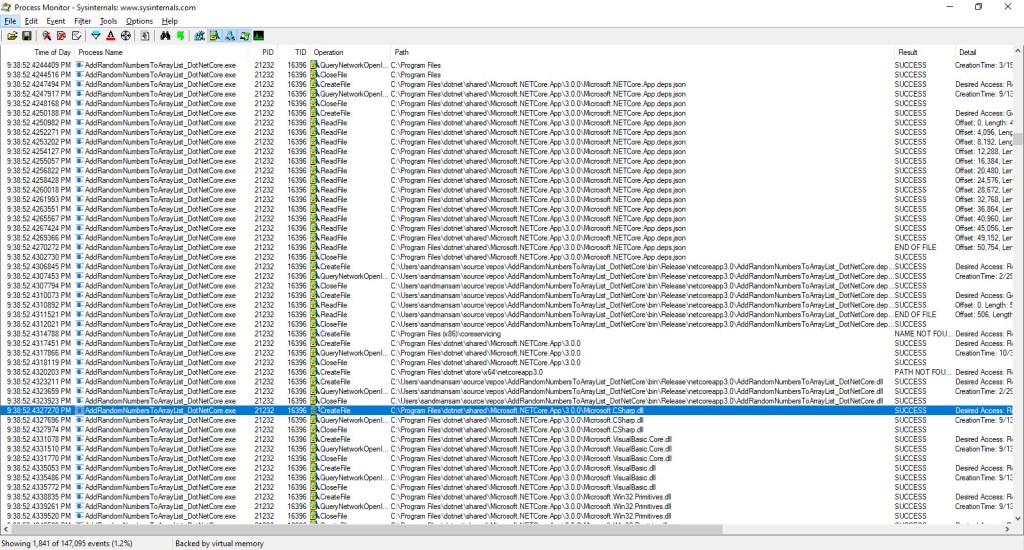
Microsoft.NetCore.App.deps.jsonfrom .NET Core’s own folder, followed by the app’s own.deps.jsonfile and starts probing for each assembly referenced within. Each assembly file – and there are about 200 of them – is simply checked upon at this stage, not loaded - The host policy loads CoreCLR
- CoreCLR loads
System.Private.CoreLib.dll, followed byclrjit.dll, then maps our app’s own.dllin the process’s address space - CoreCLR loads 5 assemblies. These are the exact same ones displayed last in our app’s console output
- CoreCLR creates 3 threads. There’s nothing else captured next aside all the threads exiting and the process that hosted our app terminating
Let’s look at the relevant snapshots taken while ProcMon was running against our sample code; each printscreen corresponds to a bullet point above:


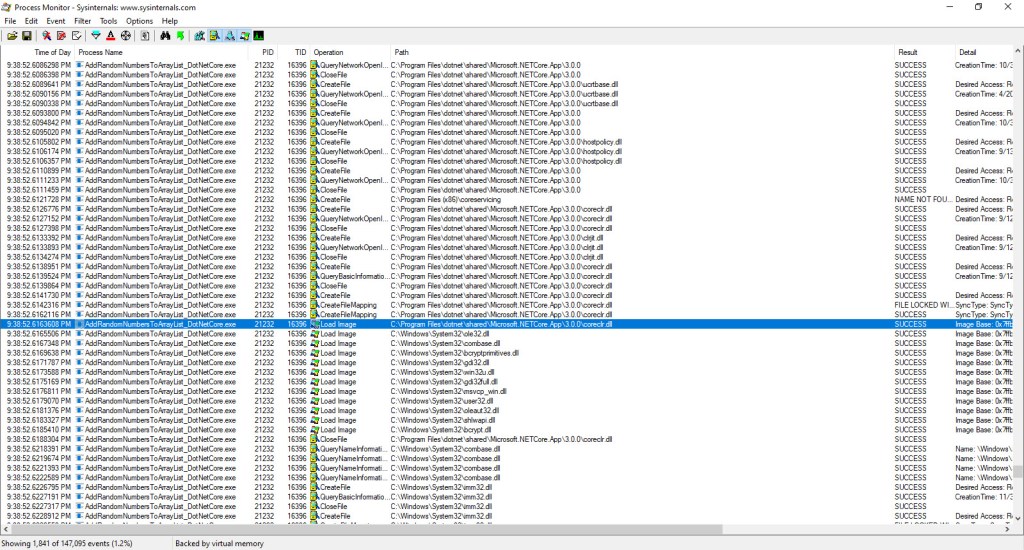


At first glance it feels peculiar that once the required assemblies are loaded, all that’s seen are 3 threads created by CoreCLR, followed immediately by events that just represent our process cleaning up and exiting. The whole work done by our app – all those 10 mil ints added – is nowhere to be seen, but absolutely normal as it doesn’t register within ProcMon scope of file and process/thread activity.
We’ve talked in depth about what goes on, and used 2 different tools to get detailed insight. Yet there’s something with far-fetching implications that wasn’t brought up so far: the bitness of the native host process. Is it a 32-bit process or a 64-bit one? Let’s look into this important aspect next.
Bitness
When building our app in Visual Studio, the project settings specify the platform target settings. The default values for a new .NET Core Console app are seen below:
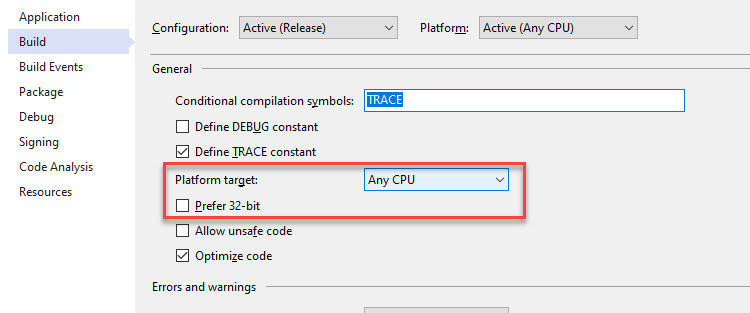
When we looked at what was going on step by step in the previous section, it was these default build settings that had been used to generate the app’s files.
But there are quite a few moving parts in our setup. We have the underlying OS (in our setup it’s x64) on top of which the (1) .exe file starts as a (2) native host process, which in turn locates and starts the (3) CoreCLR, which in turn consumes the (4) .dll assembly generated as part of our app.
Let’s discuss the .exe and the .dll. As image files, they can have either a PE32 or a PE32+ header. The header is decided upon when the files are first built, by the tools invoked by the MSBuild engine (called in turn by Visual Studio). When building, the Visual Studio platform settings described previously will tell which type of header the output files get, as follows:
- For an
x86platform target, both the native host (.exe) and the assembly (.dll) get a PE32 header - For an
x64platform target, both the native host (.exe) and the assembly (.dll) get a PE32+ header - For an
AnyCPUplatform target, then if the host OS isx64the resulting native host (.exe) and the assembly (.dll) will get a PE32+ header. ThePrefer 32-bitflag is disregarded altogether in regards to the native host (.exe) file
How can the PE header be determined by looking at an image file? Using dumpbin.exe /headers. The snapshot below is taken against the default VS platform settings described above in figure 16:
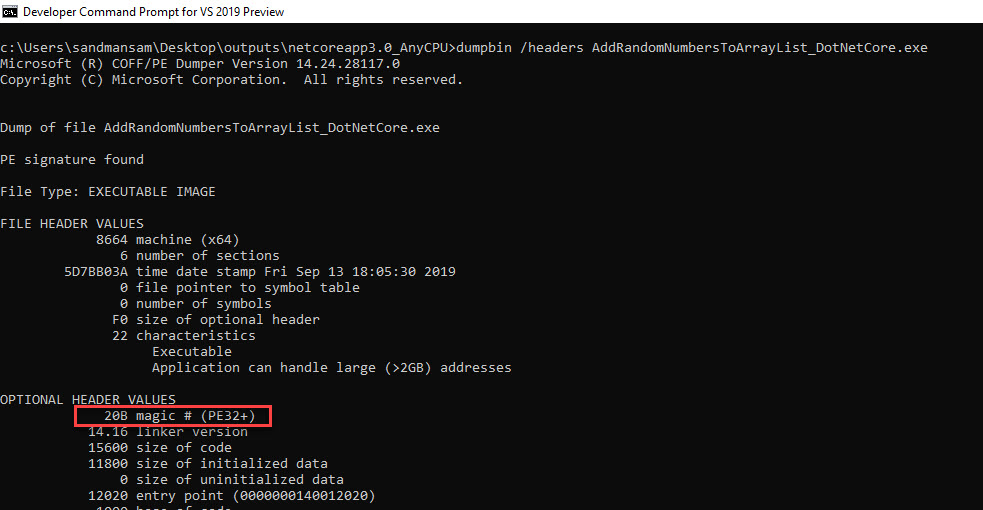
For for the assembly (.dll) that is produced, the platform target settings has additional implications, as follows:
- The
x86/x64/AnyCPUwill dictate the type of native instructions the JIT will compile the IL inside the assembly to, as previously described in detail here - The
32BITPREFflag will be turned on against the assembly’s image, provided thePrefer 32-bitoption is set; the reverse is also true
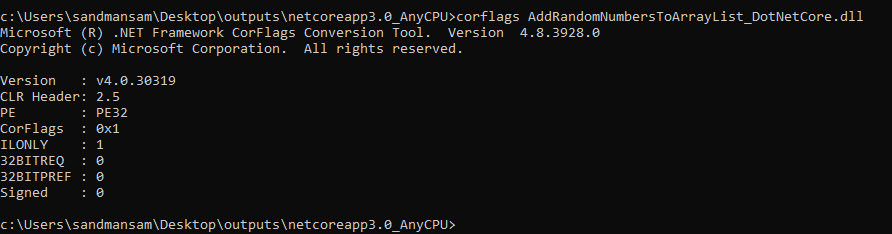
Since the .dll file is a managed assembly, we can use corflags.exe against it to get the information we’re after. Here’s how this looks against the default VS platform settings described above in figure 16:
Why is this file header type relevant? Because the process that a 64-bit Windows creates based on the .exe image will abide the following rules*:
- A
x86process is created when provided with a PE32 image - A
x64process is created when provided with a PE32+ image
The bitness for the host process will match that of the libraries (host FXR and host policy) loaded. In turn, this will match the bitness of the CoreCLR that gets loaded, and ultimately this will match the type of native instructions (32-bit or 64-bit) the IL in our assembly will compile to. How is the required version of these libraries – in terms of bitness – selected? Quite simple, as 2 separate folders exist containing the .NET Core files.
To check this, the sample code is compiled against 2 different platform settings so that one resulting .exe will start as a x64 process, while the other starts as a x86 process. We’ll use VMMap to look specifically at the images loaded within our processes virtual address space.
Here’s the output from VMMap running against the x64 process and the x86 one respectively:
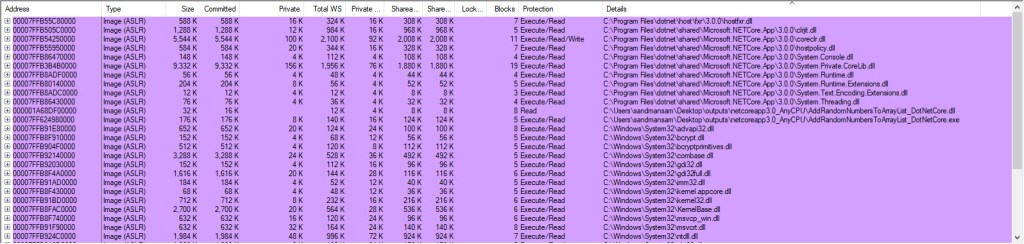
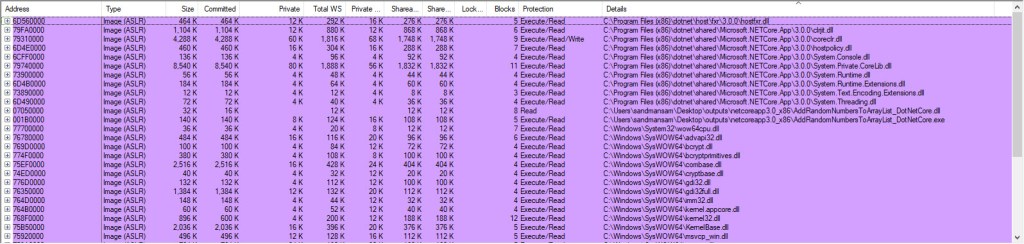
The Address column allows us to easily differentiate between the 32-bit process and the 64-bit one.
For the x64 process, the .NET Core specific files are loaded from Program Files, while the rest of the Windows libraries are loaded from%windir%\System32\. Both locations contain 64-bit files typically. For the x86 process, the .NET Core specific files are loaded from Program Files (x86), while the rest of the Windows libraries are loaded from %windir%\SysWOW64\. These location in turn contain 32-bit files on a Windows 64-bit OS*.
Next, the CoreCLR will compile the IL code to native instructions matching its own bitness.
Wrapping up, we get the: if the native host process is x86, then the CoreCLR loaded will also be x86; the assembly itself will also have its managed code JITed to x86 machine code. Conversely, if the native host is x64, the CoreCLR loaded within will be x64, and the assembly will also be JITed to x64 native instructions.
Testing against each platform setting will yield the table below:

Note – from the last 2 columns – that there’s no case when the assembly’s IL code cannot be JIT compiled by the CoreCLR loaded in the native host process. For the first 2 cases, the bitness matches, while for the other 2, the x64 CoreCLR will have no trouble compiling the AnyCPU assembly to 64-bit native instructions. As a side note, the Prefer 32-bit option serves no purpose here, unlike how it did for .NET Framework, as we’ll analyze later.
Going back to our’s apps console output in figure 4, there are quite a few assemblies listed there. What’s up with those?
Base Types
Before our Main managed method can be compiled, all the types referenced within must be resolved. For example, we’re instantiating an ArrayList – but this particular type’s definition needs to be loaded from somewhere, since we haven’t defined it ourselves. Yet when we run our app, CoreCLR automatically loads the assemblies that define the required types. This is the reason why our sample code contains a part that just writes the loaded assemblies – to help our understanding further.
In the output of our console app (figure 4) you can see 7 assemblies loaded: one is the assembly generated for our app (AddRandomNumbersToArrayList_DotNetCore) while the rest of 6 belong to .NET Core’s own assemblies.
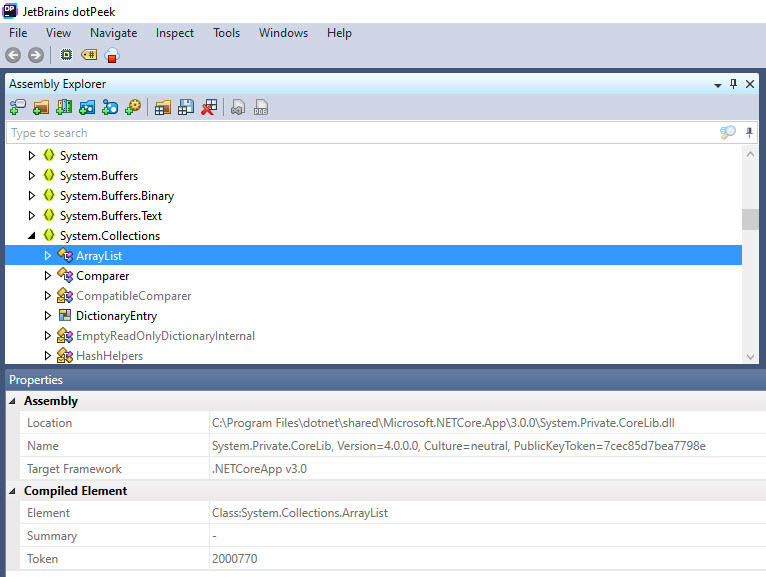
The System.Private.CoreLib assembly (or CoreLib) is special. As stated here: “CoreLib (also known as System.Private.CoreLib) is the lowest level managed library“. If we run a .NET decompiler (eg ILSpy or JetBrains’ dotPeek) against System.Private.CoreLib, we’ll see ArrayList defined within, underneath the System.Collections namespace. Multiple other base types are defined inside as well:
The other 5 assemblies are required since our code uses types or methods that CoreLib doesn’t have – eg System.Console needs to be loaded since we’re using Console.WriteLine.
And if you refer back to the figure showing which images were loaded within the process virtual address space (figure 19 (32-bit) or 20 (64-bit)), you’ll notice that aside the libraries used by the .NET Core to get the runtime running (host FXR, host policy and CoreCLR) and the JITer, the rest of .NET Core images match the list of assemblies we’ve printed as loaded in our app.
A hint about the fact that CoreLib is quite important was present back when we looked at the PerfView CPU Stacks view – if you refer back to figure 5 you’ll notice system.private.corelib.il prepended to some of the method names invoked by our Main method, within the grey highlight.
How about our own assembly, the .dll file? Why is that needed since we also have the .exe? That’s because it’s this .dll that actually contains our code:
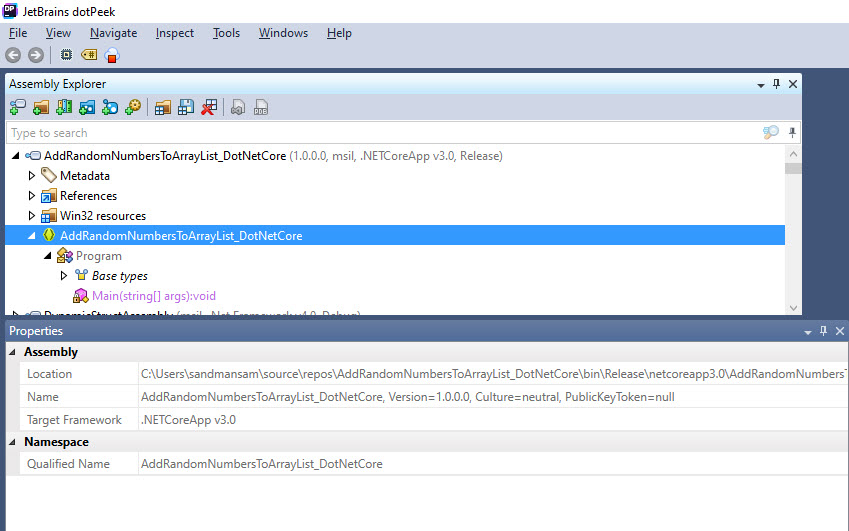
This actually explains the error message in figure 1 – the whole .NET Core application is actually within the .dll assembly; the .exe is just a native host used to get the assembly’s code running, nothing more.
Next we’ll look at what changed as opposed to what happens in .NET Framework when an app is started.
Differences From Starting an App Under .NET Framework
We’ll be going over 5 things that are different in regards to starting an app in .NET Core as opposed to .NET Framework: portability, OS support in starting the app, base types, versioning changes and running multiple CLRs per process.
Firstly, as we’ve seen previously in “Ways to Build the App” section, the .NET Core apps have the option of being made non-dependent on the underlying runtime, that is package everything needed to run the app (either as a set of files, or a single .exe) for a specific target platform (eg Windows x64). This is in contrast with .NET Framework apps, which requires* the correct underlying framework to be already installed on the host machine. Which leads us to the next point.
Secondly, the process of loading and starting an app is radically different under the 2 frameworks. Consider just launching the app’s .exe. The image file – as generated when building for .NET Core – no longer has a managed header. Running corflags.exe against our app’s runtime-dependent executable, which normally prints details about this header, returns The specified file does not have a valid managed header, just like it does for any ordinary, non-managed executable app. There’s not even any managed code within, as our IL code is actually stored within the assembly .dll, as discussed previously. And from the perspective of the Windows OS running it, the executable is just a native app. The app will have to do all the work of finding, loading and setting up the .NET Core runtime (CoreCLR), just as we’ve seen at length previously.
It’s not like this with .NET Framework, where the .exe is a full-fledged managed assembly, whom the Windows OS helps start by loading the CLR runtime itself*. Have a look below:
For this .NET Framework app, called AddRandomNumberToArrayList, you can see that right after RtlUserThreadStart and BaseThreadInitThunk things diverge from what we’ve seen for .NET Core (back in figure 5). This time there’s a call to mscoree directly – which is .NET Framework’s component that finds and loads the CLR – bypassing the whole native host work we’ve seen previously. Once the CLR has loaded, it will start executing the Main managed method within this .NET Framework app.
A valid question at this point would be why take away the OS support in loading the runtime, as it was the case with .NET framework? To answer this, the bigger picture must be considered: Microsoft is working on making this portable, so the host process must not have anything specific linked to the Windows world, or the behavior there. Otherwise, for the different OS that .NET Core wants to target, their respective kernel would have to be amended so that it recognizes managed executable assemblies, just as Windows does for .NET Framework. And this is just something that’s unlikely to happen to Linux or MacOS, which would mean the goal of portability would be a failed one. Not to mention other operating systems which .NET Core will want to target in the future.
Thirdly, in regards with the base types. Referring collectively to UWP, .NET Core and Xamarin, “C# 7.0 in a Nutshell” says:
The good news is that as of .NET Core 2.0, these frameworks along with .NET Framework 4.6.1 and later have converged in their core functionality, and now all offer a base class library (BCL) with similar types and members. This commonality has been formalized into a standard called .NET Standard 2.0.”
Albahari, Joseph,Albahari, Ben. C# 7.0 in a Nutshell
Despite this convergence however, one must still be aware that the actual assemblies implementing them are different, even though .NET Core’s System.Private.CoreLib.dll is the equivalent of .NET Framework ubiquitous mscorlib.dll. If you look at figure 24 above, you’ll notice mscorlib.ni prepended in front of the methods invoked by our code in the managed Main method, as opposed to system.private.corelib.il in figure 5 (and the discussion from the previous section).
Fourth, the version numbers used in .NET Core are more easy to get. The thing is that the .NET Framework version is not the same thing as .NET CLR version. The first is the version of the built-in assemblies containing the types and resources available for use, while the second is the component that actually runs the managed code. .NET Framework version is currently at 4.8 (as of March 2020), but the CLR version is – and has been ever since .NET Framework 4.6 – capped at 4.0.30319.42000. This does not mean that the .NET Framework CLR doesn’t get updated, but only that its version number as determined with clrver.exe, or Environment.XXX (instructions here) isn’t.
For .NET Core however, the versions match (link), as in there’s always a matching CoreCLR version to a .NET Core version.
Fifth, .NET Framework had an interesting “advanced” feature whereby 2 versions of the CLR could be loaded side-by-side in the same process. As per “CLR via C#”:
with .NET Framework 4, Microsoft now supports the ability to load v2.0 and v4.0 in a single Windows process, allowing components written for .NET Framework versions 2.0 and 4 to run side by side without experiencing any compatibility problems.
Jeffrey Richter. CLR via C#
The practical use of this feature? From the same book, we find out that Outlook can load 2 components built and tested against different versions of the .NET Framework that use different CLRs underneath, such as the v2.0 and v4.0 example above*.
In .NET Core however, there’s no official plan for now to support hosting more than 1 CoreCLR in the same process (long GitHub thread here).
The Future
What does the future hold for now? The next step is .NET 5 (without “Core” in its naming). This won’t be LTS (long-term support), at least as information from Nov 2019 goes (link here). The different versions and policies for support of .NET Core can be found here. As for the official roadmap, it’s here.
Something to keep in mind is that the .NET Framework is not actively developed anymore. Only a subset of features brought into .NET Core make their way to .NET Framework, but only non-breaking stuff.
We’ll wrap up with a block of Q&A.
Q&A
Q: What are the supported OSes for .NET Core?
A: List of currently supported OSes for the current .NET Core version at the time of this writing (3.1) are here.
Q: Can one use dotnet.exe <xxx.dll> to run an ASP.NET Core app as well? Isn’t there another entry point than Main in an ASP.NET Core app?
A: dotnet.exe can be used just fine. The entry point is still Main, as discussed here.
Q: Are there really only 2 ways of launching a .NET Core app, as in either dotnet.exe <xxx.dll> or launching the app’s own executable (if it exists)?
A: Programmatically there are multiple ways of doing it, listed here. But note that only the first 2 involve executables, as in directly being able to “launch” the app, sorta out-of-the-box. The rest are libraries, which can further be used in code custom load the CoreCLR, then start the app in turn.
Q: What is nethost? I find it referenced next to hostfxr.
A: It’s a library used by custom hosts (meaning anything aside the hosts present in the standard list of hosts) whose sole purpose is to allow the native host to easily locate hostfxr. In the .NET Core 3 world, the nethost +hostfxr combo is the preferred method to host the .NET Core runtime. Their job is to “handle the complexity of finding and setting up the runtime for initialization and allow both launching a managed application and calling into a static managed method“. Before .NET Core 3, there were two other hosting mechanisms – CoreClrHost.h API and the ICLRRuntimeHost4 interface in mscoree.h. The full details are in the link given above.
Q: I took a trace with PerfView after compiling the sample code to target .NET Core 2.2 and publishing the app as .exe. But looking in the CPU stacks, I’m still seeing references to hostfxr. I thought this library was only supposed to be used from .NET Core 3?
A: I’m not sure why this happens.
Q: Can one create a custom host for the .NET Core CLR, as opposed to using the “standard” one described in the article?
A: Yes. This is very well detailed here and here. A sample showing 3 ways to do hosting is here.
Q: I’d like to know more about how Windows’ kernel helps start a .NET Framework app. Where can I find this info?
A: There is a paragraph here, from which the relevant text is quoted below. This also came up in this GitHub comment, started as MS employees were rightly wondering at the time why dotnet.exe no longer publishes a single .exe). Slightly more information is given on this Stack Overflow question here. Lastly, I also discussed this in a previous post, complete with the relevant references within CLR via C# here.
In Microsoft Windows Vista, the operating system loader checks for managed modules by examining a bit in the COFF header. The bit being set denotes a managed module. If the loader detects managed modules, it loads `mscoree.dll, and `_CorValidateImage and `_CorImageUnloading notify the loader when the managed module images are loaded and unloaded. `_CorValidateImage performs the following actions:
– Ensures that the code is valid managed code
– Changes the entry point in the image to an entry point in the runtime
On 64-bit Windows, `_CorValidateImage modifies the image that is in memory by transforming it from PE32 to PE32+ format.
Q: Multiple versions of .NET Framework can be installed on the same machine. Do all the .NET Framework apps have to work against the latest one?
A: Multiple .NET Framework applications can target various versions of the framework – eg one can run against v4.6.1, another against 4.7.2, and yet another against 4.8. As stated here: “when running on a newer version than what was targeted, the .NET Framework uses quirked behavior to mimic the older targeted version. The app runs on the newer version but acts as if it’s running on the older version“. Note that this isn’t about forcing a particular version of the CLR to run the code (as in v2 versus v4), but simply about the features made available to the respective apps by the CLR. Eg if your app uses generics, it needs to target at least .NET Framework 2.0, since that’s when generics where introduced; it will run just fine if targeting .NET Framework 3.5, and it can even use LINQ (as this was introduced in 3.5), however it won’t be able to use async, as that was introduced only in .NET Framework 4.5.
Q: PerfView looks like an interesting tool. How can I learn more about it?
A: There are several videos on Channel9 recorded by the tool’s author here. They are almost 8 years old at the time of this writing, but they apply just the same today; it’s worth the effort of going through all to understand how the PerfView works in detail. Adam Sitnik also has a very good article on profiling the .NET Core itself here, which discusses the tool as well.
Q: For all the modules loaded by the .NET Core app we can see a Load Image operation in Procmon, except for the app’s .dll. Just like the rest of the modules it exhibits a CreateFileMapping, but this isn’t followed by the Load Image the others get. How come?
A: I don’t know why this is so, but I’ll update when I find out. What can be seen different however is that there’s just the header section section showing for the app’s .dll, unlike the other modules:

Q: Isn’t the System32 folder referring to a location where 32-bit files are stored?
A: Don’t be misled by the System32 naming – that’s actually the folder reserved for 64-bit DLLs under x64 Windows as explained here.
Q: For the images, shouldn’t the machine attribute in the file header value be discussed, aside the magic attribute in the optional header values?
A: Tests against all platform targets showed that it’s either x86 for machine and PE32 for magic or x64 for machine and PE32+ for magic. There’s no “cross-match” observed, as such the machine attribute was not brought in the discussion.
Q: Isn’t it possible to run 32-bit native code in a 64-bit process, or the other way around?
A: It’s not common to run x86 instructions in an x64 process or the other way around. Not that it’s impossible, as the example here shows. For the .NET Core/.NET Framework the JIT compilers are entirely separated, each producing its own native code bitness.
Q: Where can I find more information about platform-specific code within the .NET Core Libraries?
A: In here there’s some information about the number of lines of platform-specific code in the general library of functions for .NET Core, and some differences to .NET Framework.
Q: What does the Produce single file entry means under “File Publish Options” within Visual Studio’s Publishing wizard?
A: It’s simply the way to obtain a self-contained application, all condensed in one single executable. Publishing to single file executable is described in detailed in a section here, which also contains a link to more verbose explanation to how that file is unpacked, what’s inside, how are the files inside memory-mapped, etc – here (it’s for .the upcoming .NET 5, but should apply to .NET Core 3.x). Note that you cannot publish a self-contained single-file unless .NET Core 3.0 or later is targeted (it won’t work for .NET Core 2.2, as the option within VS is missing when this version, or below, is selected).
Q: What does the Enable ReadyToRun compilation entry means under “File Publish Options” within Visual Studio’s Publishing wizard?
A: The output is just an image that contains both IL and pre-compiled code. Note from here that “R2R is only available when you publish a self-contained app that targets specific runtime environments (RID) such as Linux x64 or Windows x64“. Note that this option can be used only if targeting .NET Core 3.0 or later.
Q: What happens when building the .NET Core application?
A: Both dotnet.exe publish and building from Visual Studio invoke the MS Build Engine (msbuild), which produces the same exact output for each case. How come? Both actually use the .sln and .csproj files, thereby it should come as no surprise that the output is identical (however dotnet.exe publish writes both in the root of the netcoreapp3.0 output folder, as well as in the publish folder within it).
Q: Does Visual Studio simply invoke dotnet.exe publish when building?
A: Doing a monitoring with ProcMon shows that Visual Studio doesn’t invoke dotnet.exe publish at any point when building a project using the .NET Core SDK 3; it’s msbuild.exe that calls an instance of the Roslyn compiler, which in turn operates against the resulting .dll.
Q: Is there a tutorial that explains how to publish a simple .NET Core project?
A: Yes, there’s a “Hello World” tutorial for building a simple app and publishing it here.
Q: I’ve come across the name CoreFX. What is this?
A: CoreFX is the name of the old repo that contained base types; they are now all moved to the unified repo, as described here. As to what it represents: “CoreFX is the foundational class libraries for .NET Core. It includes types for collections, file systems, console, JSON, XML, async and many others“. The old website for the repo is still available here at the time of this writing.
Q: Weren’t there a lot of Git repositories for individual components of the .NET Core runtime?
A: All the .NET Core runtime repos, including corefx (core libraries) and mono have been merged to dotnet/runtime (comment here).
Q: Is .NET Core just a few years old?
A: It appears not, as this answer here on Stack Overflow explains. There’s also Hans’ last comment on his own reply here.
Q: Is there a centralised place where all they namespaces and the types within can be seen?
A: Yes. There’s the .NET API Browser. It contains filters for various frameworks, and allows seeing namespaces and what they do at a glance, with the option of further drilling down to their classes/methods.
Q: How does a single-file self-contained application start executing?
A: The executable is unpacked in the temporary directory, then execution proceeds normally. You can find some info in this GitHub thread.
Q: Isn’t there a way to run a .NET Framework application regardless of which version of the framework is already installed?
A: Traditionally there wasn’t a way around installing a compatible .NET Framework first on the target machine, as the code within is still IL, and something needed to compile that to native instructions when the application ran. However, starting with Windows 10, .NET Native is a technology that compiles directly to native code, as described here. The caveat is that currently only Windows Store apps are supported (as detailed here), so the console app scenario discussed here won’t work. A Stack Overflow thread about .NET Native is here – it’s interesting to see the replies across the years.
Q: When building a runtime-dependent application, I see more than just the .exe and the .dll in the output folder. What are those files, and are they needed?
A: You’ll get .json files that describe the dependencies and the runtime required, and also a .pdb file that contains the symbols. Out of these, the .runtimeconfig.json is required – if missing, you’ll get an error:

Q: In this article it’s stated that if an image has a PE32 header then a 32-bit process is created, while for a PE32+ header a 64-bit process is started. But how about the 3rd rule described on this same blog here, whereby an image with a PE32 header that’s marked as AnyCPU will start a 64-bit process?
A: The discussion in the other blogpost applies to .NET Framework. Unlike .NET Core, those executables are managed assemblies within, and the OS treats them differently, hence the 3rd rule that’s applicable there. In the .NET Core world however, the executable is just a native application, for which the OS no longer employs special actions, hence only the 2 rules apply.
Q: Where can I read more about the PE32 / PE32+ header?
A: Here.
Q: I captured using PerfView against some code myself, but I don’t see all the functions. I also sometimes get question marks (?) next to the function names. Why?
A: First you need to clear the default GroupPats filter in the top bar. Then load the symbols (switch to “By Name” tab, select all, right click and choose “Lookup Symbols”). Once the symbols are retrieved, you should see the correct function names.
Q: I’ve done my own PerfView captures, and sometimes I get to see different functions: RtlUserThreadStart, _RtlUserThreadStart, __RtlUserThreadStart. I’m also seeing these names used sometimes inconsistently throughout your article. Why is this?
A: Good question ! From my tests, one gets to see RtlUserThreadStart only in 64-bit .NET Core app code, and both _RtlUserThreadStart and __RtlUserThreadStart (the first calling the second) in 32-bit code. Just guessing, but it might be linked to the ISO C++ standard preventing functions from being defined in their full name (a SO issue here).
Q: I’m getting A fatal error occurred. The required library hostfxr.dll could not be found. If this is a self-contained application, that library should exist in [C:\Users\adm_malbert\Desktop\]. If this is a framework-dependent application, install the runtime in the global location [C:\Program Files\dotnet] or use the DOTNET_ROOT environment variable to specify the runtime location or register the runtime location in [HKLM\SOFTWARE\dotnet\Setup\InstalledVersions\x64\InstallLocation]. The .NET Core runtime can be found at: - https://aka.ms/dotnet-core-applaunch?missing_runtime=true&arch=x64&rid=win10-x64. Why is this?
A: If you read the message carefully, you’ll understand that the problem is that the .NET Core runtime cannot be found. You either need to install it (if you have a runtime-dependent app) or ensure that the bundled files are all there (for a self-contained app). You’ll typically get the message if you only brought the .exe and the .dll of your app (assuming you didn’t publish as a single-file exe). As to why is that particular library referenced, if you look back at figure 3, hostfxr.dll is the first component invoked when the processing starts. There’s not much happening without it. Note also that the .dll most likely is present, otherwise you’d ran into The application to execute does not exist: XXX.dll captured back in figure 1.
Q: What versions were used for the sample coded analysis done in this article?
A: Windows 10 x64 v1903, .NET Core 3.0, Visual Studio 2019 16.4.0 Preview 1.
